Angular7 - การผูกเหตุการณ์
ในบทนี้เราจะพูดถึงวิธีการทำงานของการผูกเหตุการณ์ใน Angular 7 เมื่อผู้ใช้โต้ตอบกับแอพพลิเคชั่นในรูปแบบของการเคลื่อนไหวของแป้นพิมพ์การคลิกเมาส์หรือวางเมาส์เหนือจะทำให้เกิดเหตุการณ์ขึ้น เหตุการณ์เหล่านี้จำเป็นต้องได้รับการจัดการเพื่อดำเนินการบางอย่าง นี่คือที่ที่การรวมเหตุการณ์เข้ามาในรูปภาพ
ให้เราพิจารณาตัวอย่างเพื่อทำความเข้าใจเรื่องนี้ให้ดีขึ้น
app.component.html
<!--The content below is only a placeholder and can be replaced.-->
<div style = "text-align:center">
   <h1>Welcome to {{title}}.</h1>
</div>

<div> Months :
   <select>
      <option *ngFor = "let i of months">{{i}}</option>
   </select>
</div>
<br/>

<div>
   <span *ngIf = "isavailable; then condition1 else condition2">
      Condition is valid.
   </span>
   <ng-template #condition1>Condition is valid</ng-template>
   <ng-template #condition2>Condition is invalid</ng-template>
</div>
<button (click) = "myClickFunction($event)">
   Click Me
</button>
ใน app.component.html เราได้กำหนดปุ่มและเพิ่มฟังก์ชั่นโดยใช้เหตุการณ์คลิก
ต่อไปนี้เป็นไวยากรณ์เพื่อกำหนดปุ่มและเพิ่มฟังก์ชันเข้าไป
(click) = "myClickFunction($event)"ฟังก์ชันถูกกำหนดไว้ใน:app.component.ts
import { Component } from '@angular/core';
@Component({
selector: 'app-root',
templateUrl: './app.component.html',
styleUrls: ['./app.component.css']
})
export class AppComponent {
title = 'Angular 7';
// declared array of months.
months = ["January", "February", "March", "April", "May","June", "July",
"August", "September", "October", "November", "December"];
isavailable = true; //variable is set to true
myClickFunction(event) {
//just added console.log which will display the event details in browser on click of the button.
alert("Button is clicked");
console.log(event);
}
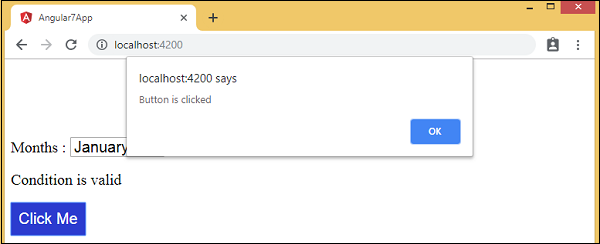
}เมื่อคลิกปุ่มตัวควบคุมจะมาที่ฟังก์ชัน myClickFunction และกล่องโต้ตอบจะปรากฏขึ้นซึ่งจะแสดงไฟล์ Button is clicked ดังที่แสดงในภาพหน้าจอต่อไปนี้ -
เพิ่มสไตล์สำหรับปุ่มใน add.component.css -
button {
   background-color: #2B3BCF;
   border: none;
   color: white;
   padding: 10px 10px;
   text-align: center;
   text-decoration: none;
   display: inline-block;
   font-size: 20px;
}
ให้เราเพิ่มเหตุการณ์ onchange ในเมนูแบบเลื่อนลง
โค้ดบรรทัดต่อไปนี้จะช่วยให้คุณเพิ่มเหตุการณ์การเปลี่ยนแปลงลงในเมนูแบบเลื่อนลง -
app.component.html
<!--The content below is only a placeholder and can be replaced.-->
<div style = "text-align:center">
   <h1>Welcome to {{title}}.</h1>
</div>

<div> Months :
   <select (change) = "changemonths($event)">
      <option *ngFor = "let i of months">{{i}}</option>
   </select>
</div>
<br/>

<div>
   <span *ngIf = "isavailable; then condition1 else condition2">
      Condition is valid.
   </span>
   <ng-template #condition1>Condition is valid</ng-template>
   <ng-template #condition2>Condition is invalid</ng-template>
</div>
<br/>

<button (click) = "myClickFunction($event)">
   Click Me
</button>
ฟังก์ชั่นถูกประกาศในไฟล์ app.component.ts ไฟล์ -
import { Component } from '@angular/core';
@Component({
   selector: 'app-root',
   templateUrl: './app.component.html',
   styleUrls: ['./app.component.css']
})
export class AppComponent {
   title = 'Angular 7';

   // declared array of months.
   months = ["January", "Feburary", "March", "April", "May", "June", "July",
      "August", "September", "October", "November", "December"];

   isavailable = true; //variable is set to true
   myClickFunction(event) {
      //just added console.log which will display the event
      details in browser on click of the button.
      alert("Button is clicked");
      console.log(event);
   }
   changemonths(event) {
      console.log("Changed month from the Dropdown");
      console.log(event);
   }
}เลือกเดือนจากรายการแบบเลื่อนลงและคุณจะเห็นข้อความคอนโซล“Changed month from the Dropdown” จะแสดงในคอนโซลพร้อมกับเหตุการณ์

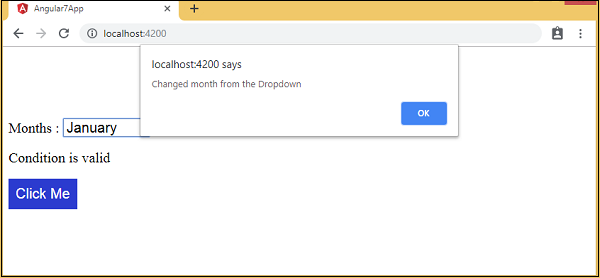
ให้เราเพิ่มข้อความแจ้งเตือนใน app.component.ts เมื่อค่าจากดรอปดาวน์มีการเปลี่ยนแปลงดังที่แสดงด้านล่าง -
import { Component } from '@angular/core';
@Component({
   selector: 'app-root',
   templateUrl: './app.component.html',
   styleUrls: ['./app.component.css']
})
export class AppComponent {
   title = 'Angular 7';

   // declared array of months.
   months = ["January", "February", "March", "April", "May", "June", "July",
      "August", "September", "October", "November", "December"];

   isavailable = true; //variable is set to true
   myClickFunction(event) {
      //just added console.log which will display the event
      details in browser on click of the button.
      alert("Button is clicked"); console.log(event);
   }
   changemonths(event) {
      alert("Changed month from the Dropdown");
   }
}
เมื่อค่าในดรอปดาวน์มีการเปลี่ยนแปลงกล่องโต้ตอบจะปรากฏขึ้นและข้อความต่อไปนี้จะปรากฏขึ้น -
“Changed month from the Dropdown”.