Angular7 - บริการ
เราอาจเจอสถานการณ์ที่เราต้องการโค้ดบางอย่างเพื่อใช้งานได้ทุกที่ในเพจ ตัวอย่างเช่นอาจใช้สำหรับการเชื่อมต่อข้อมูลที่ต้องใช้ร่วมกันระหว่างส่วนประกอบต่างๆ สามารถทำได้ด้วยความช่วยเหลือของบริการ ด้วยบริการเราสามารถเข้าถึงวิธีการและคุณสมบัติของส่วนประกอบอื่น ๆ ในโครงการทั้งหมด
ในการสร้างบริการเราจำเป็นต้องใช้ประโยชน์จากบรรทัดคำสั่งที่ระบุด้านล่าง -
ng g service myserviceC:\projectA7\angular7-app>ng g service myservice
CREATE src/app/myservice.service.spec.ts (348 bytes)
CREATE src/app/myservice.service.ts (138 bytes)ไฟล์ที่สร้างในโฟลเดอร์แอพมีดังนี้ -

ต่อไปนี้เป็นไฟล์ที่สร้างขึ้นซึ่งจะแสดงที่ด้านล่าง - myservice.service.specs.ts และ myservice.service.ts
myservice.service.ts
import { Injectable } from '@angular/core';
@Injectable({
   providedIn: 'root'
})
export class MyserviceService {
   constructor() { }
}
ที่นี่โมดูลการฉีดจะถูกนำเข้าจาก @ angular / core ประกอบด้วยเมธอด @Injectable และคลาสที่เรียกว่า MyserviceService เราจะสร้างฟังก์ชันการบริการของเราในคลาสนี้
ก่อนที่จะสร้างบริการใหม่เราจำเป็นต้องรวมบริการที่สร้างไว้ในพาเรนต์หลัก app.module.ts.
import { BrowserModule } from '@angular/platform-browser';
import { NgModule } from '@angular/core';
import { AppRoutingModule , RoutingComponent} from './app-routing.module';
import { AppComponent } from './app.component';
import { NewCmpComponent } from './new-cmp/new-cmp.component';
import { ChangeTextDirective } from './change-text.directive';
import { SqrtPipe } from './app.sqrt';
import { MyserviceService } from './myservice.service';

@NgModule({
   declarations: [
      SqrtPipe,
      AppComponent,
      NewCmpComponent,
      ChangeTextDirective,
      RoutingComponent
   ],
   imports: [
      BrowserModule,
      AppRoutingModule
   ],
   providers: [MyserviceService],
   bootstrap: [AppComponent]
})
export class AppModule { }
เราได้นำเข้าบริการที่มีชื่อคลาสและคลาสเดียวกันถูกใช้ในผู้ให้บริการ ตอนนี้ให้เราเปลี่ยนกลับไปใช้คลาสบริการและสร้างฟังก์ชันบริการ
ในคลาสบริการเราจะสร้างฟังก์ชันซึ่งจะแสดงวันที่ของวันนี้ เราสามารถใช้ฟังก์ชันเดียวกันใน app.component.ts คอมโพเนนต์หลักและในคอมโพเนนต์ใหม่ new-cmp.component.ts ที่เราสร้างในบทก่อนหน้า
ตอนนี้ให้เราดูว่าฟังก์ชันมีลักษณะอย่างไรในบริการและวิธีการใช้งานในส่วนประกอบ
import { Injectable } from '@angular/core';
@Injectable({
   providedIn: 'root'
})
export class MyserviceService {
   constructor() { }
   showTodayDate() {
      let ndate = new Date();
      return ndate;
   }
}
ในไฟล์บริการด้านบนเราได้สร้างฟังก์ชัน showTodayDate. ตอนนี้เราจะส่งคืนวันที่ () ใหม่ที่สร้างขึ้น ให้เราดูว่าเราสามารถเข้าถึงฟังก์ชันนี้ในคลาสส่วนประกอบได้อย่างไร
app.component.ts
import { Component } from '@angular/core';
import { MyserviceService } from './myservice.service';
@Component({ selector: 'app-root',
   templateUrl: './app.component.html',
   styleUrls: ['./app.component.css']
})
export class AppComponent {
   title = 'Angular 7 Project!';
   todaydate;
   constructor(private myservice: MyserviceService) {}
   ngOnInit() {
      this.todaydate = this.myservice.showTodayDate();
   }
}
ฟังก์ชัน ngOnInit ถูกเรียกโดยค่าเริ่มต้นในส่วนประกอบใด ๆ ที่สร้างขึ้น วันที่ดึงมาจากบริการดังที่แสดงด้านบน ในการดึงรายละเอียดเพิ่มเติมของบริการเราต้องรวมบริการไว้ในไฟล์องค์ประกอบ ts ก่อน
เราจะแสดงวันที่ในไฟล์. html ดังภาพด้านล่าง -
app.component.html
{{todaydate}}
<app-new-cmp></app-new-cmp>
ตอนนี้ให้เราดูวิธีใช้บริการในองค์ประกอบใหม่ที่สร้างขึ้น
new-cmp.component.ts
import { Component, OnInit } from '@angular/core';
import { MyserviceService } from './../myservice.service';

@Component({
   selector: 'app-new-cmp',
   templateUrl: './new-cmp.component.html',
   styleUrls: ['./new-cmp.component.css']
})
export class NewCmpComponent implements OnInit {
   newcomponent = "Entered in new component created";
   todaydate;
   constructor(private myservice: MyserviceService) { }
   ngOnInit() {
      this.todaydate = this.myservice.showTodayDate();
   }
}
ในส่วนประกอบใหม่ที่เราสร้างขึ้นเราต้องนำเข้าบริการที่เราต้องการก่อนและเข้าถึงวิธีการและคุณสมบัติของสิ่งเดียวกัน ตรวจสอบรหัสที่ไฮไลต์ todaydate จะแสดงใน html ของคอมโพเนนต์ดังนี้ -
new-cmp.component.html
<p>
   {{newcomponent}}
</p>
<p>
   Today's Date : {{todaydate}}
</p>
ตัวเลือกขององค์ประกอบใหม่ถูกใช้ในไฟล์ app.component.html เนื้อหาจากไฟล์ html ด้านบนจะแสดงในเบราว์เซอร์ดังที่แสดงด้านล่าง -

หากคุณเปลี่ยนคุณสมบัติของบริการในส่วนประกอบใด ๆ ส่วนประกอบอื่นก็จะเปลี่ยนไปเช่นกัน ตอนนี้ให้เราดูว่ามันทำงานอย่างไร
เราจะกำหนดตัวแปรหนึ่งตัวในบริการและใช้ในพาเรนต์และคอมโพเนนต์ใหม่ เราจะเปลี่ยนคุณสมบัติอีกครั้งในองค์ประกอบหลักและจะดูว่ามีการเปลี่ยนแปลงในองค์ประกอบใหม่หรือไม่
ใน myservice.service.tsเราได้สร้างคุณสมบัติและใช้สิ่งเดียวกันในองค์ประกอบหลักอื่น ๆ และองค์ประกอบใหม่
import { Injectable } from '@angular/core';
@Injectable({
   providedIn: 'root'
})
export class MyserviceService {
   serviceproperty = "Service Created";
   constructor() { }
   showTodayDate() {
      let ndate = new Date();
      return ndate;
   }
}
ให้เราใช้ไฟล์ servicepropertyตัวแปรในส่วนประกอบอื่น ๆ ในapp.component.tsเรากำลังเข้าถึงตัวแปรดังนี้ -
import { Component } from '@angular/core';
import { MyserviceService } from './myservice.service';
@Component({
   selector: 'app-root',
   templateUrl: './app.component.html',
   styleUrls: ['./app.component.css']
})
export class AppComponent {
   title = 'Angular 7 Project!';
   todaydate;
   componentproperty;
   constructor(private myservice: MyserviceService) {}
   ngOnInit() {
      this.todaydate = this.myservice.showTodayDate();
      console.log(this.myservice.serviceproperty);
      this.myservice.serviceproperty = "component created";
      // value is changed. this.componentproperty =
      this.myservice.serviceproperty;
   }
}
ตอนนี้เราจะดึงตัวแปรและทำงานบน console.log ในบรรทัดถัดไปเราจะเปลี่ยนค่าของตัวแปรเป็น "สร้างองค์ประกอบ" เราจะทำเช่นเดียวกันใน new-cmp.component.ts
import { Component, OnInit } from '@angular/core';
import { MyserviceService } from './../myservice.service';
@Component({
   selector: 'app-new-cmp',
   templateUrl: './new-cmp.component.html',
   styleUrls: ['./new-cmp.component.css']
})
export class NewCmpComponent implements OnInit {
   todaydate;
   newcomponentproperty; newcomponent = "Entered in
   newcomponent"; constructor(private myservice:
   MyserviceService) {}
   ngOnInit() {
      this.todaydate = this.myservice.showTodayDate();
      this.newcomponentproperty =
      this.myservice.serviceproperty;
   }
}
ในองค์ประกอบข้างต้นเราไม่ได้เปลี่ยนแปลงอะไรนอกจากกำหนดคุณสมบัติให้กับคุณสมบัติของคอมโพเนนต์โดยตรง
ตอนนี้เมื่อคุณดำเนินการในเบราว์เซอร์คุณสมบัติของบริการจะเปลี่ยนไปเนื่องจากค่าของมันมีการเปลี่ยนแปลงใน app.component.ts และจะแสดงสิ่งเดียวกันสำหรับ new-cmp.component.ts
ตรวจสอบค่าในคอนโซลก่อนที่จะมีการเปลี่ยนแปลง
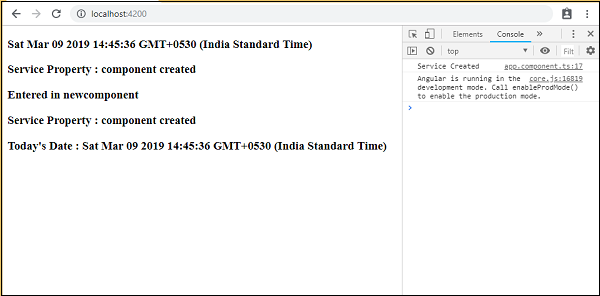
นี่คือไฟล์ app.component.html และ new-cmp.component.html -
app.component.html
<h3>{{todaydate}}>/h3>
<h3> Service Property : {{componentproperty}} </h3>
<app-new-cmp></app-new-cmp>
new-cmp.component.html
<h3>{{newcomponent}} </h3>
<h3> Service Property : {{newcomponentproperty}} </h3>
<h3> Today's Date : {{todaydate}} </h3>