Angular7 - วัสดุ
วัสดุมีโมดูลในตัวมากมายสำหรับโครงการของคุณ คุณลักษณะต่างๆเช่นการเติมข้อความอัตโนมัติ datepicker ตัวเลื่อนเมนูกริดและแถบเครื่องมือมีให้ใช้กับวัสดุใน Angular 7
ในการใช้วัสดุเราจำเป็นต้องนำเข้าบรรจุภัณฑ์ Angular 2 ยังมีคุณสมบัติข้างต้นทั้งหมด แต่มีให้ใช้งานเป็นส่วนหนึ่งของ@angular/core module. จาก Angular 4 โมดูลวัสดุได้รับการจัดทำขึ้นพร้อมกับโมดูลแยกต่างหาก @ เชิงมุม / วัสดุ สิ่งนี้ช่วยให้ผู้ใช้นำเข้าเฉพาะวัสดุที่จำเป็นในโครงการของตน
ในการเริ่มใช้วัสดุคุณต้องติดตั้งสองแพ็คเกจ: materials and cdk. ส่วนประกอบของวัสดุขึ้นอยู่กับโมดูลภาพเคลื่อนไหวสำหรับคุณสมบัติขั้นสูง ดังนั้นคุณต้องมีแพ็คเกจแอนิเมชั่นเหมือนกัน@angular/animations. แพ็คเกจได้รับการอัปเดตแล้วในบทที่แล้ว เราได้ติดตั้งแพ็กเกจ @ angular / cdk ในบทก่อนหน้าแล้วสำหรับโมดูล virtual และ drag drop
ต่อไปนี้เป็นคำสั่งเพื่อเพิ่มวัสดุในโครงการของคุณ -
npm install --save @angular/material
ให้เราดู package.json @angular/material และ @angular/cdk มีการติดตั้ง
{
   "name": "angular7-app",
   "version": "0.0.0",
   "scripts": {
      "ng": "ng",
      "start": "ng serve",
      "build": "ng build",
      "test": "ng test",
      "lint": "ng lint",
      "e2e": "ng e2e"
   },
   "private": true,
   "dependencies": {
      "@angular/animations": "~7.2.0",
      "@angular/cdk": "^7.3.4",
      "@angular/common": "~7.2.0",
      "@angular/compiler": "~7.2.0",
      "@angular/core": "~7.2.0",
      "@angular/forms": "~7.2.0",
      "@angular/material": "^7.3.4",
      "@angular/platform-browser": "~7.2.0",
      "@angular/platform-browser-dynamic": "~7.2.0",
      "@angular/router": "~7.2.0",
      "core-js": "^2.5.4",
      "rxjs": "~6.3.3",
      "tslib": "^1.9.0",
      "zone.js": "~0.8.26"
   },
   "devDependencies": {
      "@angular-devkit/build-angular": "~0.13.0",
      "@angular/cli": "~7.3.2",
      "@angular/compiler-cli": "~7.2.0",
      "@angular/language-service": "~7.2.0",
      "@types/node": "~8.9.4",
      "@types/jasmine": "~2.8.8",
      "@types/jasminewd2": "~2.0.3",
      "codelyzer": "~4.5.0",
      "jasmine-core": "~2.99.1",
      "jasmine-spec-reporter": "~4.2.1",
      "karma": "~3.1.1",
      "karma-chrome-launcher": "~2.2.0",
      "karma-coverage-istanbul-reporter": "~2.0.1",
      "karma-jasmine": "~1.1.2",
      "karma-jasmine-html-reporter": "^0.2.2",
      "protractor": "~5.4.0",
      "ts-node": "~7.0.0",
      "tslint": "~5.11.0",
      "typescript": "~3.2.2"
   }
}
เราได้เน้นแพ็คเกจที่ติดตั้งเพื่อใช้งานกับวัสดุ
ตอนนี้เราจะนำเข้าโมดูลในโมดูลหลัก - app.module.ts ดังแสดงด้านล่าง
import { BrowserModule } from '@angular/platform-browser';
import { NgModule } from '@angular/core';
import { AppRoutingModule , RoutingComponent} from './app-routing.module';
import { AppComponent } from './app.component';
import { NewCmpComponent } from './new-cmp/new-cmp.component';
import { ChangeTextDirective } from './change-text.directive';
import { SqrtPipe } from './app.sqrt';
import { MyserviceService } from './myservice.service';
import { HttpClientModule } from '@angular/common/http';
import { ScrollDispatchModule } from '@angular/cdk/scrolling';
import { DragDropModule } from '@angular/cdk/drag-drop';
import { ReactiveFormsModule } from '@angular/forms';
import { BrowserAnimationsModule } from '@angular/platform-browser/animations';
import { MatButtonModule, MatMenuModule, MatSidenavModule } from '@angular/material';

@NgModule({
   declarations: [
      SqrtPipe,
      AppComponent,
      NewCmpComponent,
      ChangeTextDirective,
      RoutingComponent
   ],
   imports: [
      BrowserModule,
      AppRoutingModule,
      HttpClientModule,
      ScrollDispatchModule,
      DragDropModule,
      ReactiveFormsModule,
      BrowserAnimationsModule,
      MatButtonModule,
      MatMenuModule,
      MatSidenavModule
   ],
   providers: [MyserviceService],
   bootstrap: [AppComponent]
})
export class AppModule { }
ในไฟล์ด้านบนเราได้นำเข้าโมดูลต่อไปนี้จากไฟล์ @angular/materials.
import { MatButtonModule, MatMenuModule, MatSidenavModule } from '@angular/material';และสิ่งเดียวกันนี้ใช้ในอาร์เรย์การนำเข้าดังที่แสดงด้านล่าง -
imports: [
   BrowserModule,
   AppRoutingModule,
   HttpClientModule,
   ScrollDispatchModule,
   DragDropModule,
   ReactiveFormsModule,
   BrowserAnimationsModule,
   MatButtonModule,
   MatMenuModule,
   MatSidenavModule
],
app.component.ts ดังรูปด้านล่าง -
import { Component } from '@angular/core';
@Component({
   selector: 'app-root',
   templateUrl: './app.component.html',
   styleUrls: ['./app.component.css']
})
export class AppComponent {
   constructor() {}
}
ให้เราเพิ่มการสนับสนุน material-css ใน styles.css.
@import "~@angular/material/prebuilt-themes/indigo-pink.css";ให้เราเพิ่มเนื้อหาภายใน app.component.html
เมนู
ในการเพิ่มเมนู <mat-menu></mat-menu>ถูกนำมาใช้. file และ Save Asรายการจะถูกเพิ่มลงในปุ่มใต้เมนูเสื่อ มีการเพิ่มปุ่มหลักMenu. การอ้างอิงของสิ่งเดียวกันจะได้รับ<mat-menu> โดยใช้ [matMenuTriggerFor]="menu" และใช้เมนูกับ # in<mat-menu>.
app.component.html
<button mat-button [matMenuTriggerFor] = "menu">Menu</button>
<mat-menu #menu = "matMenu">
   <button mat-menu-item> File </button>
   <button mat-menu-item> Save As </button>
</mat-menu>
ภาพด้านล่างจะปรากฏในเบราว์เซอร์ -

เมื่อคลิกที่เมนูจะแสดงรายการที่อยู่ข้างใน -

SideNav
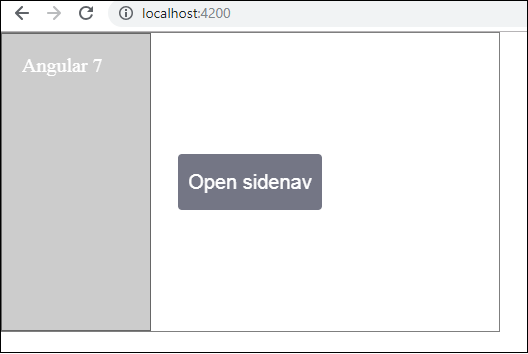
ในการเพิ่ม sidenav เราต้องการ <mat-sidenav-container></mat-sidenav-container>. <mat-sidenav></mat-sidenav>จะถูกเพิ่มเป็นลูกในคอนเทนเนอร์ มีการเพิ่ม div อื่นซึ่งเรียกใช้ sidenav โดยใช้(click)="sidenav.open()".
app.component.html
<mat-sidenav-container class="example-container" fullscreen>
   <mat-sidenav #sidenav class = "example-sidenav">
      Angular 7
   </mat-sidenav>
   <div class = "example-sidenav-content">
      <button type = "button" mat-button (click) = "sidenav.open()">
         Open sidenav
      </button>
   </div>
</mat-sidenav-container>
app.component.css
.example-container {
   width: 500px;
   height: 300px;
   border: 1px solid rgba(0, 0, 0, 0.5);
}
.example-sidenav {
   padding: 20px;
   width: 150px;
   font-size: 20px;
   border: 1px solid rgba(0, 0, 0, 0.5);
   background-color: #ccc;
   color:white;
}
ต่อไปนี้คือการแสดงเมนูและ sidenav ในเบราว์เซอร์ -
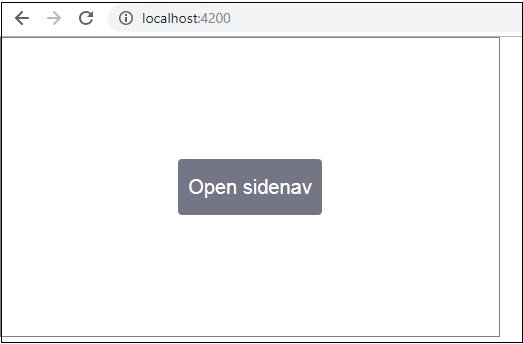
แผงต่อไปนี้จะเปิดขึ้นทางด้านซ้ายหากเราคลิกที่ Open Sidenav -
เลือกวันที่
ตอนนี้ให้เราเพิ่ม datepicker โดยใช้วัสดุ ในการเพิ่ม datepicker เราต้องนำเข้าโมดูลที่จำเป็นเพื่อแสดง datepicker
ใน app.module.tsเราได้นำเข้าโมดูลต่อไปนี้ตามที่แสดงด้านล่างสำหรับ datepicker -
import { BrowserModule } from '@angular/platform-browser';
import { NgModule } from '@angular/core';
import { AppRoutingModule , RoutingComponent} from './app-routing.module';
import { AppComponent } from './app.component';
import { NewCmpComponent } from './new-cmp/new-cmp.component';
import { ChangeTextDirective } from './change-text.directive';
import { SqrtPipe } from './app.sqrt';
import { MyserviceService } from './myservice.service';
import { HttpClientModule } from '@angular/common/http';
import { ScrollDispatchModule } from '@angular/cdk/scrolling';
import { DragDropModule } from '@angular/cdk/drag-drop';
import { ReactiveFormsModule } from '@angular/forms';
import { BrowserAnimationsModule } from '@angular/platform-browser/animations';
import { MatDatepickerModule, MatInputModule, MatNativeDateModule } from '@angular/material';

@NgModule({
   declarations: [
      SqrtPipe,
      AppComponent,
      NewCmpComponent,
      ChangeTextDirective,
      RoutingComponent
   ],
   imports: [
      BrowserModule,
      AppRoutingModule,
      HttpClientModule,
      ScrollDispatchModule,
      DragDropModule,
      ReactiveFormsModule,
      BrowserAnimationsModule,
      MatDatepickerModule,
      MatInputModule,
      MatNativeDateModule
   ],
   providers: [MyserviceService],
   bootstrap: [AppComponent]
})
export class AppModule { }
ที่นี่เราได้นำเข้าโมดูลเช่น MatDatepickerModule, MatInputModule และ MatNativeDateModule
ตอนนี้ app.component.ts ดังที่แสดงด้านล่าง -
import { Component } from '@angular/core';
@Component({
   selector: 'app-root',
   templateUrl: './app.component.html', s
   tyleUrls: ['./app.component.css']
})
export class AppComponent {
   constructor() {}
}
app.component.html ดังแสดงด้านล่าง -
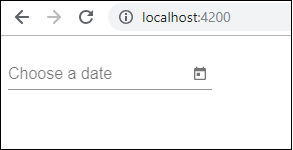
<mat-form-field>
   <input matInput [matDatepicker] = "picker" placeholder = "Choose a date">
   <mat-datepicker-toggle matSuffix [for] = "picker"></mat-datepicker-toggle>
   <mat-datepicker #picker></mat-datepicker>
</mat-form-field>
เพิ่ม css ส่วนกลางใน style.css -
/* You can add global styles to this file, and also
import other style files */
@import '~@angular/material/prebuilt-themes/deeppurple-amber.css';
body {
font-family: Roboto, Arial, sans-serif;
margin: 10;
}
.basic-container {
padding: 30px;
}
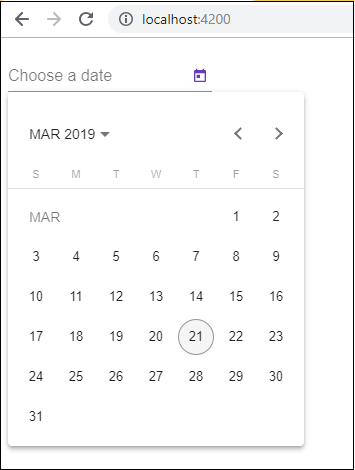
.version-info {
font-size: 8pt;
float: right;
}datepicker จะแสดงในเบราว์เซอร์ดังที่แสดงด้านล่าง -