Spring MVC - สร้างตัวอย่าง PDF
ตัวอย่างต่อไปนี้แสดงวิธีสร้าง PDF โดยใช้ Spring Web MVC Framework ในการเริ่มต้นให้เรามี Eclipse IDE ที่ใช้งานได้และปฏิบัติตามขั้นตอนต่อไปนี้เพื่อพัฒนา Web Application ที่ใช้ Dynamic Form โดยใช้ Spring Web Framework
| ขั้นตอน | คำอธิบาย |
|---|---|
| 1 | สร้างโปรเจ็กต์ด้วยชื่อ TestWeb ภายใต้แพ็คเกจ com.tutorialspoint ตามที่อธิบายไว้ในบท Spring MVC - Hello World |
| 2 | สร้างคลาส Java UserPDFView และ PDFController ภายใต้แพ็คเกจ com.tutorialspoint |
| 3 | ดาวน์โหลดไลบรารี iText - iTextจากเพจที่เก็บ maven ใส่ไว้ใน CLASSPATH ของคุณ |
| 4 | ขั้นตอนสุดท้ายคือการสร้างเนื้อหาของไฟล์ต้นทางและการกำหนดค่าและส่งออกแอปพลิเคชันตามที่อธิบายด้านล่าง |
PDFController.java
package com.tutorialspoint;

import java.util.HashMap;
import java.util.Map;

import javax.servlet.http.HttpServletRequest;
import javax.servlet.http.HttpServletResponse;

import org.springframework.web.servlet.ModelAndView;
import org.springframework.web.servlet.mvc.AbstractController;

public class PDFController extends AbstractController {

   @Override
   protected ModelAndView handleRequestInternal(HttpServletRequest request,
      HttpServletResponse response) throws Exception {
      //user data
      Map<String,String> userData = new HashMap<String,String>();
      userData.put("1", "Mahesh");
      userData.put("2", "Suresh");
      userData.put("3", "Ramesh");
      userData.put("4", "Naresh");
      return new ModelAndView("UserSummary","userData",userData);
   }
}
UserExcelView.java
package com.tutorialspoint;

import java.util.Map;

import javax.servlet.http.HttpServletRequest;
import javax.servlet.http.HttpServletResponse;

import org.springframework.web.servlet.view.document.AbstractPdfView;

import com.lowagie.text.Document;
import com.lowagie.text.Table;
import com.lowagie.text.pdf.PdfWriter;

public class UserPDFView extends AbstractPdfView {

   protected void buildPdfDocument(Map<String, Object> model, Document document,
      PdfWriter pdfWriter, HttpServletRequest request, HttpServletResponse response)
      throws Exception {
      Map<String,String> userData = (Map<String,String>) model.get("userData");

      Table table = new Table(2);
      table.addCell("Roll No");
      table.addCell("Name");

      for (Map.Entry<String, String> entry : userData.entrySet()) {
         table.addCell(entry.getKey());
         table.addCell(entry.getValue());
      }
      document.add(table);
   }
}
TestWeb-servlet.xml
<beans xmlns = "http://www.springframework.org/schema/beans"
   xmlns:context = "http://www.springframework.org/schema/context"
   xmlns:xsi = "http://www.w3.org/2001/XMLSchema-instance"
   xmlns:mvc = "http://www.springframework.org/schema/mvc"
   xsi:schemaLocation = "
   http://www.springframework.org/schema/beans
   http://www.springframework.org/schema/beans/spring-beans-3.0.xsd
   http://www.springframework.org/schema/context
   http://www.springframework.org/schema/context/spring-context-3.0.xsd
   http://www.springframework.org/schema/mvc
   http://www.springframework.org/schema/mvc/spring-mvc-3.0.xsd">
   <bean class = "org.springframework.web.servlet.mvc.support.ControllerClassNameHandlerMapping" />

   <bean class = "com.tutorialspoint.PDFController" />

   <bean class = "org.springframework.web.servlet.view.XmlViewResolver">
      <property name = "location">
         <value>/WEB-INF/views.xml</value>
      </property>
   </bean>
</beans>
views.xml
<beans xmlns = "http://www.springframework.org/schema/beans"
   xmlns:context = "http://www.springframework.org/schema/context"
   xmlns:xsi = "http://www.w3.org/2001/XMLSchema-instance"
   xsi:schemaLocation = "
   http://www.springframework.org/schema/beans
   http://www.springframework.org/schema/beans/spring-beans-3.0.xsd
   http://www.springframework.org/schema/context
   http://www.springframework.org/schema/context/spring-context-3.0.xsd">

   <bean id = "UserSummary" class = "com.tutorialspoint.UserPDFView"></bean>
</beans>
ที่นี่เราได้สร้าง PDFController และ UserPDFView คลัง iText เกี่ยวข้องกับรูปแบบไฟล์ PDF และจะแปลงข้อมูลเป็นเอกสาร PDF
เมื่อคุณสร้างไฟล์ซอร์สและไฟล์คอนฟิกเสร็จเรียบร้อยแล้วให้ส่งออกแอปพลิเคชันของคุณ คลิกขวาที่แอปพลิเคชันของคุณใช้Export → WAR File และบันทึกไฟล์ TestWeb.war ไฟล์ในโฟลเดอร์ webapps ของ Tomcat
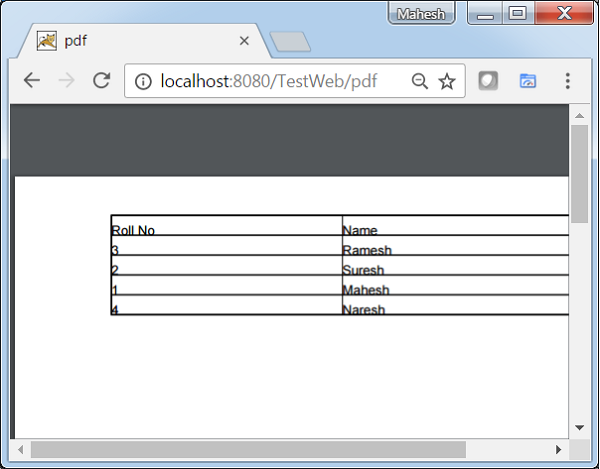
ตอนนี้เริ่มเซิร์ฟเวอร์ Tomcat และตรวจสอบให้แน่ใจว่าคุณสามารถเข้าถึงหน้าเว็บอื่น ๆ จากโฟลเดอร์ webapps โดยใช้เบราว์เซอร์มาตรฐาน เราสามารถลองใช้ URL ต่อไปนี้ -http://localhost:8080/TestWeb/pdf และหากทุกอย่างเป็นไปตามแผนเราจะเห็นหน้าจอต่อไปนี้
