Google AMP - Trang tiếp theo
Amp trang tiếp theo là một thành phần amp có thể tải động nhiều trang hơn khi người dùng đến cuối tài liệu. Chương này đề cập chi tiết đến khái niệm này.
Để làm việc với thành phần amp-next-page, chúng ta cần thêm tập lệnh sau:
<script async custom-element = "amp-next-page"
   src = "https://cdn.ampproject.org/v0/amp-next-page-0.1.js">
</script>
Ngoài ra, amp-next-page chưa được khởi chạy hoàn toàn, vì vậy, để trang thử nghiệm hoạt động, hãy thêm thẻ meta sau:
<meta name = "amp-experiments-opt-in" content = "amp-next-page">Để tải động các trang, chúng ta cần cung cấp các url trang cho thẻ script kiểu = ”application / json” như hình dưới đây -
<amp-next-page>
   <script type = "application/json">
      {

         "pages": [
            {
            "title": "Page 2",
            "image": "images/christmas1.jpg",
            "ampUrl": "ampnextpage1.html"
            },
            {
            "title": "Page 3",
            "image": "images/christmas1.jpg",
            "ampUrl": "ampnextpage2.html"
            }
         ]
      }
   </script>
</amp-next-page>
Trong thẻ trên, chúng tôi đang cố gắng tải 2 trang ampnextpage1.html và ampnextpage2.html.
Bây giờ, chúng ta hãy xem kết quả cuối cùng. Tất cả các trang cần được tải phải được thêm vào mảng trang với tiêu đề, hình ảnh và ampUrl.
Thí dụ
<!doctype html>
<html amp>
   <head>
      <meta charset = "utf-8">
      <title>Google Amp - Next Page</title>
      <link rel = "canonical" href = "ampnextpage.html">
      <meta name = "amp-experiments-opt-in" content = "amp-next-page">
      <meta name = "viewport" content ="width = device-width,
      minimum-scale = 1,initial-scale = 1">

      <style amp-boilerplate>
         body {
            -webkit-animation:
            -amp-start 8s steps(1,end) 0s 1 normal both;-moz-animation:
            -amp-start 8s steps(1,end) 0s 1 normal both;-ms-animation:
            -amp-start 8s steps(1,end) 0s 1 normal both;animation:
            -amp-start 8s steps(1,end) 0s 1 normal both
         }
         @-webkit-keyframes
         -amp-start{from{visibility:hidden}to{visibility:visible}}@-moz-keyframes
         -amp-start{from{visibility:hidden}to{visibility:visible}}@-ms-keyframes
         -amp-start{from{visibility:hidden}to{visibility:visible}}@-o-keyframes
         -amp-start{from{visibility:hidden}to{visibility:visible}}@keyframes
         -amp-start{from{visibility:hidden}to{visibility:visible}}
      </style>

      <noscript>
         <style amp-boilerplate>
            body{
               -webkit-animation:none;
               -moz-animation:none;
               -ms-animation:none;
               animation:none
            }
         </style>
      </noscript>
         <script async src="https://cdn.ampproject.org/v0.js">
      </script>
      <script async custom-element = "amp-next-page"
         src = "https://cdn.ampproject.org/v0/amp-next-page-0.1.js">
      </script>
   </head>
   <body>
      <h1>Google Amp - Next Page</h1>
      <h1>Page 1</h1>
      <p>Start of page 1</p>
      <p>This content is loaded from page 1</p>
      <p>This content is loaded from page 1</p>
      <p>This content is loaded from page 1</p>
      <p>This content is loaded from page 1</p>
      <p>This content is loaded from page 1</p>
      <p>This content is loaded from page 1</p>
      <p>This content is loaded from page 1</p>
      <p>This content is loaded from page 1</p>
      <p>This content is loaded from page 1</p>
      <p>This content is loaded from page 1</p>
      <p>This content is loaded from page 1</p>
      <p>This content is loaded from page 1</p>
      <p>This content is loaded from page 1</p>
      <p>This content is loaded from page 1</p>
      <p>This content is loaded from page 1</p>
      <p>This content is loaded from page 1</p>
      <p>This content is loaded from page 1</p>
      <p>This content is loaded from page 1</p>
      <p>This content is loaded from page 1</p>
      <p>This content is loaded from page 1</p>
      <p>This content is loaded from page 1</p>
      <p>This content is loaded from page 1</p>
      <p>End of page 1</p>

      <amp-next-page>
         <script type = "application/json">
            {
               "pages": [
                  {
                     "title": "Page 2",
                     "image": "images/christmas1.jpg",
                     "ampUrl": "ampnextpage1.html"
                  },
                  {
                     "title": "Page 3",
                     "image": "images/christmas1.jpg",
                     "ampUrl": "ampnextpage2.html"
                  }
               ]
            }
         </script>
      </amp-next-page>
   </body>
</html>
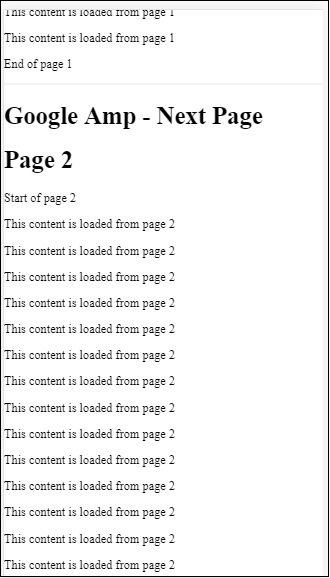
Đầu ra


Bạn có thể nhận thấy rằng khi bạn cuộn, trang mà trang tiếp theo được tải sẽ được hiển thị, cũng như url trang trong thanh địa chỉ cũng được thay đổi.