Google AMP - अगला पृष्ठ
Amp अगला पृष्ठ एक amp घटक है जो उपयोगकर्ता के दस्तावेज़ के अंत में पहुंचने पर अधिक पृष्ठों को गतिशील रूप से लोड कर सकता है। यह अध्याय इस अवधारणा के बारे में विस्तार से बताता है।
Amp-अगले-पृष्ठ घटक के साथ काम करने के लिए हमें निम्नलिखित स्क्रिप्ट जोड़ने की आवश्यकता है -
<script async custom-element = "amp-next-page"
   src = "https://cdn.ampproject.org/v0/amp-next-page-0.1.js">
</script>
इसके अलावा amp- अगला पृष्ठ पूरी तरह से लॉन्च नहीं किया गया है, इसलिए परीक्षण पृष्ठ को काम करने के लिए निम्नलिखित मेटा टैग जोड़ें -
<meta name = "amp-experiments-opt-in" content = "amp-next-page">पृष्ठों को गतिशील रूप से लोड करने के लिए, हमें निम्न प्रकार के स्क्रिप्ट टैग के लिए पृष्ठ-यूआरएल देने की आवश्यकता है = "आवेदन / json" जैसा कि नीचे दिखाया गया है -
<amp-next-page>
   <script type = "application/json">
      {

         "pages": [
            {
            "title": "Page 2",
            "image": "images/christmas1.jpg",
            "ampUrl": "ampnextpage1.html"
            },
            {
            "title": "Page 3",
            "image": "images/christmas1.jpg",
            "ampUrl": "ampnextpage2.html"
            }
         ]
      }
   </script>
</amp-next-page>
उपरोक्त टैग में, हम 2 पृष्ठ लोड करने का प्रयास कर रहे हैं ampnextpage1.html तथा ampnextpage2.html।
अब, हम अंतिम आउटपुट देखते हैं। लोड किए जाने वाले सभी पृष्ठों को शीर्षक, छवि और ampUrl के साथ पृष्ठों की सरणी में जोड़ना होगा।
उदाहरण
<!doctype html>
<html amp>
   <head>
      <meta charset = "utf-8">
      <title>Google Amp - Next Page</title>
      <link rel = "canonical" href = "ampnextpage.html">
      <meta name = "amp-experiments-opt-in" content = "amp-next-page">
      <meta name = "viewport" content ="width = device-width,
      minimum-scale = 1,initial-scale = 1">

      <style amp-boilerplate>
         body {
            -webkit-animation:
            -amp-start 8s steps(1,end) 0s 1 normal both;-moz-animation:
            -amp-start 8s steps(1,end) 0s 1 normal both;-ms-animation:
            -amp-start 8s steps(1,end) 0s 1 normal both;animation:
            -amp-start 8s steps(1,end) 0s 1 normal both
         }
         @-webkit-keyframes
         -amp-start{from{visibility:hidden}to{visibility:visible}}@-moz-keyframes
         -amp-start{from{visibility:hidden}to{visibility:visible}}@-ms-keyframes
         -amp-start{from{visibility:hidden}to{visibility:visible}}@-o-keyframes
         -amp-start{from{visibility:hidden}to{visibility:visible}}@keyframes
         -amp-start{from{visibility:hidden}to{visibility:visible}}
      </style>

      <noscript>
         <style amp-boilerplate>
            body{
               -webkit-animation:none;
               -moz-animation:none;
               -ms-animation:none;
               animation:none
            }
         </style>
      </noscript>
         <script async src="https://cdn.ampproject.org/v0.js">
      </script>
      <script async custom-element = "amp-next-page"
         src = "https://cdn.ampproject.org/v0/amp-next-page-0.1.js">
      </script>
   </head>
   <body>
      <h1>Google Amp - Next Page</h1>
      <h1>Page 1</h1>
      <p>Start of page 1</p>
      <p>This content is loaded from page 1</p>
      <p>This content is loaded from page 1</p>
      <p>This content is loaded from page 1</p>
      <p>This content is loaded from page 1</p>
      <p>This content is loaded from page 1</p>
      <p>This content is loaded from page 1</p>
      <p>This content is loaded from page 1</p>
      <p>This content is loaded from page 1</p>
      <p>This content is loaded from page 1</p>
      <p>This content is loaded from page 1</p>
      <p>This content is loaded from page 1</p>
      <p>This content is loaded from page 1</p>
      <p>This content is loaded from page 1</p>
      <p>This content is loaded from page 1</p>
      <p>This content is loaded from page 1</p>
      <p>This content is loaded from page 1</p>
      <p>This content is loaded from page 1</p>
      <p>This content is loaded from page 1</p>
      <p>This content is loaded from page 1</p>
      <p>This content is loaded from page 1</p>
      <p>This content is loaded from page 1</p>
      <p>This content is loaded from page 1</p>
      <p>End of page 1</p>

      <amp-next-page>
         <script type = "application/json">
            {
               "pages": [
                  {
                     "title": "Page 2",
                     "image": "images/christmas1.jpg",
                     "ampUrl": "ampnextpage1.html"
                  },
                  {
                     "title": "Page 3",
                     "image": "images/christmas1.jpg",
                     "ampUrl": "ampnextpage2.html"
                  }
               ]
            }
         </script>
      </amp-next-page>
   </body>
</html>
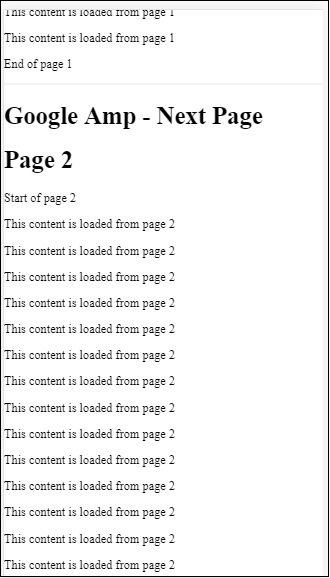
उत्पादन


आप देख सकते हैं कि जैसे ही आप स्क्रॉल करते हैं, पेज लोड होने वाला अगला पेज दिखाया जाता है, एड्रेस बार में पेज-यूआरएल भी बदल जाता है।