Windows 10 개발-적응 형 코드
이 장에서는 Windows 10에서 지원하는 다양한 장치에 응용 프로그램을 채택하는 방법을 보여줄 것입니다. UI 및 UWP 응용 프로그램에서 사용되는 모든 트릭, 기술 및 컨트롤을 채택하는 방법에 대해 이미 배웠습니다.
이제 코드 채택에 대해 알아 보겠습니다.
응용 프로그램 코드는 모든 장치에서 동일하지 않습니다.
특히 Xbox에 사용되는 API는 모바일 장치에서 사용할 수 없습니다. HoloLens 등도 마찬가지입니다.

Adaptive 코드는 특정 디바이스 제품군 및 / 또는 특정 버전의 플랫폼 / 확장 API에서 실행될 때만 애플리케이션을 조건부로 켜고 코드를 실행할 수 있습니다.
코드 작성
Windows 10에서는 C ++, C #, Visual Basic 또는 JavaScript를 사용하여 Visual Studio에서 UWP 애플리케이션을 구현할 수 있습니다.
C # 및 Visual Basic을 사용하면 UI 디자인에 XAML을 사용할 수 있습니다.
C ++에서는 XAML 대신 DirectX를 사용할 수 있습니다.
JavaScript의 경우 크로스 플랫폼 웹 표준 인 프리젠 테이션 레이어에 HTML을 사용할 수 있습니다.
Windows Core API는 코드 및 UI에 필요한 대부분의 기능을 포함하는 모든 장치에 대해 동일한 방식으로 실행됩니다. 그러나 특정 장치 제품군에 맞게 조정 된 코드 및 UI의 경우 적응 형 코드 및 적응 형 UI를 사용해야합니다.
Calling an API that is NOT implemented by the target device family −
UI는 다른 화면에 쉽게 적응할 수 있지만 장치 제품군에 따라 화면 크기가 다를뿐만 아니라 그 이상이 있습니다.
예를 들어, 휴대폰에는 뒤로 및 카메라와 같은 일부 하드웨어 버튼이 있으며 PC와 같은 다른 장치에서는 사용할 수 없습니다.
기본적으로 핵심 API에는 모든 장치에서 작동하는 대부분의 기능이 포함되어 있지만 외부 어셈블리와 마찬가지로 UWP 응용 프로그램에서 확장 SDK를 참조하여 장치 별 기능을 사용할 수 있습니다.
애플리케이션에 필요한 특정 확장 SDK를 추가하려면 다음 단계를 따르십시오.
마우스 오른쪽 버튼으로 References.
고르다 “Add References..”. 다음 대화 상자가 열립니다.
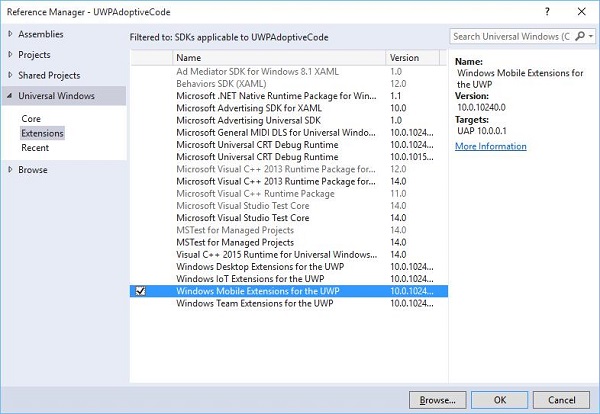
확장을 추가하는 것은 프로젝트 참조를 추가하는 것만 큼 간단합니다.
이제 목록에서 Desktop Extension, IoT Extension 및 Mobile Extension 등이 포함 된 확장 SDK를 추가 할 수 있습니다.
데스크톱 및 모바일 확장은 가장 일반적인 두 가지 플랫폼 확장 SDK입니다. 예를 들어 모바일 확장은 하드웨어 카메라 버튼을 사용하는 데 필요한 API를 활성화합니다.
다음을 사용하여 장치 기능을 확인할 수 있습니다. Windows.Foundation.Metadata.ApiInformation현재 장치에서 유형이 지원되는 경우 부울 출력을 반환하는 클래스 메서드입니다. 예를 들어, 다음과 같은 코드로 카메라 버튼을 사용하도록 Windows 앱을 활성화 할 수 있습니다.
bool isHardwareButtonsAPIPresent =
   Windows.Foundation.Metadata.ApiInformation.
   IsTypePresent("Windows.Phone.UI.Inpu t.HardwareButtons");

if (isHardwareButtonsAPIPresent) {
   Windows.Phone.UI.Input.HardwareButtons.CameraPressed += HardwareButtons_CameraPressed;
}
휴대폰-카메라 버튼 코드는 모바일 확장 SDK가 장치에서 활성화 된 경우에만 실행됩니다. 마찬가지로 다음을 사용하여 현재 API 버전의 특정 이벤트, 메서드 또는 속성을 확인할 수도 있습니다.IsEventPresent, IsMethodPresent, IsPropertyPresent, 대신에 IsTypePresent 아래 그림과 같이.
bool isHardwareButtons_CameraPressedAPIPresent =
   Windows.Foundation.Metadata.ApiInformation.IsEventPresent
   ("Windows.Phone.UI.Input.HardwareButtons", "CameraPressed");
UWP의 Win32 API
C ++ / CX로 작성된 UWP (Universal Widows Platform) 애플리케이션 또는 Windows 런타임 구성 요소는 현재 UWP의 일부인 Win32 API에 액세스 할 수 있습니다. 모든 Windows 10 장치 제품군은 응용 프로그램을 다음과 연결하여 Win32 API를 구현할 수 있습니다.Windowsapp.lib.
Windowsapp.libUWP API에 대한 내보내기를 제공하는 "우산"라이브러리입니다. 연결Windowsapp.lib 앱 종속성에 추가됩니다. dlls 모든 Windows 10 장치 제품군에 존재합니다.
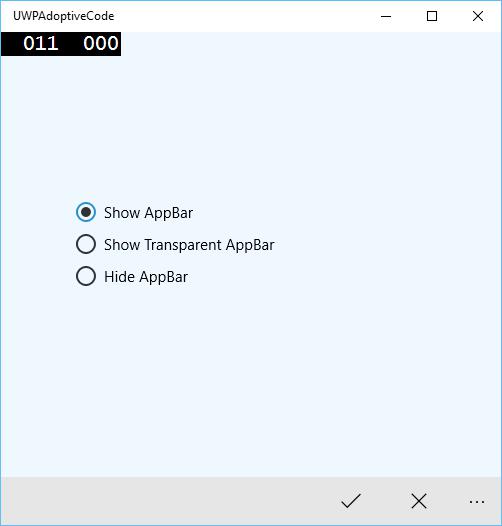
애플리케이션이 데스크톱과 전화기를 모두 대상으로하는 간단한 예를 살펴 보겠습니다. 따라서 응용 프로그램이 데스크톱에서 실행되면 상태 표시 줄이 표시되지 않지만 동일한 응용 프로그램이 휴대폰에서 실행되면 상태 표시 줄이 표시됩니다.
다음은 다른 컨트롤이 추가 된 XAML 코드입니다.
<Page
   x:Class = "UWPAdoptiveCode.MainPage"
   xmlns = "http://schemas.microsoft.com/winfx/2006/xaml/presentation"
   xmlns:x = "http://schemas.microsoft.com/winfx/2006/xaml"
   xmlns:local = "using:UWPAdoptiveCode"
   xmlns:d = "http://schemas.microsoft.com/expression/blend/2008"
   xmlns:mc = "http://schemas.openxmlformats.org/markup-compatibility/2006"
   mc:Ignorable = "d">

   <Page.Background>
      <SolidColorBrush Color = "Green"/>
   </Page.Background>

   <Page.BottomAppBar>
      <CommandBar x:Name = "commandBar" >
         <AppBarButton Icon = "Accept" Label = "appbarbutton"/>
         <AppBarButton Icon = "Cancel" Label = "appbarbutton"/>
      </CommandBar>
   </Page.BottomAppBar>

   <Grid Background = "AliceBlue">

      <VisualStateManager.VisualStateGroups>

         <VisualStateGroup>

            <VisualState>
               <VisualState.StateTriggers>
                  <local:DeviceFamilyTrigger DeviceFamily = "Desktop" />
               </VisualState.StateTriggers>

               <VisualState.Setters>
                  <Setter Target = "StatusBarControls.Visibility"
                     Value = "Collapsed"/>
               </VisualState.Setters>

            </VisualState>

         </VisualStateGroup>

      </VisualStateManager.VisualStateGroups>

      <StackPanel HorizontalAlignment = "Left" Margin = "75,164,0,0"
         VerticalAlignment = "Top" >

         <RadioButton x:Name = "ShowAppBarRadioButton" Content = "Show AppBar"
            HorizontalAlignment = "Stretch" VerticalAlignment = "Stretch"
            IsChecked = "True" Checked = "RadioButton_Checked"/>

         <RadioButton x:Name = "ShowOpaqueAppBarRadioButton"
            Content = "Show Transparent AppBar" HorizontalAlignment = "Stretch"
            VerticalAlignment = "Stretch" Checked = "RadioButton_Checked"/>

         <RadioButton x:Name = "HideAppBarRadioButton" Content = "Hide AppBar"
            HorizontalAlignment = "Stretch" VerticalAlignment = "Stretch"
            Checked = "RadioButton_Checked"/>

      </StackPanel>

      <StackPanel x:Name = "StatusBarControls" Orientation = "Vertical"
         Margin = "75,350,0,0" Visibility = "Visible">

         <CheckBox x:Name = "StatusBarBackgroundCheckBox"
            Content = "Set StatusBar Background"
            Checked = "StatusBarBackgroundCheckBox_Checked"
            Unchecked = "StatusBarBackgroundCheckBox_Unchecked"/>

         <CheckBox x:Name = "StatusBarHiddenCheckBox"
            Content = "Set StatusBar Hidden" Checked = "StatusBarHiddenCheckBox_Checked"
            Unchecked = "StatusBarHiddenCheckBox_Unchecked"/>

      </StackPanel>

   </Grid>

</Page>
다음은 다양한 이벤트에 대한 C # 구현입니다.
using Windows.UI;
using Windows.UI.Xaml;
using Windows.UI.Xaml.Controls;
// The Blank Page item template is documented at
http://go.microsoft.com/fwlink/?LinkId=402352&clcid=0x409
namespace UWPAdoptiveCode {
/// <summary>
/// An empty page that can be used on its own or navigated to within a Frame.
/// </summary>
public sealed partial class MainPage : Page {
private Color? DefaultTitleBarButtonsBGColor;
private Color? DefaultTitleBarBGColor;
public MainPage() {
this.InitializeComponent();
//Windows.UI.ViewManagement.ApplicationView.GetForCurrentView().
VisibleBoundsCh anged += MainPage_VisibleBoundsChanged;
var viewTitleBar = Windows.UI.ViewManagement.ApplicationView.
GetForCurrentView().TitleBar;
DefaultTitleBarBGColor = viewTitleBar.BackgroundColor;
DefaultTitleBarButtonsBGColor = viewTitleBar.ButtonBackgroundColor;
}
private void RadioButton_Checked(object sender, RoutedEventArgs e) {
// Bottom AppBar shows on Desktop and Mobile
if (ShowAppBarRadioButton != null) {
if (ShowAppBarRadioButton.IsChecked.HasValue &&
(ShowAppBarRadioButton.IsChecked.Value == true)) {
commandBar.Visibility = Windows.UI.Xaml.Visibility.Visible;
commandBar.Opacity = 1;
} else {
commandBar.Visibility = Windows.UI.Xaml.Visibility.Collapsed;
}
}
if (ShowOpaqueAppBarRadioButton != null) {
if (ShowOpaqueAppBarRadioButton.IsChecked.HasValue &&
(ShowOpaqueAppBarRadioButton.IsChecked.Value == true)){
commandBar.Visibility = Windows.UI.Xaml.Visibility.Visible;
commandBar.Background.Opacity = 0;
} else{
commandBar.Background.Opacity = 1;
}
}
}
private void StatusBarHiddenCheckBox_Checked(object sender, RoutedEventArgs e){
// StatusBar is Mobile only
if (Windows.Foundation.Metadata.ApiInformation.
IsTypePresent("Windows.UI.ViewManag ement.StatusBar")){
var ignore = Windows.UI.ViewManagement.StatusBar.GetForCurrentView().HideAsync();
}
}
private void StatusBarHiddenCheckBox_Unchecked(object sender, RoutedEventArgs e){
// StatusBar is Mobile only
if (Windows.Foundation.Metadata.ApiInformation.
IsTypePresent("Windows.UI.ViewManag ement.StatusBar")){
var ignore = Windows.UI.ViewManagement.StatusBar.GetForCurrentView().ShowAsync();
}
}
private void StatusBarBackgroundCheckBox_Checked(object sender, RoutedEventArgs e){
// StatusBar is Mobile only
if (Windows.Foundation.Metadata.ApiInformation.
IsTypePresent("Windows.UI.ViewManag ement.StatusBar")){
Windows.UI.ViewManagement.StatusBar.GetForCurrentView().
BackgroundColor = Windows.UI.Colors.Blue;
Windows.UI.ViewManagement.StatusBar.GetForCurrentView().
BackgroundOpacity = 1;
}
}
private void StatusBarBackgroundCheckBox_Unchecked(object sender, RoutedEventArgs e){
// StatusBar is Mobile only
if (Windows.Foundation.Metadata.ApiInformation.
IsTypePresent("Windows.UI.ViewManag ement.StatusBar")){
Windows.UI.ViewManagement.StatusBar.GetForCurrentView().
BackgroundOpacity = 0;
}
}
}
public class DeviceFamilyTrigger : StateTriggerBase{
//private variables
private string _deviceFamily;
//Public property
public string DeviceFamily {
get {
return _deviceFamily;
}
set{
_deviceFamily = value;
var qualifiers = Windows.ApplicationModel.Resources.Core.ResourceContext.
GetForCurrentView().Qua lifierValues;
if (qualifiers.ContainsKey("DeviceFamily"))
SetActive(qualifiers["DeviceFamily"] == _deviceFamily);
else
SetActive(false);
}
}
}
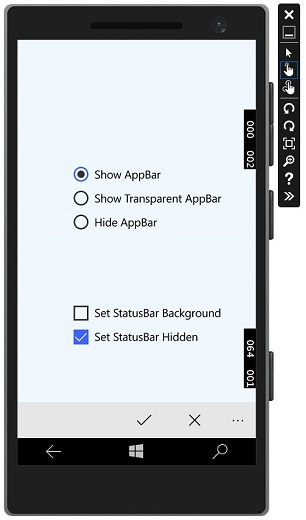
}위의 코드가 Mobile에서 컴파일되고 실행되면 다음과 같은 창이 나타납니다.
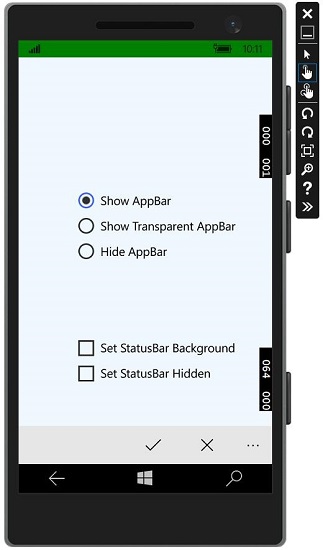
이미지와 같이 확인란을 사용하여 상태 표시 줄의 배경색을 변경할 수 있습니다.
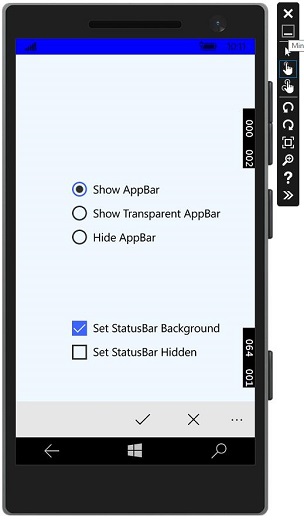
상태 표시 줄을 숨길 수도 있습니다.
이제 데스크톱 장치에서 동일한 애플리케이션을 실행하면 상태 표시 줄과 상태 표시 줄에 해당하는 확인란이 보이지 않는 다음 창이 표시됩니다.