Windows 10 개발-첫 번째 앱
이 장에서는 첫 번째 간단한 응용 프로그램을 만들 것입니다. "Hello world" Windows 10에서 XAML 및 C #을 사용하는 UWP (유니버설 Windows 플랫폼)에서. Visual Studio에서 만든 단일 UWP 응용 프로그램을 모든 Windows 10 장치에서 실행하고 실행할 수있는 방법을 보여줍니다.
아래 단계에 따라 앱 생성을 시작하겠습니다.
Visual Studio 2015를 시작합니다.
클릭 File 메뉴 및 선택 New > Project.
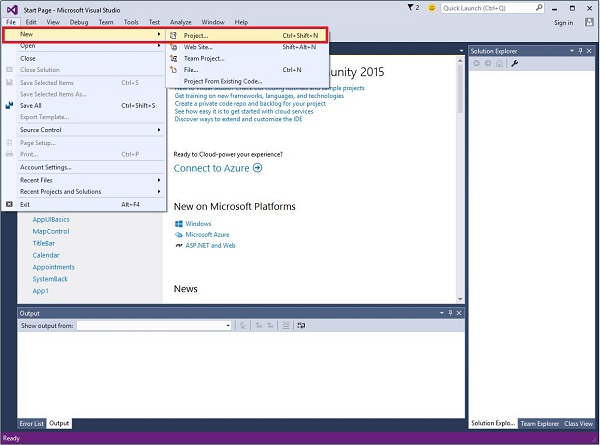
다음과 같은 New Project대화 창이 표시됩니다. 대화 상자의 왼쪽 창에서 다양한 유형의 템플릿을 볼 수 있습니다.
왼쪽 창에서 트리보기를 볼 수 있습니다. 고르다Universal template ...에서 Templates > Visual C# > Windows.
가운데 창에서 Blank App (Universal Windows) 주형
작성하여 프로젝트에 이름을 지정하십시오. UWPHelloWorld 에 Name field.
딸깍 하는 소리 OK 새 UWP 프로젝트를 만듭니다.
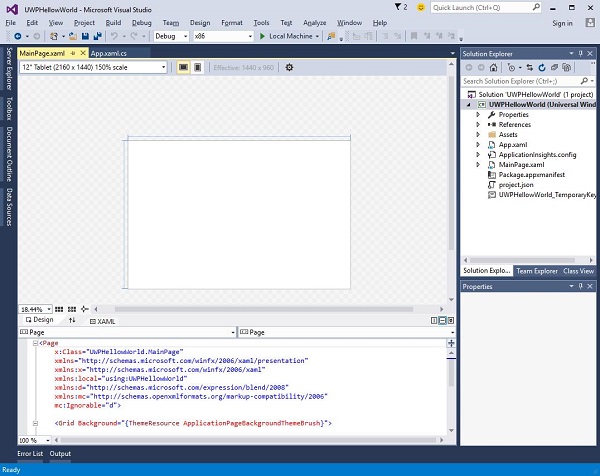
새로 생성 된 프로젝트는 Solution Explorer.
이것은 빈 앱이지만 UWP 애플리케이션의 최소 요구 사항 인 많은 파일을 포함합니다.
MainPage.xaml 과 MainPage.xaml.cs 애플리케이션을 실행할 때 실행됩니다.
기본적으로, MainPage.xaml 파일에는 다음 정보가 포함되어 있습니다.
<Page
   x:Class = ”UWPHellowWorld.MainPage”
   xmlns = ”http://schemas.microsoft.com/winfx/2006/xaml/presentation”
   xmlns:x = ”http://schemas.microsoft.com/winfx/2006/xaml”
   xmlns:local = ”using:UWPHellowWorld”
   xmlns:d = ”http://schemas.microsoft.com/expression/blend/2008”
   xmlns:mc = ”http://schemas.openxmlformats.org/markup-compatibility/2006”
   mc:Ignorable = ”d”>

   <Grid Background = ”{ThemeResource ApplicationPageBackgroundThemeBrush}”>
   </Grid>

</Page>
아래에 제공되는 기본 정보는 MainPage.xaml.cs.
using System;
using System.Collections.Generic;
using System.IO;
using System.Linq;
using System.Runtime.InteropServices.WindowsRuntime;

using Windows.Foundation;
using Windows.Foundation.Collections;

using Windows.UI.Xaml;
using Windows.UI.Xaml.Controls;
using Windows.UI.Xaml.Controls.Primitives;
using Windows.UI.Xaml.Data;
using Windows.UI.Xaml.Input;
using Windows.UI.Xaml.Media;
using Windows.UI.Xaml.Navigation;

// The Blank Page item template is documented at
   http://go.microsoft.com/fwlink/?LinkId=402352&clcid=0x409

namespace UWPHellowWorld {

   /// <summary>
      /// An empty page that can be used on its own or navigated to within a Frame.
   /// </summary>

   public sealed partial class MainPage : Page {
      public MainPage(){
         this.InitializeComponent();
      }
   }

}
아래 XAML 코드에 표시된대로 몇 가지 텍스트 블록, 텍스트 상자 및 단추를 추가해 보겠습니다.
<Page
   x:Class = ”UWPHellowWorld.MainPage”
   xmlns = ”http://schemas.microsoft.com/winfx/2006/xaml/presentation”
   xmlns:x = ”http://schemas.microsoft.com/winfx/2006/xaml”
   xmlns:local = ”using:UWPHellowWorld”
   xmlns:d = ”http://schemas.microsoft.com/expression/blend/2008”
   xmlns:mc = ”http://schemas.openxmlformats.org/markup-compatibility/2006”
   mc:Ignorable = ”d”>

   <Grid Background = ”{ThemeResource ApplicationPageBackgroundThemeBrush}”>

      <StackPanel HorizontalAlignment = ”Center”>
         <TextBlock Text = ”Hello, world!”  Margin = ”20”  Width = ”200”
            HorizontalAlignment = ”Left”/>

         <TextBlock Text = ”Write your name.” Margin = ”20” Width = ”200”
            HorizontalAlignment = ”Left”/>

         <TextBox x:Name = ”txtbox”  Width = ”280” Margin = ”20”
            HorizontalAlignment = ”Left”/>

         <Button x:Name = ”button” Content = ”Click Me” Margin = ”20”
            Click = ”button_Click”/>

         <TextBlock x:Name = ”txtblock” HorizontalAlignment = ”Left”
            Margin = ”20”/>
      </StackPanel>

   </Grid>

</Page>- 아래는 C #의 클릭 이벤트 버튼입니다.
using System;
using System.Collections.Generic;
using System.IO;
using System.Linq;
using System.Runtime.InteropServices.WindowsRuntime;
using Windows.Foundation;
using Windows.Foundation.Collections;
using Windows.UI.Xaml;
using Windows.UI.Xaml.Controls;
using Windows.UI.Xaml.Controls.Primitives;
using Windows.UI.Xaml.Data;
using Windows.UI.Xaml.Input;
using Windows.UI.Xaml.Media;
using Windows.UI.Xaml.Navigation;
// The Blank Page item template is documented at
http://go.microsoft.com/fwlink/?LinkId=402352&clcid=0x409
namespace UWPHellowWorld {
/// <summary>
/// An empty page that can be used on its own or navigated to within a Frame.
/// </summary>
public sealed partial class MainPage : Page {
public MainPage() {
this.InitializeComponent();
}
private void button_Click(object sender, RoutedEventArgs e) {
if (txtbox.Text != “”)
txtblock.Text = “Hello: “ + txtbox.Text;
else
txtblock.Text = “You have not write your name”;
}
}
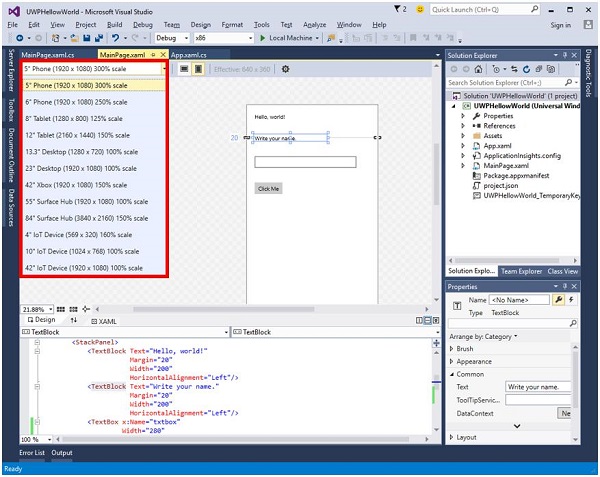
}UWP 프로젝트에서 device preview 옵션은 Design Window, 레이아웃을 쉽게 변경하여 애플리케이션을 대상으로하는 장치 제품군의 모든 장치 화면 크기에 맞출 수 있습니다.
로컬 머신, 시뮬레이터 또는 에뮬레이터 또는 원격 기기에서 앱을 실행하고 테스트 할 수 있습니다. 아래와 같이 다음 메뉴에서 대상 장치를 선택할 수 있습니다.
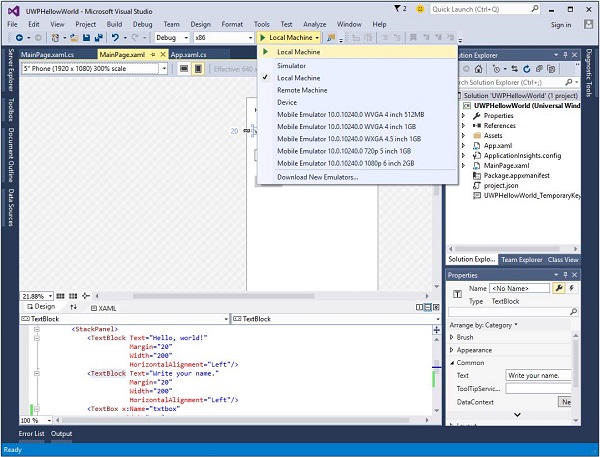
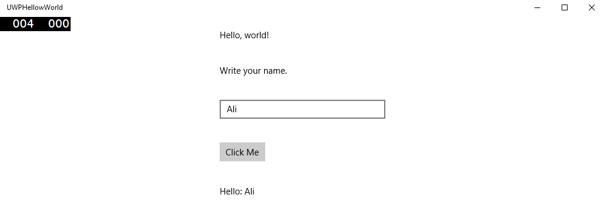
위의 코드를 로컬 컴퓨터에서 실행하면 다음 창이 표시됩니다. 이제 텍스트 상자에 이름을 입력하고 버튼을 클릭하십시오.Click Me.
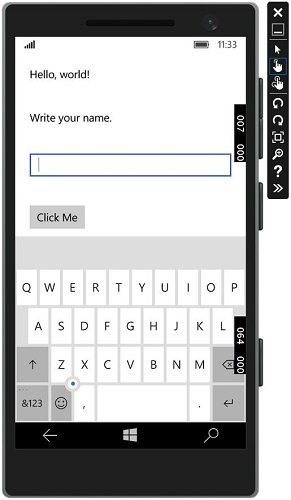
이제 에뮬레이터에서 앱을 테스트하려는 경우 메뉴에서 특정 에뮬레이터를 선택하고 애플리케이션을 실행할 수 있습니다. 다음 에뮬레이터가 표시됩니다.
위의 응용 프로그램을 다른 장치에서 실행하는 것이 좋습니다.