Windows 10 개발-서비스
이 장에서는 UWP 앱이 다른 UWP (유니버설 Windows 플랫폼) 응용 프로그램에 서비스를 제공하거나 지원하는 방법에 대해 알아 봅니다. 사실이 장은 장의 확장입니다.Background execution 그리고 그것의 특별한 경우입니다.
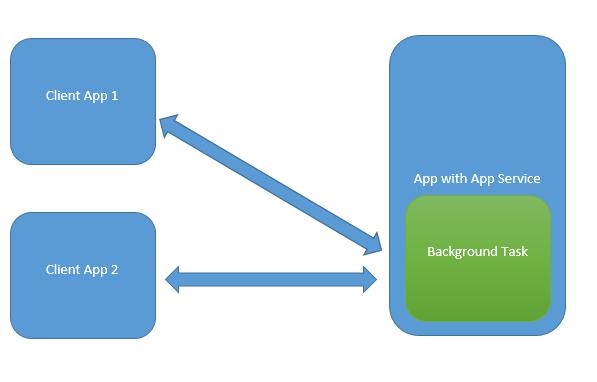
Windows 10에서 앱 서비스는 앱이 다른 앱에 서비스를 제공하는 방법 또는 메커니즘입니다.
앱 서비스는 백그라운드 작업의 형태로 작동합니다.
Foreground 앱은 다른 앱에서 앱 서비스를 호출하여 백그라운드에서 작업을 수행 할 수 있습니다.

앱 서비스는 웹 서비스와 비슷하지만 앱 서비스는 Windows 10 장치에서 사용됩니다.
UWP (유니버설 Windows 플랫폼) 애플리케이션은 다양한 방식으로 다른 UWP 애플리케이션과 상호 작용할 수 있습니다.
- LaunchUriAsync를 사용한 URI 연결
- LaunchFileAsync를 사용한 파일 연결
- LaunchUriForResultsAsync를 사용하여 결과 시작
- 앱 서비스
처음 세 가지 방법은 두 애플리케이션이 모두 포 그라운드 인 경우에 사용되지만 앱 서비스는 background task 이 경우 클라이언트 애플리케이션은 포 그라운드에 있어야하며 앱 서비스를 사용할 수 있어야합니다.
앱 서비스는 비 시각적 서비스가 제공되는 애플리케이션에서 매우 유용합니다. 예를 들어 전경 앱이 이미지를 가져와 바코드를 식별하기 위해 해당 바이트를 앱 서비스로 보내는 바코드 스캐너입니다.
이러한 모든 개념을 이해하기 위해 이름을 가진 새 UWP 프로젝트를 만들어 보겠습니다. AppServiceProvider Microsoft Visual Studio 2015에서.
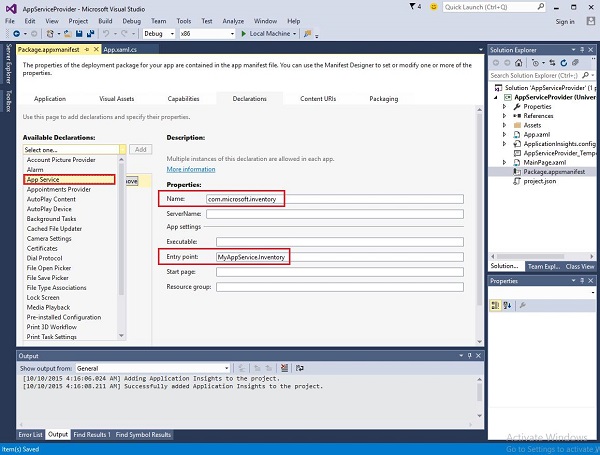
이제 Package.appmenifest 파일에 다음 정보를 추가하십시오.

포 그라운드 애플리케이션에서 호출 할 수있는 앱 서비스를 생성하기 위해 새로운 Windows Runtime 솔루션에 대한 구성 요소 프로젝트 MyAppService 앱 서비스가 백그라운드 작업으로 구현되기 때문입니다.
에 대한 참조 추가 MyAppService 프로젝트 AppServiceProvider 계획.
이제 삭제 class1.cs 파일에서 MyAppService 프로젝트를 수행하고 인벤토리 이름이있는 새 클래스를 추가하면 IBackgrounTask 상호 작용.
그만큼 IBackgrounTask 인터페이스에는 하나의 방법 만 있습니다. “Run” 백그라운드 작업을 위해 구현되어야합니다.
public sealed class Inventory : IBackgroundTask {
   public void Run(IBackgroundTaskInstance taskInstance) {

   }
}
백그라운드 작업이 생성되면 Run() method이 호출되고 Run 메서드가 완료되면 백그라운드 작업이 종료됩니다. 백그라운드 작업을 유지하고 요청을 처리하기 위해 코드가 지연됩니다.
앱 서비스 코드는 OnRequestedReceived(). 이 예에서 인벤토리 항목에 대한 인덱스는 지정된 인벤토리 항목의 이름과 가격을 검색하기 위해 서비스에 전달됩니다.
private async void OnRequestReceived(AppServiceConnection sender,
   AppServiceRequestReceivedEventArgs args) {
      // Get a deferral because we use an awaitable API below to respond to the message
}
다음은 C #에서 인벤토리 클래스의 전체 구현입니다.
using System;
using System.Collections.Generic;
using System.Linq;
using System.Text;
using System.Threading.Tasks;

using Windows.ApplicationModel.AppService;
using Windows.ApplicationModel.Background;
using Windows.Foundation.Collections;

namespace MyAppService{
   public sealed class Inventory : IBackgroundTask {

      private BackgroundTaskDeferral backgroundTaskDeferral;
      private AppServiceConnection appServiceconnection;

      private String[] inventoryItems = new string[] { "Robot vacuum", "Chair" };
      private double[] inventoryPrices = new double[] { 129.99, 88.99 };

      public void Run(IBackgroundTaskInstance taskInstance) {
         this.backgroundTaskDeferral = taskInstance.GetDeferral();
         taskInstance.Canceled += OnTaskCanceled;
         var details = taskInstance.TriggerDetails as AppServiceTriggerDetails;

         appServiceconnection = details.AppServiceConnection;
         appServiceconnection.RequestReceived += OnRequestReceived;
      }

      private async void OnRequestReceived(AppServiceConnection sender,
         AppServiceRequestReceivedEventArgs args) {

            var messageDeferral = args.GetDeferral();
            ValueSet message = args.Request.Message;
            ValueSet returnData = new ValueSet();

            string command = message["Command"] as string;
            int? inventoryIndex = message["ID"] as int?;
            if (inventoryIndex.HasValue &&

            inventoryIndex.Value >= 0 &&
            inventoryIndex.Value < inventoryItems.GetLength(0)) {

               switch (command) {

                  case "Price": {
                     returnData.Add("Result", inventoryPrices[inventoryIndex.Value]);
                     returnData.Add("Status", "OK");
                     break;
                  }

                  case "Item": {
                     returnData.Add("Result", inventoryItems[inventoryIndex.Value]);
                     returnData.Add("Status", "OK");
                     break;
                  }

                  default: {
                     returnData.Add("Status", "Fail: unknown command");
                     break;
                  }
               } else {
                  returnData.Add("Status", "Fail: Index out of range");
               }
            }
            await args.Request.SendResponseAsync(returnData);
            messageDeferral.Complete();
      }

      private void OnTaskCanceled(IBackgroundTaskInstance sender,
         BackgroundTaskCancellationReason reason){
            if (this.backgroundTaskDeferral != null) {
               // Complete the service deferral.
               this.backgroundTaskDeferral.Complete();
            }
      }
   }
}
새 빈 UWP 프로젝트를 추가하여 클라이언트 앱을 만들어 보겠습니다. ClientApp XAML 파일에서 아래와 같이 버튼 1 개, 텍스트 상자 1 개 및 텍스트 블록 2 개를 추가합니다.
<Page
   x:Class = "ClientApp.MainPage"
   xmlns = "http://schemas.microsoft.com/winfx/2006/xaml/presentation"
   xmlns:x = "http://schemas.microsoft.com/winfx/2006/xaml"
   xmlns:local = "using:ClientApp"
   xmlns:d = "http://schemas.microsoft.com/expression/blend/2008"
   xmlns:mc = "http://schemas.openxmlformats.org/markup-compatibility/2006"
   mc:Ignorable = "d">

   <Grid Background = "{ThemeResource ApplicationPageBackgroundThemeBrush}">
      <TextBlock HorizontalAlignment = "Left" Text = "Enter Item No."
         Margin = "52,40,0,0" TextWrapping = "Wrap"
         VerticalAlignment = "Top" Height = "32" Width = "268"/>

      <Button x:Name = "button" Content = "Get Info" HorizontalAlignment = "Left"
         Margin = "255,96,0,0" VerticalAlignment = "Top" Click = "button_Click"/>

      <TextBox x:Name = "textBox" HorizontalAlignment = "Left" Margin = "52,96,0,0"
         TextWrapping = "Wrap" VerticalAlignment = "Top" Width = "168"/>

      <TextBlock x:Name = "textBlock" HorizontalAlignment = "Left"
         Margin = "52,190,0,0" TextWrapping = "Wrap"
         VerticalAlignment = "Top" Height = "32" Width = "268"/>
   </Grid>

</Page>
다음은 앱 서비스가 요청되는 버튼 클릭 이벤트 구현입니다.
using System;

using Windows.ApplicationModel.AppService;
using Windows.Foundation.Collections;

using Windows.UI.Xaml;
using Windows.UI.Xaml.Controls;

// The Blank Page item template is documented at
   http://go.microsoft.com/fwlink/?LinkId=402352&clcid=0x409

namespace ClientApp {

   /// <summary>
      /// An empty page that can be used on its own or navigated to within a Frame.
   /// </summary>

   public sealed partial class MainPage : Page {

      private AppServiceConnection inventoryService;

      public MainPage() {
         this.InitializeComponent();
      }

      private async void button_Click(object sender, RoutedEventArgs e){

         // Add the connection.
         if (this.inventoryService == null) {

            this.inventoryService = new AppServiceConnection();
            this.inventoryService.AppServiceName = "com.microsoft.inventory";
            this.inventoryService.PackageFamilyName =
               "bb1a8478-8005-46869923-e525ceaa26fc_4sz2ag3dcq60a";

            var status = await this.inventoryService.OpenAsync();

            if (status != AppServiceConnectionStatus.Success) {
               button.Content = "Failed to connect";
               return;
            }
         }

         // Call the service.
         int idx = int.Parse(textBox.Text);
         var message = new ValueSet();

         message.Add("Command", "Item");
         message.Add("ID", idx);

         AppServiceResponse response = await
            this.inventoryService.SendMessageAsync(message);
         string result = "";

         if (response.Status == AppServiceResponseStatus.Success) {
            // Get the data  that the service sent  to us.
            if (response.Message["Status"] as string == "OK") {
               result = response.Message["Result"] as string;
            }
         }

         message.Clear();
         message.Add("Command", "Price");
         message.Add("ID", idx);

         response = await this.inventoryService.SendMessageAsync(message);

         if (response.Status == AppServiceResponseStatus.Success){
            // Get the data that the service sent to us.
            if (response.Message["Status"] as string == "OK") {
               result += " : Price = " + "$"+ response.Message["Result"] as string;
            }
         }

         textBlock.Text = result;
      }
   }
}
이 응용 프로그램을 실행하려면 다음을 설정해야합니다. ClientApp 프로젝트를 솔루션 탐색기에서 시작 프로젝트로 설정하고 다음에서이 솔루션을 배포합니다. Build > Deploy 해결책.

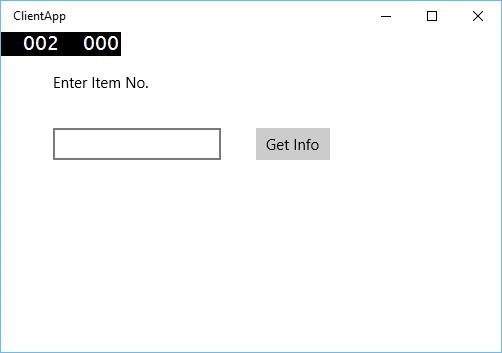
위의 코드를 컴파일하고 실행하면 다음과 같은 창이 나타납니다. 앱 서비스에서 방금 두 항목의 정보를 추가했습니다. 따라서 0 또는 1을 입력하여 해당 항목에 대한 정보를 얻을 수 있습니다.

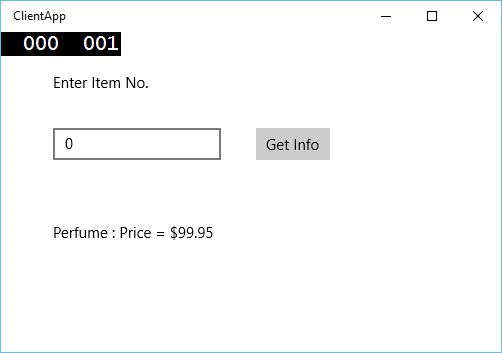
0을 입력하고 버튼을 클릭하면 백그라운드 작업으로 앱 서비스가 실행되고 textblock.