Flex - Điều khiển tùy chỉnh
Flex cung cấp hai cách để tạo các thành phần tùy chỉnh.
- Sử dụng ActionScript
- Sử dụng MXML
Sử dụng ActionScript
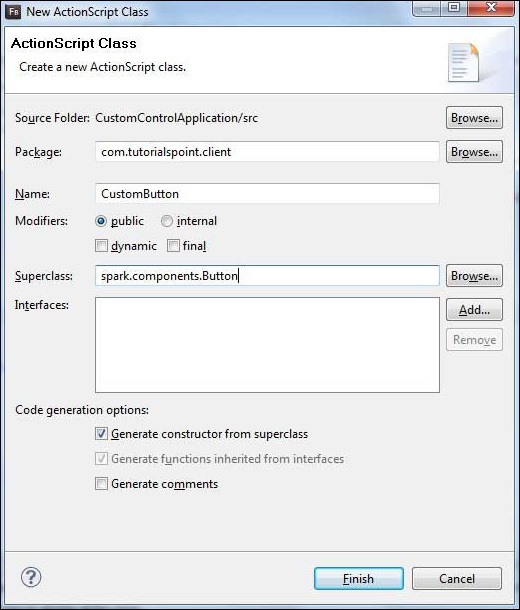
Bạn có thể tạo một thành phần bằng cách mở rộng thành phần hiện có. Để tạo một thành phần bằng Flash Builder, hãy nhấp vàoFile > New > ActionScript Class.
Nhập thông tin chi tiết như hình dưới đây -

Flash Builder sẽ tạo tệp CustomButton.as sau.
package com.tutorialspoint.client {
   import spark.components.Button;

   public class CustomButton extends Button {
      public function CustomButton() {
         super();
      }
   }
}
Sử dụng MXML
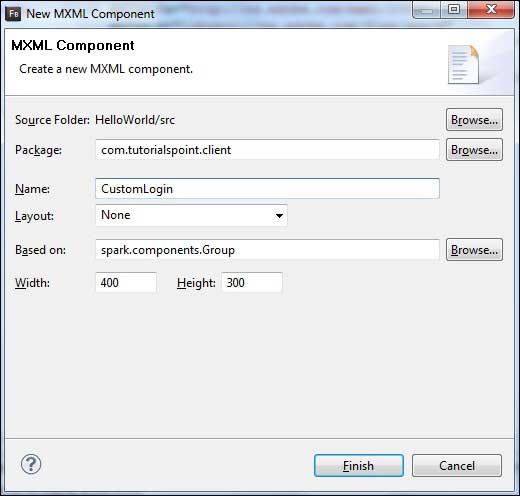
Bạn có thể tạo một thành phần bằng cách mở rộng thành phần hiện có. Để tạo một thành phần bằng Flash Builder, hãy nhấp vàoFile > New > MXML Component.
Nhập thông tin chi tiết như hình dưới đây.

Flash Builder sẽ tạo tệp CustomLogin.mxml sau.
<?xml version = "1.0" encoding = "utf-8"?>
<s:Group xmlns:fx = "http://ns.adobe.com/mxml/2009"
   xmlns:s = "library://ns.adobe.com/flex/spark"
   xmlns:mx = "library://ns.adobe.com/flex/mx"
   width = "400" height = "300">
</s:Group>
Hãy để chúng tôi làm theo các bước sau để kiểm tra các điều khiển tùy chỉnh trong ứng dụng Flex -
| Bươc | Sự miêu tả |
|---|---|
| 1 | Tạo một dự án với tên HelloWorld trong một gói com.tutorialspoint.client như được giải thích trong chương Flex - Create Application . |
| 2 | Sửa đổi HelloWorld.mxml như được giải thích bên dưới. Giữ phần còn lại của các tệp không thay đổi. |
| 3 | Tạo thành phần CustomLogin.mxml và CustomButton.as như đã giải thích ở trên. Sửa đổi các tệp này như được giải thích bên dưới. Giữ phần còn lại của các tệp không thay đổi. |
| 4 | Biên dịch và chạy ứng dụng để đảm bảo logic nghiệp vụ đang hoạt động theo yêu cầu. |
Sau đây là nội dung của tệp mxml đã sửa đổi src/com.tutorialspoint/client/CustomLogin.mxml.
<?xml version = "1.0" encoding = "utf-8"?>
<s:Group xmlns:fx = "http://ns.adobe.com/mxml/2009"
   xmlns:s = "library://ns.adobe.com/flex/spark"
   xmlns:mx = "library://ns.adobe.com/flex/mx" width = "400" height = "300">

   <s:Form>
      <s:FormItem label = "UserName:">
         <s:TextInput width = "200" />
      </s:FormItem>

      <s:FormItem label = "Password:">
         <s:TextInput width = "200" displayAsPassword = "true" />
      </s:FormItem>

      <s:FormItem>
         <s:Button label = "Login" />
      </s:FormItem>
   </s:Form>
</s:Group>
Sau đây là nội dung của tệp mxml đã sửa đổi src/com.tutorialspoint/client/CustomButton.as.
package com.tutorialspoint.client {
   import spark.components.Button;

   public class CustomButton extends Button {

      public function CustomButton() {
         super();
         this.setStyle("color","green");
         this.label = "Submit";
      }
   }
}
Sau đây là nội dung của tệp mxml đã sửa đổi src/com.tutorialspoint/client/HelloWorld.mxml.
<?xml version = "1.0" encoding = "utf-8"?>
<s:Application xmlns:fx = "http://ns.adobe.com/mxml/2009"
   xmlns:s = "library://ns.adobe.com/flex/spark"
   xmlns:mx = "library://ns.adobe.com/flex/mx"
   xmlns:client = "com.tutorialspoint.client.*"
   initialize = "application_initializeHandler(event)">

   <fx:Style source = "/com/tutorialspoint/client/Style.css" />
   <fx:Script>
      <![CDATA[
        import mx.events.FlexEvent;

        protected function application_initializeHandler(event:FlexEvent):void {
           //create a new custom button
           var customButton: CustomButton = new CustomButton();
           asPanel.addElement(customButton);
        }

      ]]>
   </fx:Script>

   <s:BorderContainer width = "630" height = "480" id = "mainContainer"
      styleName = "container">
      <s:VGroup width = "100%" height = "100%" gap = "10"
         horizontalAlign = "center" verticalAlign = "middle">
         <s:Label id = "lblHeader" text = "Custom Controls Demonstration"
            fontSize = "40" color = "0x777777" styleName = "heading" />

         <s:Panel title = "Using MXML Component" width = "400" height = "200">
            <client:CustomLogin>
            </client:CustomLogin>
         </s:Panel>

         <s:Panel  title = "Using AS Component" width = "400" height = "100">
            <s:VGroup id = "asPanel" width = "100%" height = "100%" gap = "10"
               horizontalAlign = "center" verticalAlign = "middle">
            </s:VGroup>
         </s:Panel>
      </s:VGroup>
   </s:BorderContainer>
</s:Application>
Khi bạn đã sẵn sàng với tất cả các thay đổi được thực hiện, hãy để chúng tôi biên dịch và chạy ứng dụng ở chế độ bình thường như chúng tôi đã làm trong chương Flex - Create Application . Nếu mọi thứ đều ổn với ứng dụng của bạn, ứng dụng sẽ cho kết quả sau: [ Dùng thử trực tuyến ]
