フラッター-アニメーション
アニメーションは、どのモバイルアプリケーションでも複雑な手順です。その複雑さにもかかわらず、アニメーションはユーザーエクスペリエンスを新しいレベルに高め、豊富なユーザーインタラクションを提供します。その豊かさのために、アニメーションは現代のモバイルアプリケーションの不可欠な部分になります。Flutterフレームワークは、アニメーションの重要性を認識し、あらゆるタイプのアニメーションを開発するためのシンプルで直感的なフレームワークを提供します。
前書き
アニメーションは、一連の画像/画像を特定の期間内に特定の順序で表示して、動きの錯覚を与えるプロセスです。アニメーションの最も重要な側面は次のとおりです-
アニメーションには、開始値と終了値の2つの異なる値があります。アニメーションは開始値から始まり、一連の中間値を通過し、最後に終了値で終了します。たとえば、ウィジェットをアニメーション化してフェードアウトさせる場合、初期値は完全な不透明度になり、最終値はゼロの不透明度になります。
中間値は、本質的に線形または非線形(曲線)であり、構成することができます。アニメーションが構成どおりに機能することを理解します。各構成は、アニメーションに異なる感触を提供します。たとえば、ウィジェットのフェードは本質的に線形になりますが、ボールのバウンスは本質的に非線形になります。
アニメーションプロセスの期間は、アニメーションの速度(遅さまたは速さ)に影響します。
アニメーションの開始、アニメーションの停止、アニメーションを繰り返して設定回数にする、アニメーションのプロセスを逆にするなど、アニメーションプロセスを制御する機能。
Flutterでは、アニメーションシステムは実際のアニメーションを実行しません。代わりに、画像をレンダリングするためにすべてのフレームで必要な値のみを提供します。
アニメーションベースのクラス
フラッターアニメーションシステムは、アニメーションオブジェクトに基づいています。コアアニメーションクラスとその使用法は次のとおりです-
アニメーション
特定の期間にわたって2つの数値の間で補間された値を生成します。最も一般的なアニメーションクラスは次のとおりです。
Animation<double> −2つの10進数の間の値を補間します
Animation<Color> −2つの色の間で色を補間する
Animation<Size> −2つのサイズの間でサイズを補間する
AnimationController−アニメーション自体を制御するための特別なアニメーションオブジェクト。アプリケーションが新しいフレームの準備ができるたびに、新しい値を生成します。線形ベースのアニメーションをサポートし、値は0.0から1.0で始まります
controller = AnimationController(duration: const Duration(seconds: 2), vsync: this);ここで、コントローラーはアニメーションを制御し、期間オプションはアニメーションプロセスの期間を制御します。vsyncは、アニメーションで使用されるリソースを最適化するために使用される特別なオプションです。
CurvedAnimation
AnimationControllerに似ていますが、非線形アニメーションをサポートします。CurvedAnimationは、以下のようにAnimationオブジェクトと一緒に使用できます-
controller = AnimationController(duration: const Duration(seconds: 2), vsync: this);
animation = CurvedAnimation(parent: controller, curve: Curves.easeIn)
トゥイーン<T>
Animatable <T>から派生し、0と1以外の任意の2つの数値の間の数値を生成するために使用されます。animateメソッドを使用して実際のAnimationオブジェクトを渡すことにより、Animationオブジェクトと一緒に使用できます。
AnimationController controller = AnimationController(
   duration: const Duration(milliseconds: 1000),
vsync: this); Animation<int> customTween = IntTween(
   begin: 0, end: 255).animate(controller);
Tweenは、以下のようにCurvedAnimationと一緒に使用することもできます-
AnimationController controller = AnimationController(
   duration: const Duration(milliseconds: 500), vsync: this);
final Animation curve = CurvedAnimation(parent: controller, curve: Curves.easeOut);
Animation<int> customTween = IntTween(begin: 0, end: 255).animate(curve);
ここで、コントローラーは実際のアニメーションコントローラーです。曲線は非線形性のタイプを提供し、customTweenは0から255までのカスタム範囲を提供します。
Flutterアニメーションのワークフロー
アニメーションのワークフローは以下の通りです−
StatefulWidgetのinitStateでアニメーションコントローラーを定義して開始します。
AnimationController(duration: const Duration(seconds: 2), vsync: this);
animation = Tween<double>(begin: 0, end: 300).animate(controller);
controller.forward();
アニメーションベースのリスナー、addListenerを追加して、ウィジェットの状態を変更します。
animation = Tween<double>(begin: 0, end: 300).animate(controller) ..addListener(() {
   setState(() {
      // The state that has changed here is the animation object’s value.
   });
});
組み込みウィジェット、AnimatedWidgetおよびAnimatedBuilderを使用して、このプロセスをスキップできます。どちらのウィジェットもAnimationオブジェクトを受け入れ、アニメーションに必要な現在の値を取得します。
ウィジェットのビルドプロセス中にアニメーション値を取得し、元の値の代わりに幅、高さ、または関連するプロパティに適用します。
child: Container(
   height: animation.value,
   width: animation.value,
   child: <Widget>,
)
実用的なアプリケーション
Flutterフレームワークのアニメーションの概念を理解するために、簡単なアニメーションベースのアプリケーションを作成しましょう。
AndroidStudioで新しいFlutterアプリケーションproduct_animation_appを作成します。
アセットフォルダーをproduct_nav_appからproduct_animation_appにコピーし、pubspec.yamlファイル内にアセットを追加します。
flutter:
   assets:
   - assets/appimages/floppy.png
   - assets/appimages/iphone.png
   - assets/appimages/laptop.png
   - assets/appimages/pendrive.png
   - assets/appimages/pixel.png
   - assets/appimages/tablet.png
デフォルトのスタートアップコード(main.dart)を削除します。
インポートと基本的なメイン機能を追加します。
import 'package:flutter/material.dart';
void main() => runApp(MyApp());
StatefulWidgtetから派生したMyAppウィジェットを作成します。
class MyApp extends StatefulWidget {
   _MyAppState createState() => _MyAppState();
}
デフォルトのビルドメソッドに加えて、_MyAppStateウィジェットを作成し、initStateを実装して破棄します。
class _MyAppState extends State<MyApp> with SingleTickerProviderStateMixin {
   Animation<double> animation;
   AnimationController controller;
   @override void initState() {
      super.initState();
      controller = AnimationController(
         duration: const Duration(seconds: 10), vsync: this
      );
      animation = Tween<double>(begin: 0.0, end: 1.0).animate(controller);
      controller.forward();
   }
   // This widget is the root of your application.
   @override
   Widget build(BuildContext context) {
      controller.forward();
      return MaterialApp(
         title: 'Flutter Demo',
         theme: ThemeData(primarySwatch: Colors.blue,),
         home: MyHomePage(title: 'Product layout demo home page', animation: animation,)
      );
   }
   @override
   void dispose() {
      controller.dispose();
      super.dispose();
   }
}
ここに、
initStateメソッドでは、アニメーションコントローラーオブジェクト(コントローラー)、アニメーションオブジェクト(アニメーション)を作成し、controller.forwardを使用してアニメーションを開始しました。
disposeメソッドでは、アニメーションコントローラーオブジェクト(コントローラー)を破棄しました。
buildメソッドで、コンストラクターを介してアニメーションをMyHomePageウィジェットに送信します。これで、MyHomePageウィジェットはアニメーションオブジェクトを使用してそのコンテンツをアニメーション化できます。
次に、ProductBoxウィジェットを追加します
class ProductBox extends StatelessWidget {
   ProductBox({Key key, this.name, this.description, this.price, this.image})
      : super(key: key);
   final String name;
   final String description;
   final int price;
   final String image;

   Widget build(BuildContext context) {
      return Container(
         padding: EdgeInsets.all(2),
         height: 140,
         child: Card(
            child: Row(
               mainAxisAlignment: MainAxisAlignment.spaceEvenly,
               children: <Widget>[
                  Image.asset("assets/appimages/" + image),
                  Expanded(
                     child: Container(
                        padding: EdgeInsets.all(5),
                        child: Column(
                           mainAxisAlignment: MainAxisAlignment.spaceEvenly,
                           children: <Widget>[
                              Text(this.name, style:
                                 TextStyle(fontWeight: FontWeight.bold)),
                              Text(this.description),
                                 Text("Price: " + this.price.toString()),
                           ],
                        )
                     )
                  )
               ]
            )
         )
      );
   }
}
新しいウィジェットMyAnimatedWidgetを作成して、不透明度を使用して単純なフェードアニメーションを実行します。
class MyAnimatedWidget extends StatelessWidget {
   MyAnimatedWidget({this.child, this.animation});

   final Widget child;
   final Animation<double> animation;

   Widget build(BuildContext context) => Center(
   child: AnimatedBuilder(
      animation: animation,
      builder: (context, child) => Container(
         child: Opacity(opacity: animation.value, child: child),
      ),
      child: child),
   );
}
ここでは、AniatedBuilderを使用してアニメーションを作成しました。AnimatedBuilderは、アニメーションを実行しながらコンテンツを作成するウィジェットです。アニメーションオブジェクトを受け入れて、現在のアニメーション値を取得します。アニメーション値animation.valueを使用して、子ウィジェットの不透明度を設定しました。事実上、ウィジェットは不透明度の概念を使用して子ウィジェットをアニメーション化します。
最後に、MyHomePageウィジェットを作成し、アニメーションオブジェクトを使用してそのコンテンツをアニメーション化します。
class MyHomePage extends StatelessWidget {
MyHomePage({Key key, this.title, this.animation}) : super(key: key);
final String title;
final Animation<double>
animation;
@override
Widget build(BuildContext context) {
return Scaffold(
appBar: AppBar(title: Text("Product Listing")),body: ListView(
shrinkWrap: true,
padding: const EdgeInsets.fromLTRB(2.0, 10.0, 2.0, 10.0),
children: <Widget>[
FadeTransition(
child: ProductBox(
name: "iPhone",
description: "iPhone is the stylist phone ever",
price: 1000,
image: "iphone.png"
), opacity: animation
),
MyAnimatedWidget(child: ProductBox(
name: "Pixel",
description: "Pixel is the most featureful phone ever",
price: 800,
image: "pixel.png"
), animation: animation),
ProductBox(
name: "Laptop",
description: "Laptop is most productive development tool",
price: 2000,
image: "laptop.png"
),
ProductBox(
name: "Tablet",
description: "Tablet is the most useful device ever for meeting",
price: 1500,
image: "tablet.png"
),
ProductBox(
name: "Pendrive",
description: "Pendrive is useful storage medium",
price: 100,
image: "pendrive.png"
),
ProductBox(
name: "Floppy Drive",
description: "Floppy drive is useful rescue storage medium",
price: 20,
image: "floppy.png"
),
],
)
);
}
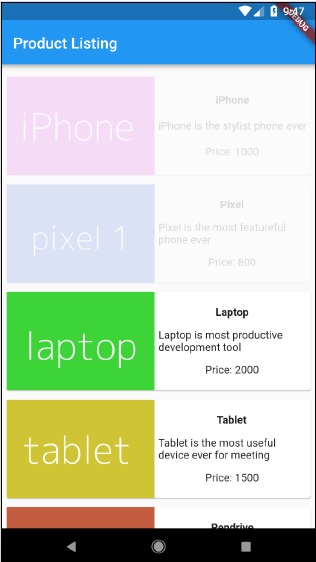
}ここでは、FadeAnimationとMyAnimationWidgetを使用して、リストの最初の2つのアイテムをアニメーション化しました。FadeAnimationは組み込みのアニメーションクラスであり、不透明度の概念を使用して子をアニメーション化するために使用しました。
完全なコードは次のとおりです-
import 'package:flutter/material.dart';
void main() => runApp(MyApp());

class MyApp extends StatefulWidget {
   _MyAppState createState() => _MyAppState();
}
class _MyAppState extends State<MyApp> with SingleTickerProviderStateMixin {
   Animation<double> animation;
   AnimationController controller;

   @override
   void initState() {
      super.initState();
      controller = AnimationController(
         duration: const Duration(seconds: 10), vsync: this);
      animation = Tween<double>(begin: 0.0, end: 1.0).animate(controller);
      controller.forward();
   }
   // This widget is the root of your application.
   @override
   Widget build(BuildContext context) {
      controller.forward();
      return MaterialApp(
         title: 'Flutter Demo', theme: ThemeData(primarySwatch: Colors.blue,),
         home: MyHomePage(title: 'Product layout demo home page', animation: animation,)
      );
   }
   @override
   void dispose() {
      controller.dispose();
      super.dispose();
   }
}
class MyHomePage extends StatelessWidget {
   MyHomePage({Key key, this.title, this.animation}): super(key: key);
   final String title;
   final Animation<double> animation;

   @override
   Widget build(BuildContext context) {
      return Scaffold(
         appBar: AppBar(title: Text("Product Listing")),
         body: ListView(
            shrinkWrap: true,
            padding: const EdgeInsets.fromLTRB(2.0, 10.0, 2.0, 10.0),
            children: <Widget>[
               FadeTransition(
                  child: ProductBox(
                     name: "iPhone",
                     description: "iPhone is the stylist phone ever",
                     price: 1000,
                     image: "iphone.png"
                  ),
                  opacity: animation
               ),
               MyAnimatedWidget(
                  child: ProductBox(
                     name: "Pixel",
                     description: "Pixel is the most featureful phone ever",
                     price: 800,
                     image: "pixel.png"
                  ),
                  animation: animation
               ),
               ProductBox(
                  name: "Laptop",
                  description: "Laptop is most productive development tool",
                  price: 2000,
                  image: "laptop.png"
               ),
               ProductBox(
                  name: "Tablet",
                  description: "Tablet is the most useful device ever for meeting",
                  price: 1500,
                  image: "tablet.png"
               ),
               ProductBox(
                  name: "Pendrive",
                  description: "Pendrive is useful storage medium",
                  price: 100,
                  image: "pendrive.png"
               ),
               ProductBox(
                  name: "Floppy Drive",
                  description: "Floppy drive is useful rescue storage medium",
                  price: 20,
                  image: "floppy.png"
               ),
            ],
         )
      );
   }
}
class ProductBox extends StatelessWidget {
   ProductBox({Key key, this.name, this.description, this.price, this.image}) :
      super(key: key);
   final String name;
   final String description;
   final int price;
   final String image;
   Widget build(BuildContext context) {
      return Container(
         padding: EdgeInsets.all(2),
         height: 140,
         child: Card(
            child: Row(
               mainAxisAlignment: MainAxisAlignment.spaceEvenly,
               children: <Widget>[
                  Image.asset("assets/appimages/" + image),
                  Expanded(
                     child: Container(
                        padding: EdgeInsets.all(5),
                        child: Column(
                           mainAxisAlignment: MainAxisAlignment.spaceEvenly,
                           children: <Widget>[
                              Text(
                                 this.name, style: TextStyle(
                                    fontWeight: FontWeight.bold
                                 )
                              ),
                              Text(this.description), Text(
                                 "Price: " + this.price.toString()
                              ),
                           ],
                        )
                     )
                  )
               ]
            )
         )
      );
   }
}
class MyAnimatedWidget extends StatelessWidget {
   MyAnimatedWidget({this.child, this.animation});
   final Widget child;
   final Animation<double> animation;

   Widget build(BuildContext context) => Center(
      child: AnimatedBuilder(
         animation: animation,
         builder: (context, child) => Container(
            child: Opacity(opacity: animation.value, child: child),
         ),
         child: child
      ),
   );
}
アプリケーションをコンパイルして実行し、結果を確認します。アプリケーションの初期バージョンと最終バージョンは次のとおりです-