フラッター-状態管理
アプリケーションの状態を管理することは、アプリケーションのライフサイクルにおいて最も重要で必要なプロセスの1つです。
簡単なショッピングカートアプリケーションについて考えてみましょう。
ユーザーは、自分の資格情報を使用してアプリケーションにログインします。
ユーザーがログインすると、アプリケーションはログインしたユーザーの詳細をすべての画面に保持する必要があります。
この場合も、ユーザーが商品を選択してカートに保存すると、ユーザーがカートをチェックアウトするまで、カート情報はページ間で保持されます。
任意のインスタンスでのユーザーとそのカート情報は、そのインスタンスでのアプリケーションの状態と呼ばれます。
状態管理は、特定の状態がアプリケーションで持続する期間に基づいて2つのカテゴリに分類できます。
Ephemeral−アニメーションの現在の状態のように数秒間続くか、製品の現在の評価のように1ページ続きます。FlutterはStatefulWidgetを介してそれをサポートします。
app state −ログインしたユーザーの詳細、カート情報など、アプリケーション全体で最後に、Flutterはscoped_modelを介してサポートします。
ナビゲーションとルーティング
どのアプリケーションでも、あるページ/画面から別のページに移動すると、アプリケーションのワークフローが定義されます。アプリケーションのナビゲーションが処理される方法は、ルーティングと呼ばれます。Flutterは、アプリケーションのワークフローを定義するために、基本的なルーティングクラスであるMaterialPageRouteと2つのメソッドであるNavigator.pushとNavigator.popを提供します。
MaterialPageRoute
MaterialPageRouteは、画面全体をプラットフォーム固有のアニメーションに置き換えることでUIをレンダリングするために使用されるウィジェットです。
MaterialPageRoute(builder: (context) => Widget())ここで、ビルダーは、アプリケーションの現在のコンテキストを提供することにより、コンテンツをビルドする関数を受け入れます。
Navigation.push
Navigation.pushは、MaterialPageRouteウィジェットを使用して新しい画面に移動するために使用されます。
Navigator.push( context, MaterialPageRoute(builder: (context) => Widget()), );Navigation.pop
Navigation.popは、前の画面に移動するために使用されます。
Navigator.push(context);ナビゲーションの概念をよりよく理解するために、新しいアプリケーションを作成しましょう。
AndroidStudioで新しいFlutterアプリケーションproduct_nav_appを作成します
アセットフォルダーをproduct_nav_appからproduct_state_appにコピーし、pubspec.yamlファイル内にアセットを追加します。
flutter:
   assets:
   - assets/appimages/floppy.png
   - assets/appimages/iphone.png
   - assets/appimages/laptop.png
   - assets/appimages/pendrive.png
   - assets/appimages/pixel.png
   - assets/appimages/tablet.png
デフォルトのスタートアップコード(main.dart)をスタートアップコードに置き換えます。
import 'package:flutter/material.dart';
void main() => runApp(MyApp());

class MyApp extends StatelessWidget {
   // This widget is the root of your application.
   @override
   Widget build(BuildContext context) {
      return MaterialApp(
         title: 'Flutter Demo',
         theme: ThemeData(
            primarySwatch: Colors.blue,
         ),
         home: MyHomePage(
            title: 'Product state demo home page'
         ),
      );
   }
}
class MyHomePage extends StatelessWidget {
   MyHomePage({Key key, this.title}) : super(key: key);
   final String title;
   @override
   Widget build(BuildContext context) {
      return Scaffold(
         appBar: AppBar(
            title: Text(this.title),
         ),
         body: Center(
            child: Text('Hello World',)
         ),
      );
   }
}
製品情報を整理するためのProductクラスを作成しましょう。
class Product {
   final String name;
   final String description;
   final int price;
   final String image;
   Product(this.name, this.description, this.price, this.image);
}
ProductクラスにメソッドgetProductsを記述して、ダミーの製品レコードを生成しましょう。
static List<Product> getProducts() {
   List<Product> items = <Product>[];

   items.add(
      Product(
         "Pixel",
         "Pixel is the most feature-full phone ever", 800,
         "pixel.png"
      )
   );
   items.add(
      Product(
         "Laptop",
         "Laptop is most productive development tool",
         2000, "
         laptop.png"
      )
   );
   items.add(
      Product(
         "Tablet",
         "Tablet is the most useful device ever for meeting",
         1500,
         "tablet.png"
      )
   );
   items.add(
      Product(
         "Pendrive",
         "Pendrive is useful storage medium",
         100,
         "pendrive.png"
      )
   );
   items.add(
      Product(
         "Floppy Drive",
         "Floppy drive is useful rescue storage medium",
         20,
         "floppy.png"
      )
   );
   return items;
}
import product.dart in main.dart
import 'Product.dart';
新しいウィジェット、RatingBoxを含めましょう。
class RatingBox extends StatefulWidget {
   @override
   _RatingBoxState createState() =>_RatingBoxState();
}
class _RatingBoxState extends State<RatingBox> {
   int _rating = 0;
   void _setRatingAsOne() {
      setState(() {
         _rating = 1;
      });
   }
   void _setRatingAsTwo() {
      setState(() {
         _rating = 2;
      });
   }
   void _setRatingAsThree() {
      setState(() {
         _rating = 3;
      });
   }
   Widget build(BuildContext context) {
      double _size = 20;
      print(_rating);
      return Row(
         mainAxisAlignment: MainAxisAlignment.end,
         crossAxisAlignment: CrossAxisAlignment.end,
         mainAxisSize: MainAxisSize.max,
         children: <Widget>[
            Container(
               padding: EdgeInsets.all(0),
               child: IconButton(
                  icon: (
                     _rating >= 1?
                     Icon(
                        Icons.star,
                        size: _size,
                     )
                     : Icon(
                        Icons.star_border,
                        size: _size,
                     )
                  ),
                  color: Colors.red[500],
                  onPressed: _setRatingAsOne,
                  iconSize: _size,
               ),
            ),
            Container(
               padding: EdgeInsets.all(0),
               child: IconButton(
                  icon: (
                     _rating >= 2?
                     Icon(
                        Icons.star,
                        size: _size,
                     )
                     : Icon(
                        Icons.star_border,
                        size: _size,
                     )
                  ),
                  color: Colors.red[500],
                  onPressed: _setRatingAsTwo,
                  iconSize: _size,
               ),
            ),
            Container(
               padding: EdgeInsets.all(0),
               child: IconButton(
                  icon: (
                     _rating >= 3 ?
                     Icon(
                        Icons.star,
                        size: _size,
                     )
                     : Icon(
                        Icons.star_border,
                        size: _size,
                     )
                  ),
                  color: Colors.red[500],
                  onPressed: _setRatingAsThree,
                  iconSize: _size,
               ),
            ),
         ],
      );
   }
}
ProductBoxウィジェットを変更して、新しいProductクラスで動作するようにしましょう。
class ProductBox extends StatelessWidget {
   ProductBox({Key key, this.item}) : super(key: key);
   final Product item;

   Widget build(BuildContext context) {
      return Container(
         padding: EdgeInsets.all(2),
         height: 140,
         child: Card(
            child: Row(
               mainAxisAlignment: MainAxisAlignment.spaceEvenly,
               children: <Widget>[
                  Image.asset("assets/appimages/" + this.item.image),
                  Expanded(
                     child: Container(
                        padding: EdgeInsets.all(5),
                        child: Column(
                           mainAxisAlignment: MainAxisAlignment.spaceEvenly,
                           children: <Widget>[
                              Text(this.item.name,
                              style: TextStyle(fontWeight: FontWeight.bold)),
                              Text(this.item.description),
                              Text("Price: " + this.item.price.toString()),
                              RatingBox(),
                           ],
                        )
                     )
                  )
               ]
            ),
         )
      );
   }
}
MyHomePageウィジェットを書き直して、Productモデルを操作し、ListViewを使用してすべての製品を一覧表示しましょう。
class MyHomePage extends StatelessWidget {
   MyHomePage({Key key, this.title}) : super(key: key);
   final String title;
   final items = Product.getProducts();

   @override
   Widget build(BuildContext context) {
      return Scaffold( appBar: AppBar(title: Text("Product Navigation")),
      body: ListView.builder(
         itemCount: items.length,
         itemBuilder: (context, index) {
            return GestureDetector(
               child: ProductBox(item: items[index]),
               onTap: () {
                  Navigator.push(
                     context, MaterialPageRoute(
                        builder: (context) => ProductPage(item: items[index]),
                     ),
                  );
               },
            );
         },
      ));
   }
}
ここでは、MaterialPageRouteを使用して製品の詳細ページに移動しました。
それでは、ProductPageを追加して、製品の詳細を表示しましょう。
class ProductPage extends StatelessWidget {
   ProductPage({Key key, this.item}) : super(key: key);
   final Product item;

   @override
   Widget build(BuildContext context) {
      return Scaffold(
         appBar: AppBar(
            title: Text(this.item.name),
         ),
         body: Center(
            child: Container(
               padding: EdgeInsets.all(0),
               child: Column(
                  mainAxisAlignment: MainAxisAlignment.start,
                  crossAxisAlignment: CrossAxisAlignment.start,
                  children: <Widget>[
                     Image.asset("assets/appimages/" + this.item.image),
                     Expanded(
                        child: Container(
                           padding: EdgeInsets.all(5),
                           child: Column(
                              mainAxisAlignment: MainAxisAlignment.spaceEvenly,
                              children: <Widget>[
                                 Text(
                                    this.item.name, style: TextStyle(
                                       fontWeight: FontWeight.bold
                                    )
                                 ),
                                 Text(this.item.description),
                                 Text("Price: " + this.item.price.toString()),
                                 RatingBox(),
                              ],
                           )
                        )
                     )
                  ]
               ),
            ),
         ),
      );
   }
}
アプリケーションの完全なコードは次のとおりです-
import 'package:flutter/material.dart';
void main() => runApp(MyApp());
class Product {
final String name;
final String description;
final int price;
final String image;
Product(this.name, this.description, this.price, this.image);
static List<Product> getProducts() {
List<Product> items = <Product>[];
items.add(
Product(
"Pixel",
"Pixel is the most featureful phone ever",
800,
"pixel.png"
)
);
items.add(
Product(
"Laptop",
"Laptop is most productive development tool",
2000,
"laptop.png"
)
);
items.add(
Product(
"Tablet",
"Tablet is the most useful device ever for meeting",
1500,
"tablet.png"
)
);
items.add(
Product(
"Pendrive",
"iPhone is the stylist phone ever",
100,
"pendrive.png"
)
);
items.add(
Product(
"Floppy Drive",
"iPhone is the stylist phone ever",
20,
"floppy.png"
)
);
items.add(
Product(
"iPhone",
"iPhone is the stylist phone ever",
1000,
"iphone.png"
)
);
return items;
}
}
class MyApp extends StatelessWidget {
// This widget is the root of your application.
@override
Widget build(BuildContext context) {
return MaterialApp(
title: 'Flutter Demo',
theme: ThemeData(
primarySwatch: Colors.blue,
),
home: MyHomePage(title: 'Product Navigation demo home page'),
);
}
}
class MyHomePage extends StatelessWidget {
MyHomePage({Key key, this.title}) : super(key: key);
final String title;
final items = Product.getProducts();
@override
Widget build(BuildContext context) {
return Scaffold(
appBar: AppBar(title: Text("Product Navigation")),
body: ListView.builder(
itemCount: items.length,
itemBuilder: (context, index) {
return GestureDetector(
child: ProductBox(item: items[index]),
onTap: () {
Navigator.push(
context,
MaterialPageRoute(
builder: (context) => ProductPage(item: items[index]),
),
);
},
);
},
)
);
}
}
class ProductPage extends StatelessWidget {
ProductPage({Key key, this.item}) : super(key: key);
final Product item;
@override
Widget build(BuildContext context) {
return Scaffold(
appBar: AppBar(
title: Text(this.item.name),
),
body: Center(
child: Container(
padding: EdgeInsets.all(0),
child: Column(
mainAxisAlignment: MainAxisAlignment.start,
crossAxisAlignment: CrossAxisAlignment.start,
children: <Widget>[
Image.asset("assets/appimages/" + this.item.image),
Expanded(
child: Container(
padding: EdgeInsets.all(5),
child: Column(
mainAxisAlignment: MainAxisAlignment.spaceEvenly,
children: <Widget>[
Text(this.item.name, style: TextStyle(fontWeight: FontWeight.bold)),
Text(this.item.description),
Text("Price: " + this.item.price.toString()),
RatingBox(),
],
)
)
)
]
),
),
),
);
}
}
class RatingBox extends StatefulWidget {
@override
_RatingBoxState createState() => _RatingBoxState();
}
class _RatingBoxState extends State<RatingBox> {
int _rating = 0;
void _setRatingAsOne() {
setState(() {
_rating = 1;
});
}
void _setRatingAsTwo() {
setState(() {
_rating = 2;
});
}
void _setRatingAsThree() {
setState(() {
_rating = 3;
});
}
Widget build(BuildContext context) {
double _size = 20;
print(_rating);
return Row(
mainAxisAlignment: MainAxisAlignment.end,
crossAxisAlignment: CrossAxisAlignment.end,
mainAxisSize: MainAxisSize.max,
children: <Widget>[
Container(
padding: EdgeInsets.all(0),
child: IconButton(
icon: (
_rating >= 1 ? Icon(
Icons.star,
size: _size,
)
: Icon(
Icons.star_border,
size: _size,
)
),
color: Colors.red[500],
onPressed: _setRatingAsOne,
iconSize: _size,
),
),
Container(
padding: EdgeInsets.all(0),
child: IconButton(
icon: (
_rating >= 2 ?
Icon(
Icons.star,
size: _size,
)
: Icon(
Icons.star_border,
size: _size,
)
),
color: Colors.red[500],
onPressed: _setRatingAsTwo,
iconSize: _size,
),
),
Container(
padding: EdgeInsets.all(0),
child: IconButton(
icon: (
_rating >= 3 ?
Icon(
Icons.star,
size: _size,
)
: Icon(
Icons.star_border,
size: _size,
)
),
color: Colors.red[500],
onPressed: _setRatingAsThree,
iconSize: _size,
),
),
],
);
}
}
class ProductBox extends StatelessWidget {
ProductBox({Key key, this.item}) : super(key: key);
final Product item;
Widget build(BuildContext context) {
return Container(
padding: EdgeInsets.all(2),
height: 140,
child: Card(
child: Row(
mainAxisAlignment: MainAxisAlignment.spaceEvenly,
children: <Widget>[
Image.asset("assets/appimages/" + this.item.image),
Expanded(
child: Container(
padding: EdgeInsets.all(5),
child: Column(
mainAxisAlignment: MainAxisAlignment.spaceEvenly,
children: <Widget>[
Text(this.item.name, style: TextStyle(fontWeight: FontWeight.bold)), Text(this.item.description),
Text("Price: " + this.item.price.toString()),
RatingBox(),
],
)
)
)
]
),
)
);
}
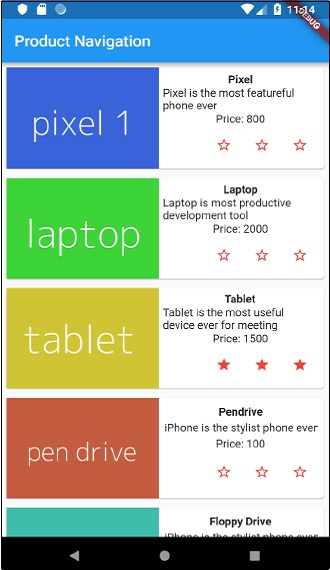
}アプリケーションを実行し、製品アイテムのいずれかをクリックします。関連する詳細ページが表示されます。戻るボタンをクリックするとホームページに移動できます。アプリケーションの製品リストページと製品詳細ページは次のように表示されます-