垂直ナビゲーション
この章では、Webサイトに垂直ナビゲーションまたはメニュー項目を追加する方法を学習します。ステップバイステップで行きましょう。
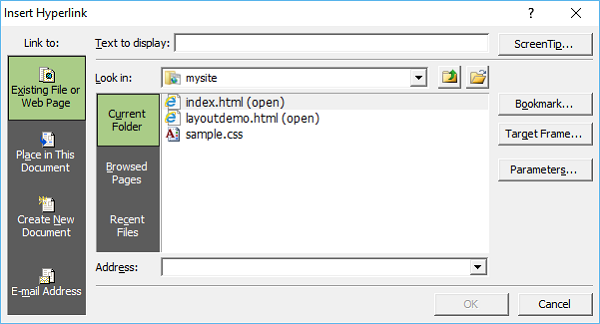
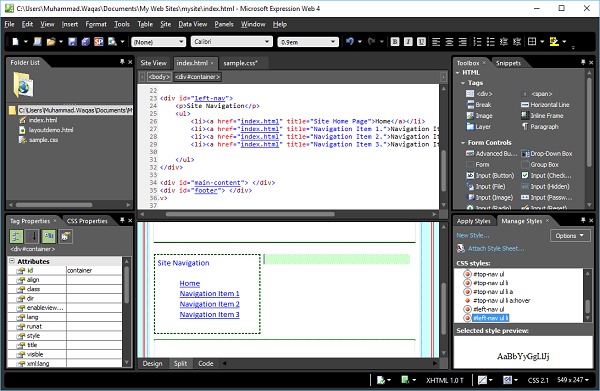
Step 1 −メニュー項目または垂直ナビゲーションを作成するには、次のコードをに追加しましょう。 <div id = “left-nav”> メニュー項目のリストを含むindex.htmlファイル内。
<div id = "left-nav">
   <p>Site Navigation</p>
   <ul>
      <li></li>
      <li></li>
      <li></li>
      <li></li>
   </ul>
</div>
Step 2−これはトップメニューの簡単な箇条書きです。ハイパーリンクを作成するには、design view または code view。

Step 3 −ハイパーリンクとして使用する項目を選択し、Ctrl + Kを押します。
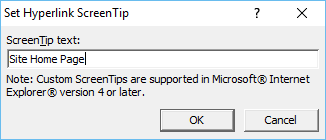
Step 4−ScreenTip…ボタンをクリックします。必要なテキストをscreentip [OK]をクリックします。
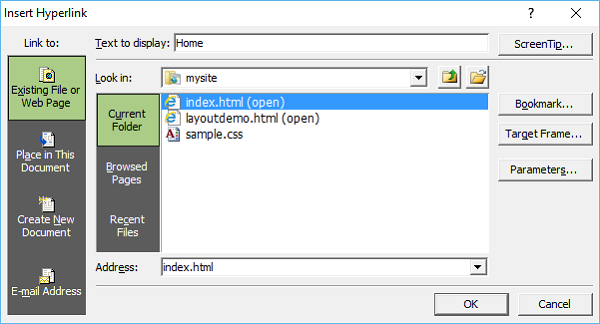
Step 5 −で Text to display フィールドに入力します Home index.htmlファイルを選択し、[OK]をクリックします。
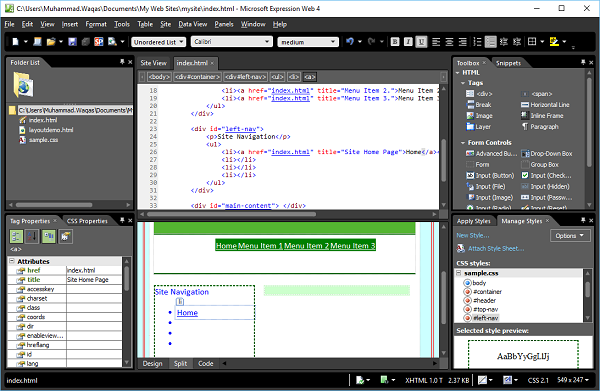
この段階では、index.htmlページは次のようになります-
Step 6 −次のコードに示すように、他のメニュー項目のハイパーリンクをさらに追加します。
<!DOCTYPE html PUBLIC "-//W3C//DTD XHTML 1.0 Transitional//EN"
"http://www.w3.org/TR/xhtml1/DTD/xhtml1-transitional.dtd">
<!DOCTYPE html PUBLIC "-//W3C//DTD XHTML 1.0 Transitional//EN"
"http://www.w3.org/TR/xhtml1/DTD/xhtml1-transitional.dtd">
<html xmlns = "http://www.w3.org/1999/xhtml">
<head>
<meta content = "text/html; charset = utf-8" http-equiv = "Content-Type" />
<style type = "text/css"></style>
<link href = "sample.css" rel = "stylesheet" type = "text/css" />
</head>
<body>
<div id = "container">
<div id = "header"></div>
<div id = "top-nav">
<ul>
<li><a href = "index.html" title = "Site Home Page">Home</a></li>
<li><a href = "index.html" title = "Menu Item 1.">Menu Item 1</a></li>
<li><a href = "index.html" title = "Menu Item 2.">Menu Item 2</a></li>
<li><a href = "index.html" title = "Menu Item 3.">Menu Item 3</a></li>
</ul>
</div>
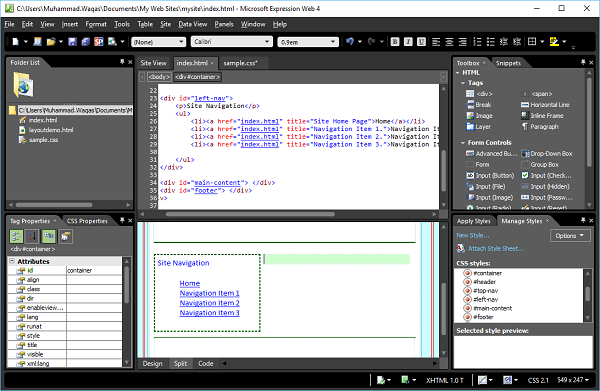
<div id = "left-nav">
<p>Site Navigation</p>
<ul>
<li><a href = "index.html" title = "Site Home Page">Home</a></li>
<li><a href = "index.html" title = "Navigation Item 1.">Navigation Item 1</a></li>
<li><a href = "index.html" title = "Navigation Item 2.">Navigation Item 2</a></li>
<li><a href = "index.html" title = "Navigation Item 3.">Navigation Item 3</a></li>
</ul>
</div>
<div id = "main-content"></div>
<div id = "footer"></div>
</div>
</body>
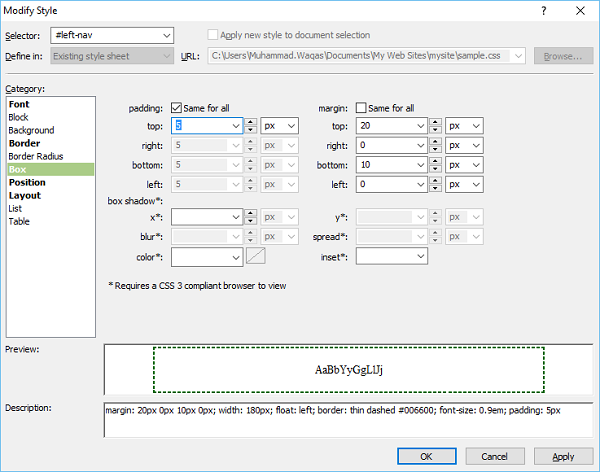
</html>Step 7−トップナビゲーションのスタイルを設定するには、[スタイルの管理]パネルに移動します。右クリック#left-nav [スタイルの変更…]を選択します

Step 8 − font-sizeフィールドに値0.9を入力し、 em font-sizeの横にあるドロップダウンリストから、Boxカテゴリに移動します。

Step 9−パディング「すべて同じ」を確認し、上部のフィールドに5と入力して、[OK]をクリックします。[スタイルの適用]パネルで、[新しいスタイル…]をクリックします。
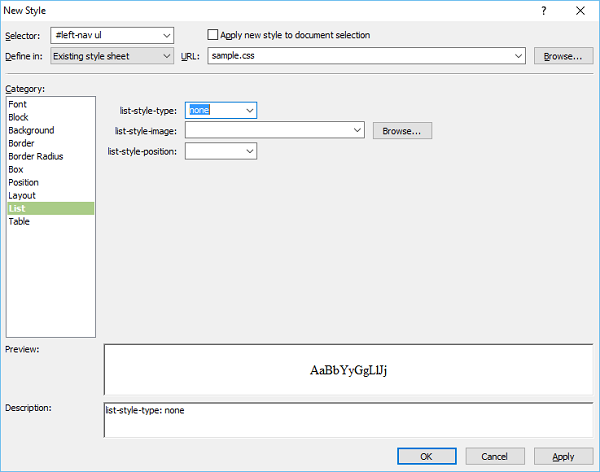
Step 10 −入力 #left-nav ul[セレクター]フィールド。[定義]ドロップダウンから[既存のスタイルシート]を選択し、[リスト]カテゴリで、[リストスタイルタイプ]フィールドから[なし]を選択して、[OK]をクリックします。
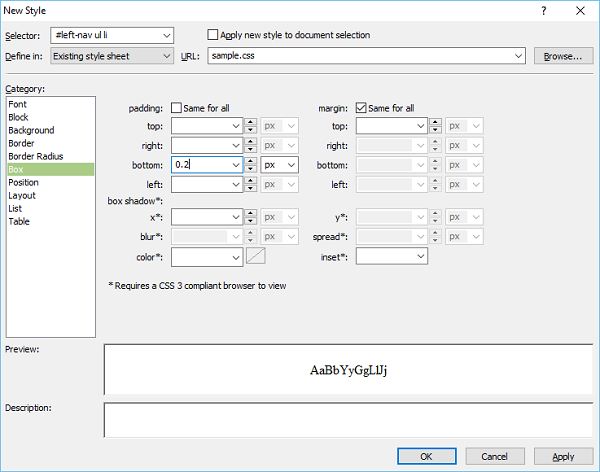
Step 11 −繰り返しますが、 Apply Styles パネルをクリックします New Style。パディングのチェックを外します「すべて同じ」。下部のフィールドに0.2と入力し、[OK]をクリックします。
Step 12 −入力 #left-nav ul li [セレクター]フィールドで、[定義]ドロップダウンから[既存のスタイルシート]を選択し、[ボックス]カテゴリに移動します。
Step 13 − [スタイルの適用]パネルに移動し、[新しいスタイル]をクリックします。
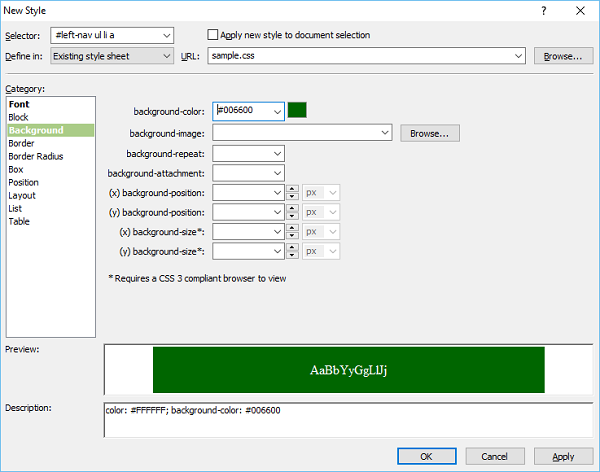
Step 14 −入力 #left-nav ul li a [セレクター]フィールドで、[定義]ドロップダウンから[既存のスタイルシート]を選択し、フォントの色として白を選択します。

Step 15− [背景]カテゴリに移動します。背景色として色を選択します
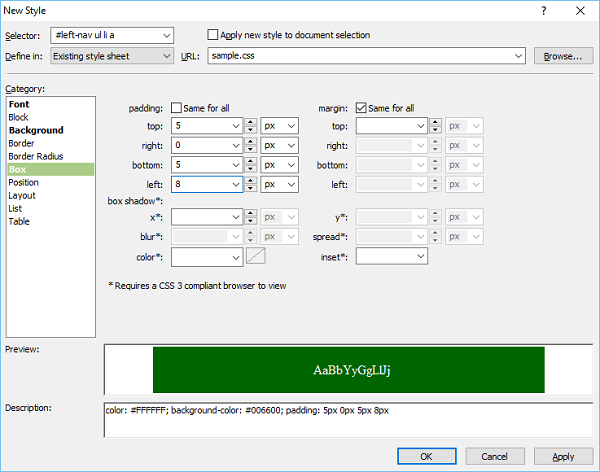
Step 16 −に移動します Box カテゴリを設定し、パディング値を設定します。
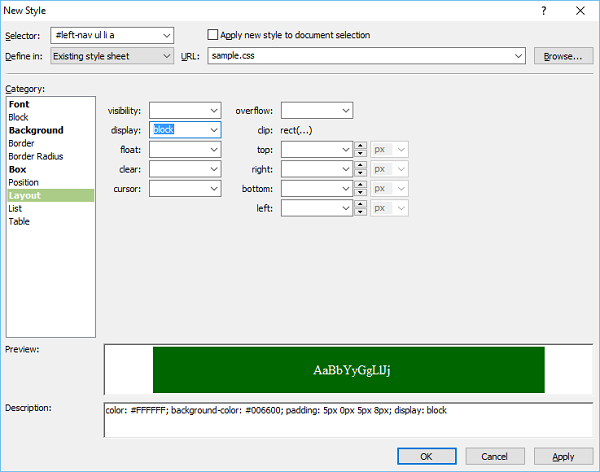
Step 17 −に移動します Layoutカテゴリー。選択するblock から display ドロップダウンをクリックして、[OK]をクリックします。
Step 18−次に、[スタイルの適用]パネルに戻り、[新しいスタイル]をクリックします。入る#left-nav ul li a:hover[セレクター]フィールドで、[定義]ドロップダウンから[既存のスタイルシート]を選択します。フォントの色として黒を選択します。
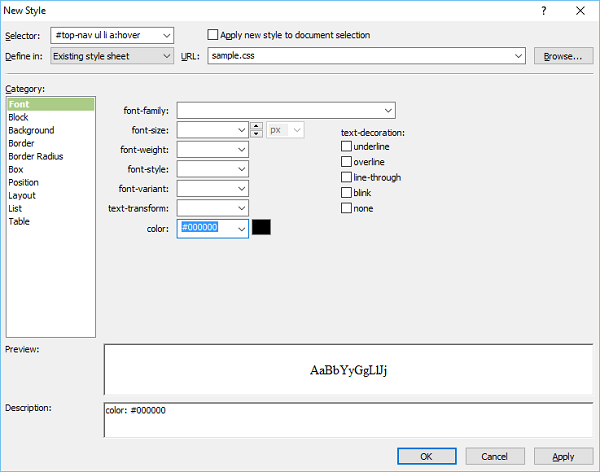
Step 19−次に、[背景]カテゴリに移動します。マウスがメニュー項目にカーソルを合わせているときにメニューオプションの背景色を選択し、[OK]をクリックします。

Step 20 −外観を確認するには、[ファイル]メニューに移動し、ブラウザで[プレビュー]を選択します。
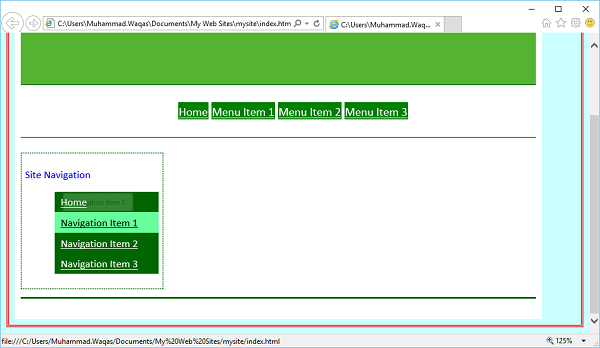
メニュー項目にマウスを合わせると、背景とフォントの色が変わります。