Angular 4-서비스
이 장에서는 Angular 4의 서비스에 대해 설명합니다.
페이지의 모든 곳에서 사용할 코드가 필요한 상황이 발생할 수 있습니다. 구성 요소 등에서 공유해야하는 데이터 연결을위한 것일 수 있습니다. 서비스는이를 달성하는 데 도움이됩니다. 서비스를 통해 전체 프로젝트의 다른 구성 요소에서 메서드와 속성에 액세스 할 수 있습니다.
서비스를 만들려면 명령 줄을 사용해야합니다. 같은 명령은-
C:\projectA4\Angular 4-app>ng g service myservice
installing service
   create src\app\myservice.service.spec.ts
   create src\app\myservice.service.ts
   WARNING Service is generated but not provided, it must be provided to be used

   C:\projectA4\Angular 4-app>
파일은 다음과 같이 앱 폴더에 생성됩니다.
다음은 하단에 생성 된 파일입니다. myservice.service.specs.ts 과 myservice.service.ts.
myservice.service.ts
import { Injectable } from '@angular/core';

@Injectable()
export class MyserviceService {
   constructor() { }
}
여기에서 Injectable 모듈은 @angular/core. 그것은 포함합니다@Injectable 메서드 및 호출 된 클래스 MyserviceService. 이 클래스에서 서비스 함수를 생성합니다.
새 서비스를 생성하기 전에 기본 상위에 생성 된 서비스를 포함해야합니다. app.module.ts.
import { BrowserModule } from '@angular/platform-browser';
import { NgModule } from '@angular/core';
import { RouterModule} from '@angular/router';
import { AppComponent } from './app.component';

import { MyserviceService } from './myservice.service';
import { NewCmpComponent } from './new-cmp/new-cmp.component';
import { ChangeTextDirective } from './change-text.directive';
import { SqrtPipe } from './app.sqrt';

@NgModule({
   declarations: [
      SqrtPipe,
      AppComponent,
      NewCmpComponent,
      ChangeTextDirective
   ],
   imports: [
      BrowserModule,
      RouterModule.forRoot([
         {
            path: 'new-cmp',
            component: NewCmpComponent
         }
      ])
   ],
   providers: [MyserviceService],
   bootstrap: [AppComponent]
})

export class AppModule { }
클래스 이름이있는 서비스를 가져 왔으며 공급자에서 동일한 클래스가 사용됩니다. 이제 서비스 클래스로 다시 전환하고 서비스 함수를 생성하겠습니다.
서비스 클래스에서 오늘 날짜를 표시하는 함수를 생성합니다. 주 상위 구성 요소에서 동일한 기능을 사용할 수 있습니다.app.component.ts 또한 새 구성 요소에서 new-cmp.component.ts 이전 장에서 만들었습니다.
이제 함수가 서비스에서 어떻게 보이는지와 구성 요소에서 어떻게 사용되는지 살펴 보겠습니다.
import { Injectable } from '@angular/core';
@Injectable()
export class MyserviceService {
   constructor() { }
   showTodayDate() {
      let ndate = new Date();
      return ndate;
   }
}
위의 서비스 파일에서 함수를 생성했습니다. showTodayDate. 이제 생성 된 새 날짜 ()를 반환합니다. 컴포넌트 클래스에서이 함수에 액세스하는 방법을 살펴 보겠습니다.
app.component.ts
import { Component } from '@angular/core';
import { MyserviceService } from './myservice.service';

@Component({
   selector: 'app-root',
   templateUrl: './app.component.html',
   styleUrls: ['./app.component.css']
})

export class AppComponent {
   title = 'Angular 4 Project!';
   todaydate;
   constructor(private myservice: MyserviceService) {}
   ngOnInit() {
      this.todaydate = this.myservice.showTodayDate();
   }
}
그만큼 ngOnInit함수는 생성 된 모든 구성 요소에서 기본적으로 호출됩니다. 위에 표시된대로 서비스에서 날짜를 가져옵니다. 서비스에 대한 자세한 정보를 가져 오려면 먼저 구성 요소에 서비스를 포함해야합니다.ts 파일.
우리는 날짜를 .html 아래에 표시된 파일-
{{todaydate}}
<app-new-cmp></app-new-cmp>
// data to be displayed to user from the new component class.
이제 생성 된 새 구성 요소에서 서비스를 사용하는 방법을 살펴 보겠습니다.
import { Component, OnInit } from '@angular/core';
import { MyserviceService } from './../myservice.service';

@Component({
   selector: 'app-new-cmp',
   templateUrl: './new-cmp.component.html',
   styleUrls: ['./new-cmp.component.css']
})

export class NewCmpComponent implements OnInit {
   todaydate;
   newcomponent = "Entered in new component created";
   constructor(private myservice: MyserviceService) {}

   ngOnInit() {
      this.todaydate = this.myservice.showTodayDate();
   }
}
우리가 만든 새 구성 요소에서 먼저 원하는 서비스를 가져 와서 동일한 메서드와 속성에 액세스해야합니다. 강조 표시된 코드를 참조하십시오. todaydate는 다음과 같이 구성 요소 html에 표시됩니다-
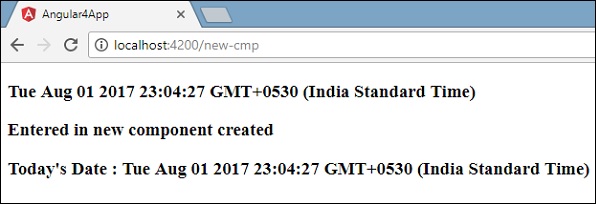
<p>
   {{newcomponent}}
</p>
<p>
   Today's Date : {{todaydate}}
</p>
새 구성 요소의 선택기는 app.component.html파일. 위의 html 파일의 내용은 아래와 같이 브라우저에 표시됩니다.
어떤 구성 요소에서 서비스의 속성을 변경하면 다른 구성 요소에서도 동일하게 변경됩니다. 이제 이것이 어떻게 작동하는지 봅시다.
서비스에서 하나의 변수를 정의하고이를 상위 및 새 구성 요소에서 사용합니다. 부모 구성 요소의 속성을 다시 변경하고 새 구성 요소에서도 동일한 속성이 변경되었는지 확인합니다.
에 myservice.service.ts, 우리는 속성을 만들고 다른 부모 및 새 구성 요소에서 동일하게 사용했습니다.
import { Injectable } from '@angular/core';

@Injectable()
export class MyserviceService {
   serviceproperty = "Service Created";
   constructor() { }
   showTodayDate() {
      let ndate = new Date();
      return ndate;
   }
}
이제 serviceproperty다른 구성 요소의 변수. 에app.component.ts, 우리는 다음과 같이 변수에 액세스합니다.
import { Component } from '@angular/core';
import { MyserviceService } from './myservice.service';
@Component({
selector: 'app-root',
templateUrl: './app.component.html',
styleUrls: ['./app.component.css']
})
export class AppComponent {
title = 'Angular 4 Project!';
todaydate;
componentproperty;
constructor(private myservice: MyserviceService) {}
ngOnInit() {
this.todaydate = this.myservice.showTodayDate();
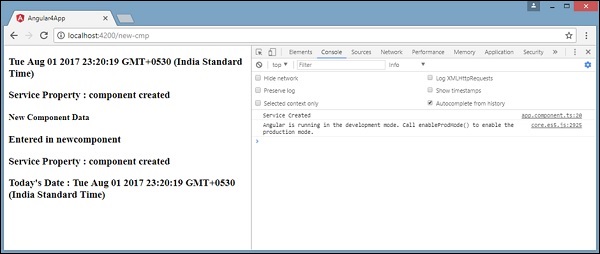
console.log(this.myservice.serviceproperty);
this.myservice.serviceproperty = "component created"; // value is changed.
this.componentproperty = this.myservice.serviceproperty;
}
}이제 변수를 가져와 console.log에서 작업합니다. 다음 줄에서 변수 값을 "component created”. 우리는 똑같이 할 것입니다new-cmp.component.ts.
import { Component, OnInit } from '@angular/core';
import { MyserviceService } from './../myservice.service';

@Component({
   selector: 'app-new-cmp',
   templateUrl: './new-cmp.component.html',
   styleUrls: ['./new-cmp.component.css']
})

export class NewCmpComponent implements OnInit {
   todaydate;
   newcomponentproperty;
   newcomponent = "Entered in newcomponent";
   constructor(private myservice: MyserviceService) {}
   ngOnInit() {
      this.todaydate = this.myservice.showTodayDate();
      this.newcomponentproperty = this.myservice.serviceproperty;
   }
}
위의 구성 요소에서 우리는 아무것도 변경하지 않고 속성을 구성 요소 속성에 직접 할당합니다.
이제 브라우저에서 실행하면 해당 값이 변경되므로 서비스 속성이 변경됩니다. app.component.ts 동일한 내용이 new-cmp.component.ts.
또한 변경하기 전에 콘솔에서 값을 확인하십시오.