Windows10 Dev - Comunicação de aplicativo
A comunicação de aplicativo para aplicativo significa que seu aplicativo pode falar ou se comunicar com outro aplicativo instalado no mesmo dispositivo. Este não é um recurso novo no aplicativo UWP (Plataforma Universal do Windows) e também estava disponível no Windows 8.1.
No Windows 10, algumas maneiras novas e aprimoradas são apresentadas para se comunicar facilmente entre os aplicativos no mesmo dispositivo. A comunicação entre dois aplicativos pode ser feita das seguintes maneiras -
- Um aplicativo iniciando outro aplicativo com alguns dados.
- Os aplicativos simplesmente trocam dados sem iniciar nada.
A principal vantagem da comunicação de aplicativo para aplicativo é que você pode dividir os aplicativos em pedaços menores, que podem ser mantidos, atualizados e consumidos facilmente.
Preparando seu aplicativo
Se você seguir as etapas fornecidas abaixo, outros aplicativos podem iniciar seu aplicativo.
Adicione uma declaração de protocolo no manifesto do pacote do aplicativo.
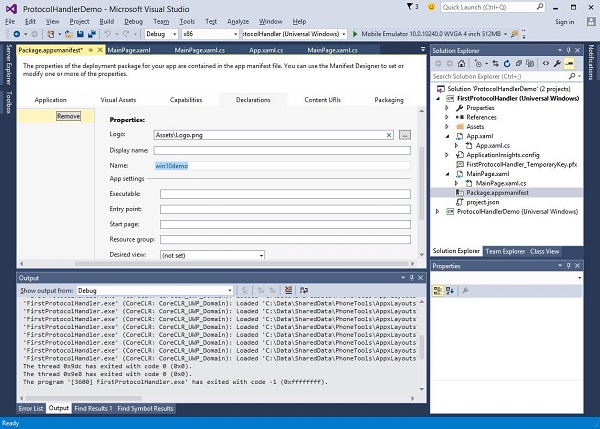
Clique duas vezes no Package.appxmanifest , que está disponível no Solution Explorer conforme mostrado abaixo.
Vou ao Declaration guia e escreva o Nome do protocolo conforme mostrado abaixo.

A próxima etapa é adicionar o activation código, para que o aplicativo possa responder apropriadamente quando iniciado por outro aplicativo.
Para responder às ativações de protocolo, precisamos substituir o OnActivatedmétodo da classe de ativação. Portanto, adicione o seguinte código emApp.xaml.cs Arquivo.
protected override void OnActivated(IActivatedEventArgs args) {

   ProtocolActivatedEventArgs protocolArgs = args as ProtocolActivatedEventArgs;

   if (args != null){

      Frame rootFrame = Window.Current.Content as Frame;

      // Do not repeat app initialization when the Window already has content,
      // just ensure that the window is active

      if (rootFrame == null){

         // Create a Frame to act as the navigation context and navigate to the first page
         rootFrame = new Frame();

         // Set the default language
         rootFrame.Language = Windows.Globalization.ApplicationLanguages.Languages[0];
         rootFrame.NavigationFailed += OnNavigationFailed;

         // Place the frame in the current Window
         Window.Current.Content = rootFrame;
      }

      if (rootFrame.Content == null){

         // When the navigation stack isn't restored, navigate to the
         // first page, configuring the new page by passing required
         // information as a navigation parameter

         rootFrame.Navigate(typeof(MainPage), null);
      }

      // Ensure the current window is active
      Window.Current.Activate();

   }
}
Para iniciar o aplicativo, você pode simplesmente usar o Launcher.LaunchUriAsync método, que iniciará o aplicativo com o protocolo especificado neste método.
await Windows.System.Launcher.LaunchUriAsync(new Uri("win10demo:?SomeData=123"));Vamos entender isso com um exemplo simples no qual temos dois aplicativos UWP com ProtocolHandlerDemo e FirstProtocolHandler.
Neste exemplo, o ProtocolHandlerDemo aplicativo contém um botão e, clicando no botão, ele abrirá o FirstProtocolHandler inscrição.
O código XAML no aplicativo ProtocolHandlerDemo, que contém um botão, é fornecido a seguir.
<Page
   x:Class = "ProtocolHandlerDemo.MainPage"
   xmlns = "http://schemas.microsoft.com/winfx/2006/xaml/presentation"
   xmlns:x = "http://schemas.microsoft.com/winfx/2006/xaml"
   xmlns:local = "using:ProtocolHandlerDemo"
   xmlns:d = "http://schemas.microsoft.com/expression/blend/2008"
   xmlns:mc = "http://schemas.openxmlformats.org/markup-compatibility/2006"
   mc:Ignorable = "d">

   <Grid Background = "{ThemeResource ApplicationPageBackgroundThemeBrush}">
      <Button x:Name = "LaunchButton" Content = " Launch First Protocol App"
         FontSize = "24" HorizontalAlignment = "Center"
         Click = "LaunchButton_Click"/>
   </Grid>

</Page>
A seguir está o código C #, no qual o evento de clique de botão é implementado.
using System;
using Windows.UI.Xaml;
using Windows.UI.Xaml.Controls;

// The Blank Page item template is documented at
   http://go.microsoft.com/fwlink/?LinkId=402352&clcid=0x409

namespace ProtocolHandlerDemo {

   /// <summary>
      /// An empty page that can be used on its own or navigated to within a Frame.
   /// </summary>

   public sealed partial class MainPage : Page {

      public MainPage(){
         this.InitializeComponent();
      }

      private async void LaunchButton_Click(object sender, RoutedEventArgs e) {
         await Windows.System.Launcher.LaunchUriAsync(new
            Uri("win10demo:?SomeData=123"));
      }

   }
}
Agora, vamos dar uma olhada no FirstProtocolHandlertabela de aplicação. A seguir está o código XAML no qual um textblock é criado com algumas propriedades.
<Page
   x:Class = "FirstProtocolHandler.MainPage"
   xmlns = "http://schemas.microsoft.com/winfx/2006/xaml/presentation"
   xmlns:x = "http://schemas.microsoft.com/winfx/2006/xaml"
   xmlns:local = "using:FirstProtocolHandler"
   xmlns:d = "http://schemas.microsoft.com/expression/blend/2008"
   xmlns:mc = "http://schemas.openxmlformats.org/markup-compatibility/2006"
   mc:Ignorable = "d">

   <Grid Background = "{ThemeResource ApplicationPageBackgroundThemeBrush}">
      <TextBlock Text = "You have successfully launch First Protocol Application"
         TextWrapping = "Wrap" Style = "{StaticResource SubtitleTextBlockStyle}"
         Margin = "30,39,0,0" VerticalAlignment = "Top" HorizontalAlignment = "Left"
         Height = "100" Width = "325"/>
   </Grid>

</Page>
A implementação C # do App.xaml.cs arquivo no qual OnActicatedé substituído é mostrado abaixo. Adicione o seguinte código dentro da classe App noApp.xaml.cs Arquivo.
protected override void OnActivated(IActivatedEventArgs args) {
   ProtocolActivatedEventArgs protocolArgs = args as ProtocolActivatedEventArgs;

   if (args != null) {
      Frame rootFrame = Window.Current.Content as Frame;

      // Do not repeat app initialization when the Window already has content,
      // just ensure that the window is active

      if (rootFrame == null) {

         // Create a Frame to act as the navigation context and navigate to
            the first page
         rootFrame = new Frame();

         // Set the default language
         rootFrame.Language = Windows.Globalization.ApplicationLanguages.Languages[0];
         rootFrame.NavigationFailed += OnNavigationFailed;

         // Place the frame in the current Window
         Window.Current.Content = rootFrame;
      }

      if (rootFrame.Content == null) {

         // When the navigation stack isn't restored navigate to the
         // first page, configuring the new page by passing required
         // information as a navigation parameter

         rootFrame.Navigate(typeof(MainPage), null);
      }

      // Ensure the current window is active
      Window.Current.Activate();
   }
}
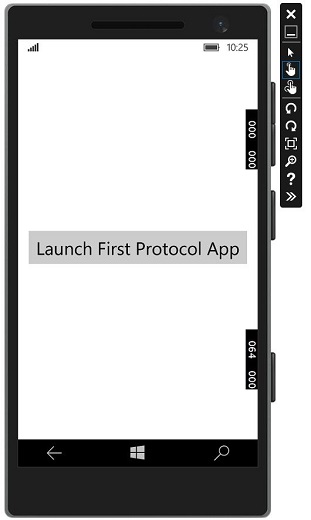
Quando você compila e executa o ProtocolHandlerDemo aplicativo em um emulador, você verá a seguinte janela.

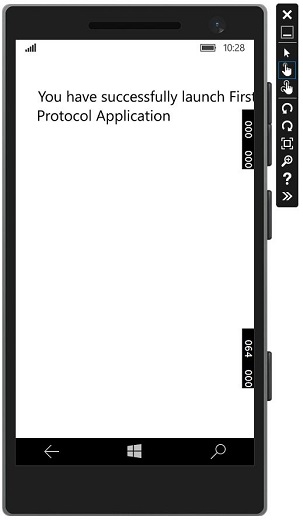
Agora, quando você clicar no botão, ele abrirá o FirstProtocolHandler aplicação conforme mostrado abaixo.
