การพัฒนา Windows 10 - ฐานข้อมูล SQLite
ในหลาย ๆ แอปพลิเคชันมีข้อมูลบางประเภทซึ่งมีความสัมพันธ์ซึ่งกันและกัน ข้อมูลประเภทนี้ซึ่งจัดเก็บในไฟล์ได้ยากสามารถจัดเก็บไว้ในฐานข้อมูลได้
หากคุณคุ้นเคยกับประเภทของฐานข้อมูลเช่นเซิร์ฟเวอร์ SQL หรือฐานข้อมูล Oracle ในแอปพลิเคชันใด ๆ ก็จะเข้าใจได้ง่ายมาก SQLite database.
SQLite คืออะไร?
SQLite เป็นไลบรารีซอฟต์แวร์ที่ใช้ในตัวเซิร์ฟเวอร์น้อยลงการกำหนดค่าเป็นศูนย์เอ็นจินฐานข้อมูล SQL แบบทรานแซคชัน
คุณสมบัติที่สำคัญคือ -
SQLite เป็นเอ็นจินฐานข้อมูลที่มีการปรับใช้อย่างแพร่หลายที่สุดในโลก
ซอร์สโค้ดสำหรับ SQLite คือโอเพ่นซอร์ส
มีผลกระทบอย่างมากต่อการพัฒนาเกมและแอปพลิเคชันมือถือเนื่องจากพกพาได้และมีพื้นที่น้อย
ข้อดีของ SQLite
ต่อไปนี้เป็นข้อดีของ SQLite -
- เป็นฐานข้อมูลที่มีน้ำหนักเบามาก
- เป็นแพลตฟอร์มที่เป็นอิสระและใช้งานได้กับทุกแพลตฟอร์ม
- มีรอยความทรงจำขนาดเล็ก
- มีความน่าเชื่อถือ
- ไม่จำเป็นต้องตั้งค่าและติดตั้งใด ๆ
- ไม่มีการอ้างอิง
ใช้ SQLite ในแอปพลิเคชัน Universal Windows Platform (UWP) ของคุณคุณต้องทำตามขั้นตอนด้านล่างนี้
สร้างแอปเปล่า Universal Windows ใหม่ที่มีชื่อ UWPSQLiteDemo.
ไปที่ไฟล์ Toolsเมนูแล้วเลือก Extensions and Updates กล่องโต้ตอบต่อไปนี้จะเปิดขึ้น
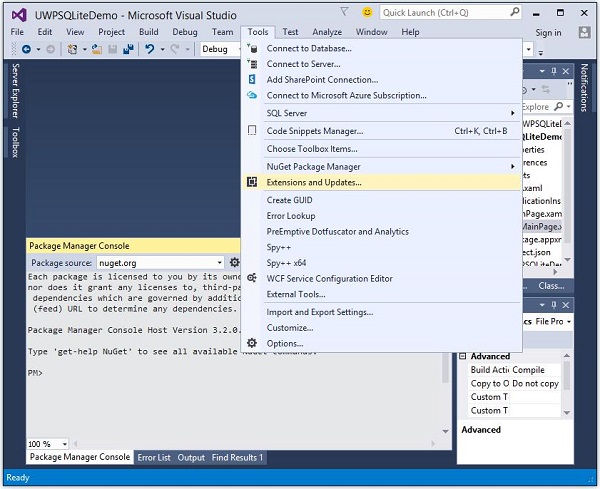
- หลังจากเลือก Extensions and Updates หน้าต่างต่อไปนี้จะเปิดขึ้น
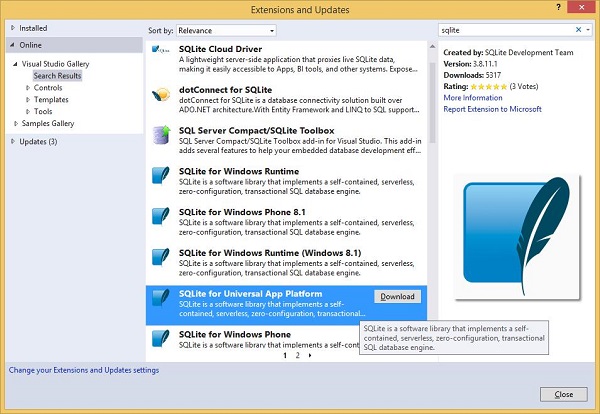
ตอนนี้เลือก Online ตัวเลือกและค้นหา SQLite จากบานหน้าต่างด้านซ้าย
ดาวน์โหลดและติดตั้ง SQLite สำหรับ Universal App Platform
ตอนนี้ไปที่เมนูเครื่องมืออีกครั้งแล้วเลือก NuGet Package Manager > Package Manager Console ตัวเลือกเมนูดังที่แสดงด้านล่าง
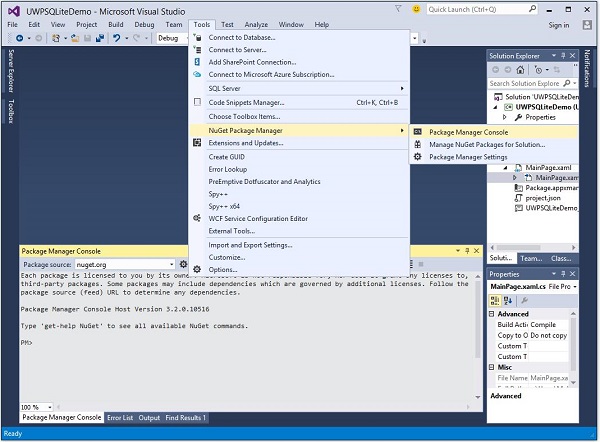
เขียนคำสั่งต่อไปนี้ใน Package Manager Console และกด Enter เพื่อดำเนินการคำสั่งนี้ -
Install-Package SQLite.Net-PCL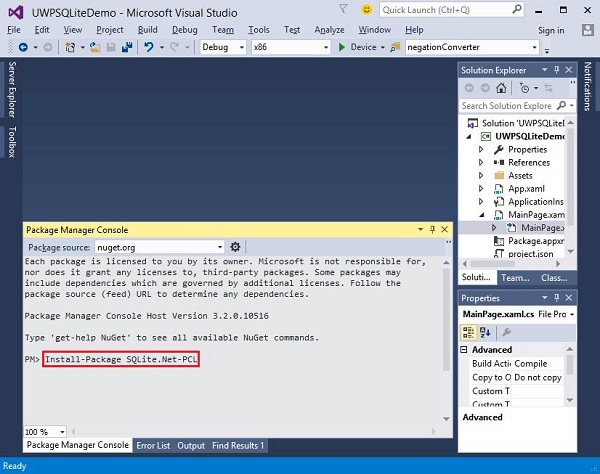
ตอนนี้คลิกขวาที่ References ในตัวสำรวจโซลูชันและเลือก Add References.
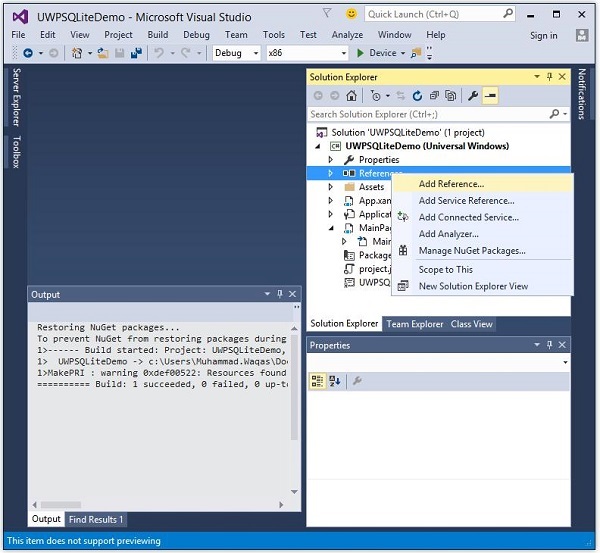
- กล่องโต้ตอบต่อไปนี้จะเปิดขึ้น
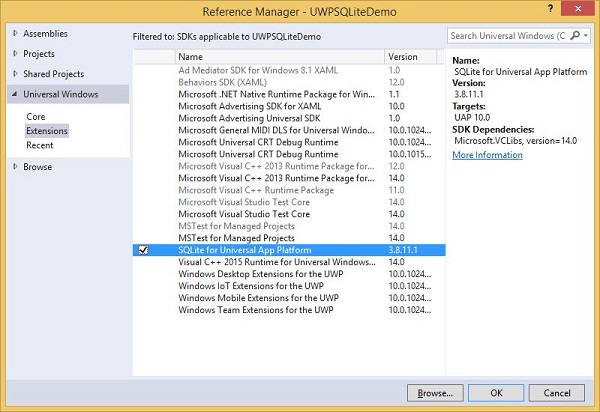
เลือก Extensions จากบานหน้าต่างด้านซ้ายภายใต้ Universal Windowsตรวจสอบ SQLite สำหรับ Universal App Platform ในบานหน้าต่างตรงกลางแล้วคลิกตกลง
ตอนนี้คุณพร้อมที่จะใช้งาน SQLite ในแอปพลิเคชัน UWP ของคุณแล้ว
คุณสามารถสร้างฐานข้อมูลโดยใช้รหัสต่อไปนี้
string path = Path.Combine(Windows.Storage.ApplicationData.
   Current.LocalFolder.Path, "db.sqlite");

SQLite.Net.SQLiteConnection conn = new SQLite.Net.SQLiteConnection(new
   SQLite.Net.Platform.WinRT.SQLitePlatformWinRT(), path);
ในการสร้างตารางคุณต้องโทร CreateTable วิธีการกับวัตถุชื่อตาราง
conn.CreateTable<Customer>();คุณสามารถแทรกข้อมูลลงในตารางของคุณโดยใช้รหัสต่อไปนี้
conn.Insert(new Customer(){
   Name = textBox.Text,
   Age = textBox1.Text
});
ด้านล่างนี้คือรหัสสำหรับดึงข้อมูลจากตาราง
var query = conn.Table<Customer>();
string id = "";
string name = "";
string age = "";

foreach (var message in query) {
   id = id + " " + message.Id;
   name = name + " " + message.Name;
   age = age + " " + message.Age;
}
ให้เราเข้าใจวิธีการสร้างฐานข้อมูลตารางและวิธีการแทรกและดึงข้อมูลจากฐานข้อมูลด้วยความช่วยเหลือของตัวอย่างง่ายๆ เราจะเพิ่มชื่อและอายุจากนั้นเราจะดึงข้อมูลเดียวกันจากตาราง ด้านล่างนี้คือรหัส XAML ซึ่งมีการเพิ่มการควบคุมที่แตกต่างกัน
<Page
   x:Class = "UWPSQLiteDemo.MainPage"
   xmlns = "http://schemas.microsoft.com/winfx/2006/xaml/presentation"
   xmlns:x = "http://schemas.microsoft.com/winfx/2006/xaml"
   xmlns:local = "using:UWPSQLiteDemo"
   xmlns:d = "http://schemas.microsoft.com/expression/blend/2008"
   xmlns:mc = "http://schemas.openxmlformats.org/markup-compatibility/2006"
   mc:Ignorable = "d">

   <Grid Background = "{ThemeResource ApplicationPageBackgroundThemeBrush}" >
      <Button x:Name = "Retrieve" Content = "Retrieve" HorizontalAlignment = "Left"
         VerticalAlignment = "Top" Margin = "384,406,0,0"
         Click = "Retrieve_Click"/>

      <Button x:Name = "Add" Content = "Add" HorizontalAlignment = "Left"
         VerticalAlignment = "Top" Margin = "291,406,0,0" Click = "Add_Click"/>

      <TextBlock x:Name = "textBlock" HorizontalAlignment = "Left"
         TextWrapping = "Wrap" Text = "Name" VerticalAlignment = "Top"
         Margin = "233,280,0,0" Width = "52"/>

      <TextBox x:Name = "textBox" HorizontalAlignment = "Left" TextWrapping = "Wrap"
         VerticalAlignment = "Top" Margin = "289,274,0,0" Width = "370"/>

      <TextBlock x:Name = "textBlock1" HorizontalAlignment = "Left"
         TextWrapping = "Wrap" Text = "Age" VerticalAlignment = "Top"
         Margin = "233,342,0,0" Width = "52"/>

      <TextBox x:Name = "textBox1" HorizontalAlignment = "Left" TextWrapping = "Wrap"
         VerticalAlignment = "Top" Margin = "289,336,0,0" Width = "191"/>

      <TextBlock x:Name = "textBlock2" HorizontalAlignment = "Left"
         Margin = "290,468,0,0" TextWrapping = "Wrap"
         VerticalAlignment = "Top" Width = "324" Height = "131"/>

   </Grid>

</Page>
ด้านล่างนี้คือการใช้งาน C # สำหรับเหตุการณ์และ SQLite database.
using SQLite.Net.Attributes;

using System;
using System.Collections.Generic;
using System.IO;
using System.Linq;
using System.Runtime.InteropServices.WindowsRuntime;

using Windows.Foundation;
using Windows.Foundation.Collections;

using Windows.UI.Xaml;
using Windows.UI.Xaml.Controls;
using Windows.UI.Xaml.Controls.Primitives;
using Windows.UI.Xaml.Data;
using Windows.UI.Xaml.Input;
using Windows.UI.Xaml.Media;
using Windows.UI.Xaml.Navigation;

// The Blank Page item template is documented at
   http://go.microsoft.com/fwlink/?LinkId=402352&clcid=0x409

namespace UWPSQLiteDemo {

   /// <summary>
      /// An empty page that can be used on its own or navigated to within a Frame.
   /// </summary>

   public sealed partial class MainPage : Page {
      string path;
      SQLite.Net.SQLiteConnection conn;

      public MainPage(){
         this.InitializeComponent();
         path = Path.Combine(Windows.Storage.ApplicationData.Current.LocalFolder.Path,
            "db.sqlite");
         conn = new SQLite.Net.SQLiteConnection(new
            SQLite.Net.Platform.WinRT.SQLitePlatformWinRT(), path);
         conn.CreateTable<Customer>();
      }

      private void Retrieve_Click(object sender, RoutedEventArgs e) {
         var query = conn.Table<Customer>();
         string id = "";
         string name = "";
         string age = "";

         foreach (var message in query) {
            id = id + " " + message.Id;
            name = name + " " + message.Name;
            age = age + " " + message.Age;
         }

         textBlock2.Text = "ID: " + id + "\nName: " + name + "\nAge: " + age;
      }

      private void Add_Click(object sender, RoutedEventArgs e){

         var s = conn.Insert(new Customer(){
            Name = textBox.Text,
            Age = textBox1.Text
         });

      }
   }

   public class Customer {
      [PrimaryKey, AutoIncrement]
      public int Id { get; set; }
      public string Name { get; set; }
      public string Age { get; set; }
   }

}
เมื่อโค้ดด้านบนถูกคอมไพล์และรันคุณจะเห็นหน้าต่างต่อไปนี้
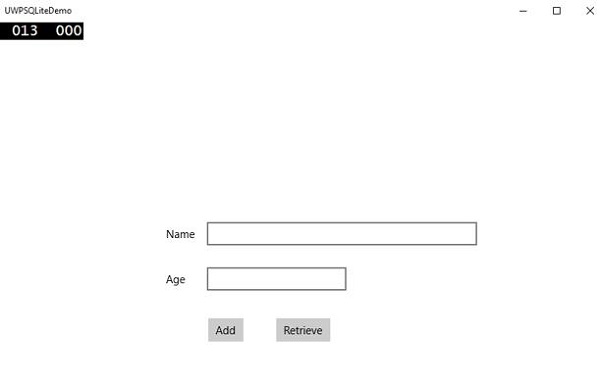
ป้อนไฟล์ Name และ Age แล้วคลิกไฟล์ Add ปุ่ม.
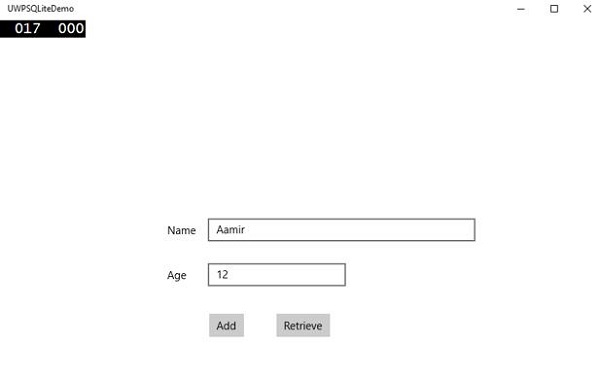
ตอนนี้คลิกที่ไฟล์ Retrieveปุ่ม. คุณจะเห็นข้อมูลต่อไปนี้ในไฟล์Text Block.
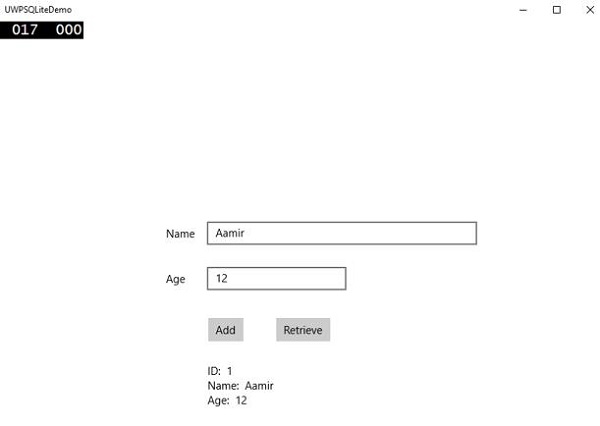
ฟิลด์ ID คือฟิลด์คีย์หลักและฟิลด์เพิ่มอัตโนมัติซึ่งระบุไว้ในคลาสลูกค้า
[PrimaryKey, AutoIncrement]
public int Id { get; set; }