Windows 10 Geliştirme - Hizmetler
Bu bölümde, UWP uygulamalarının başka bir Evrensel Windows Platformu (UWP) uygulamalarına nasıl yardımcı olabileceğini veya hizmet sağlayabileceğini öğreneceğiz. Aslında bu bölüm, bölümün bir uzantısıdırBackground execution ve bunun özel bir durumu.
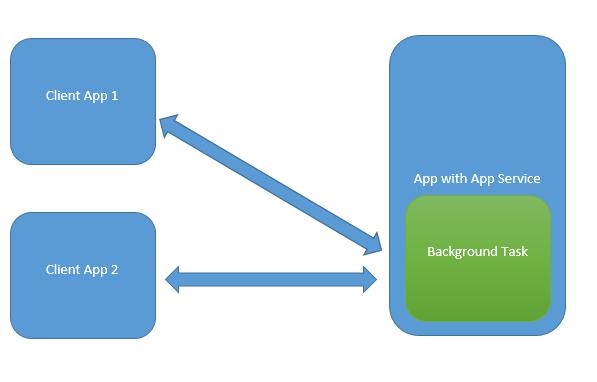
Windows 10'da bir uygulama hizmeti, bir uygulamanın diğer uygulamalara hizmet sağlaması için bir yol veya mekanizmadır.
Bir uygulama hizmeti, bir arka plan görevi biçiminde çalışır.
Ön plan uygulamaları, arka planda görevleri gerçekleştirmek için başka bir uygulamadaki bir uygulama hizmetini çağırabilir.
Uygulama hizmetleri web hizmetleri gibidir ancak uygulama hizmetleri Windows 10 cihazında kullanılır.
Evrensel Windows Platformu (UWP) uygulamaları, başka bir UWP uygulamasıyla çeşitli şekillerde etkileşim kurabilir -
- LaunchUriAsync kullanarak URI ilişkilendirmesi
- LaunchFileAsync kullanarak dosya ilişkilendirme
- LaunchUriForResultsAsync kullanarak sonuçlar için başlatın
- Uygulama hizmetleri
İlk üç yol, her iki uygulama da ön plandayken kullanılır, ancak Uygulama hizmetleri background task ve bu durumda istemci uygulamasının ön planda olması ve Uygulama hizmetini kullanabilmesi gerekir.
Uygulama hizmetleri, görsel olmayan hizmetlerin sağlandığı uygulamalarda çok faydalıdır, örneğin ön plandaki bir uygulamanın görüntüyü alacağı ve bu baytları barkodu tanımlamak için uygulama hizmetlerine göndereceği bir barkod tarayıcı.
Tüm bu kavramları anlamak için, adıyla yeni bir UWP projesi oluşturalım. AppServiceProvider Microsoft Visual Studio 2015'te.
Şimdi Package.appmenifest dosya, aşağıdaki bilgileri ekleyin.
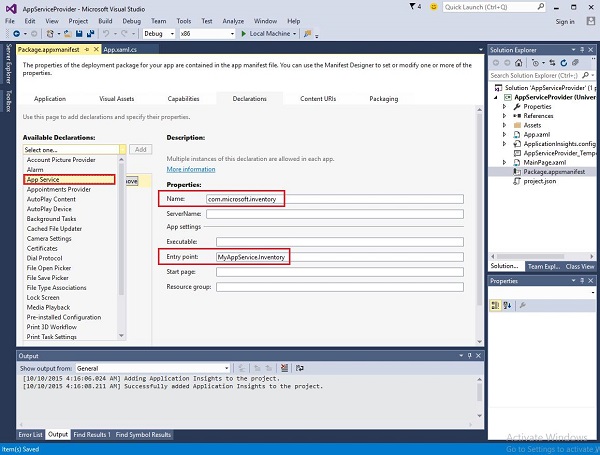
Ön plan uygulamaları tarafından çağrılabilen bir uygulama servisi oluşturmak için yeni bir Windows Runtime Bileşen projesi ile çözüme MyAppService name, çünkü uygulama hizmetleri arka plan görevi olarak uygulanıyor.
Bir referans ekleyin MyAppService projede AppServiceProvider proje.
Şimdi silin class1.cs dosyasından MyAppService projelendirin ve envanter adıyla yeni bir sınıf ekleyin; IBackgrounTask arayüz.
IBackgrounTask arayüzün sadece bir yöntemi vardır “Run” Arka plan Görevi için uygulanması gereken.
public sealed class Inventory : IBackgroundTask {
   public void Run(IBackgroundTaskInstance taskInstance) {

   }
}
Arka plan görevi oluşturulduğunda, Run() methodçağrılır ve Run yöntemi tamamlandığında arka plan görevleri sonlandırılır. Bir arka plan görevine bağlı kalmak, isteklere hizmet etmek için kod ertelenir.
Uygulama hizmetleri kodu OnRequestedReceived(). Bu örnekte, bir stok kalemi için bir dizin, belirtilen envanter kaleminin adını ve fiyatını almak için hizmete geçer.
private async void OnRequestReceived(AppServiceConnection sender,
   AppServiceRequestReceivedEventArgs args) {
      // Get a deferral because we use an awaitable API below to respond to the message
}
Aşağıda, C # 'da Envanter sınıfının tam uygulaması verilmiştir.
using System;
using System.Collections.Generic;
using System.Linq;
using System.Text;
using System.Threading.Tasks;

using Windows.ApplicationModel.AppService;
using Windows.ApplicationModel.Background;
using Windows.Foundation.Collections;

namespace MyAppService{
   public sealed class Inventory : IBackgroundTask {

      private BackgroundTaskDeferral backgroundTaskDeferral;
      private AppServiceConnection appServiceconnection;

      private String[] inventoryItems = new string[] { "Robot vacuum", "Chair" };
      private double[] inventoryPrices = new double[] { 129.99, 88.99 };

      public void Run(IBackgroundTaskInstance taskInstance) {
         this.backgroundTaskDeferral = taskInstance.GetDeferral();
         taskInstance.Canceled += OnTaskCanceled;
         var details = taskInstance.TriggerDetails as AppServiceTriggerDetails;

         appServiceconnection = details.AppServiceConnection;
         appServiceconnection.RequestReceived += OnRequestReceived;
      }

      private async void OnRequestReceived(AppServiceConnection sender,
         AppServiceRequestReceivedEventArgs args) {

            var messageDeferral = args.GetDeferral();
            ValueSet message = args.Request.Message;
            ValueSet returnData = new ValueSet();

            string command = message["Command"] as string;
            int? inventoryIndex = message["ID"] as int?;
            if (inventoryIndex.HasValue &&

            inventoryIndex.Value >= 0 &&
            inventoryIndex.Value < inventoryItems.GetLength(0)) {

               switch (command) {

                  case "Price": {
                     returnData.Add("Result", inventoryPrices[inventoryIndex.Value]);
                     returnData.Add("Status", "OK");
                     break;
                  }

                  case "Item": {
                     returnData.Add("Result", inventoryItems[inventoryIndex.Value]);
                     returnData.Add("Status", "OK");
                     break;
                  }

                  default: {
                     returnData.Add("Status", "Fail: unknown command");
                     break;
                  }
               } else {
                  returnData.Add("Status", "Fail: Index out of range");
               }
            }
            await args.Request.SendResponseAsync(returnData);
            messageDeferral.Complete();
      }

      private void OnTaskCanceled(IBackgroundTaskInstance sender,
         BackgroundTaskCancellationReason reason){
            if (this.backgroundTaskDeferral != null) {
               // Complete the service deferral.
               this.backgroundTaskDeferral.Complete();
            }
      }
   }
}
Yeni bir boş UWP projesi ekleyerek bir müşteri uygulaması oluşturalım ClientApp ve XAML dosyasında aşağıda gösterildiği gibi bir düğme, bir metin kutusu ve iki metin bloğu ekleyin.
<Page
   x:Class = "ClientApp.MainPage"
   xmlns = "http://schemas.microsoft.com/winfx/2006/xaml/presentation"
   xmlns:x = "http://schemas.microsoft.com/winfx/2006/xaml"
   xmlns:local = "using:ClientApp"
   xmlns:d = "http://schemas.microsoft.com/expression/blend/2008"
   xmlns:mc = "http://schemas.openxmlformats.org/markup-compatibility/2006"
   mc:Ignorable = "d">

   <Grid Background = "{ThemeResource ApplicationPageBackgroundThemeBrush}">
      <TextBlock HorizontalAlignment = "Left" Text = "Enter Item No."
         Margin = "52,40,0,0" TextWrapping = "Wrap"
         VerticalAlignment = "Top" Height = "32" Width = "268"/>

      <Button x:Name = "button" Content = "Get Info" HorizontalAlignment = "Left"
         Margin = "255,96,0,0" VerticalAlignment = "Top" Click = "button_Click"/>

      <TextBox x:Name = "textBox" HorizontalAlignment = "Left" Margin = "52,96,0,0"
         TextWrapping = "Wrap" VerticalAlignment = "Top" Width = "168"/>

      <TextBlock x:Name = "textBlock" HorizontalAlignment = "Left"
         Margin = "52,190,0,0" TextWrapping = "Wrap"
         VerticalAlignment = "Top" Height = "32" Width = "268"/>
   </Grid>

</Page>
Aşağıda, Uygulama hizmetlerinin talep edildiği düğme tıklama etkinliği uygulaması verilmiştir.
using System;

using Windows.ApplicationModel.AppService;
using Windows.Foundation.Collections;

using Windows.UI.Xaml;
using Windows.UI.Xaml.Controls;

// The Blank Page item template is documented at
   http://go.microsoft.com/fwlink/?LinkId=402352&clcid=0x409

namespace ClientApp {

   /// <summary>
      /// An empty page that can be used on its own or navigated to within a Frame.
   /// </summary>

   public sealed partial class MainPage : Page {

      private AppServiceConnection inventoryService;

      public MainPage() {
         this.InitializeComponent();
      }

      private async void button_Click(object sender, RoutedEventArgs e){

         // Add the connection.
         if (this.inventoryService == null) {

            this.inventoryService = new AppServiceConnection();
            this.inventoryService.AppServiceName = "com.microsoft.inventory";
            this.inventoryService.PackageFamilyName =
               "bb1a8478-8005-46869923-e525ceaa26fc_4sz2ag3dcq60a";

            var status = await this.inventoryService.OpenAsync();

            if (status != AppServiceConnectionStatus.Success) {
               button.Content = "Failed to connect";
               return;
            }
         }

         // Call the service.
         int idx = int.Parse(textBox.Text);
         var message = new ValueSet();

         message.Add("Command", "Item");
         message.Add("ID", idx);

         AppServiceResponse response = await
            this.inventoryService.SendMessageAsync(message);
         string result = "";

         if (response.Status == AppServiceResponseStatus.Success) {
            // Get the data  that the service sent  to us.
            if (response.Message["Status"] as string == "OK") {
               result = response.Message["Result"] as string;
            }
         }

         message.Clear();
         message.Add("Command", "Price");
         message.Add("ID", idx);

         response = await this.inventoryService.SendMessageAsync(message);

         if (response.Status == AppServiceResponseStatus.Success){
            // Get the data that the service sent to us.
            if (response.Message["Status"] as string == "OK") {
               result += " : Price = " + "$"+ response.Message["Result"] as string;
            }
         }

         textBlock.Text = result;
      }
   }
}
Bu uygulamayı çalıştırmak için, ClientApp Çözüm Gezgini'nde başlangıç projesi olması için proje yapın ve ardından bu çözümü Build > Deploy Çözüm.
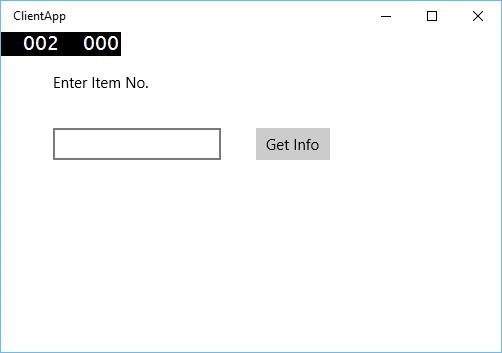
Yukarıdaki kod derlendiğinde ve çalıştırıldığında, aşağıdaki pencereyi göreceksiniz. Uygulama hizmetlerinde, iki öğenin bilgilerini ekledik. Dolayısıyla, bu öğelerin bilgilerini almak için 0 veya 1 girebilirsiniz.
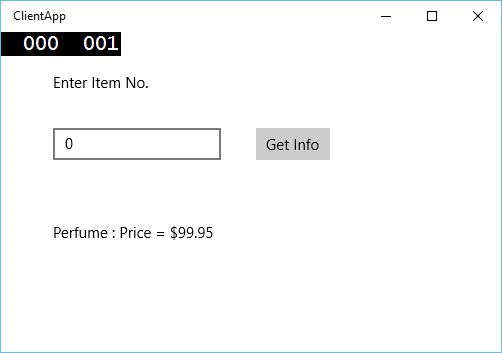
0 girip düğmeye tıkladığınızda, arka plan görevi olarak Uygulama hizmetini çalıştıracak ve öğenin bilgilerini ekranda gösterecektir. textblock.