Développement Windows 10 - Services
Dans ce chapitre, nous allons découvrir comment les applications UWP peuvent aider ou fournir des services à une autre application de la plateforme Windows universelle (UWP). En fait, ce chapitre est une extension du chapitreBackground execution et en est un cas particulier.
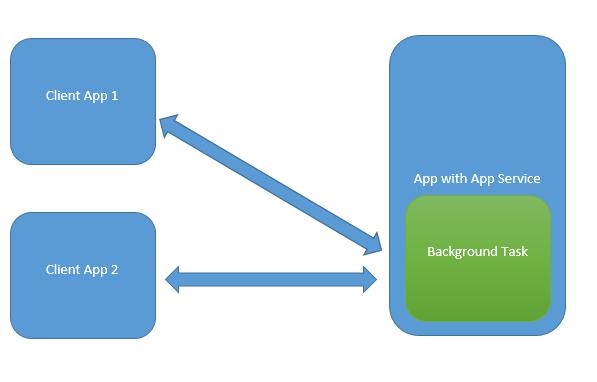
Dans Windows 10, un service d'application est un moyen ou un mécanisme permettant à une application de fournir des services à d'autres applications.
Un service d'application fonctionne sous la forme d'une tâche en arrière-plan.
Les applications de premier plan peuvent appeler un service d'application dans une autre application pour effectuer des tâches en arrière-plan.

Les services d'application sont comme les services Web, mais les services d'application sont utilisés sur les appareils Windows 10.
Les applications de la plateforme Windows universelle (UWP) peuvent interagir avec une autre application UWP de différentes manières -
- Association d'URI à l'aide de LaunchUriAsync
- Association de fichiers à l'aide de LaunchFileAsync
- Lancer pour obtenir des résultats à l'aide de LaunchUriForResultsAsync
- Services d'application
Les trois premières méthodes sont utilisées lorsque les deux applications sont au premier plan, mais que les services d'application sont utilisés dans background task et dans ce cas, l'application cliente doit être au premier plan et disponible pour utiliser App service.
Les services d'application sont très utiles dans les applications où des services non visuels sont fournis, par exemple un lecteur de code à barres dans lequel une application de premier plan prendra l'image et enverra ces octets aux services d'application pour identifier le code à barres.
Pour comprendre tous ces concepts, créons un nouveau projet UWP avec le nom AppServiceProvider dans Microsoft Visual Studio 2015.
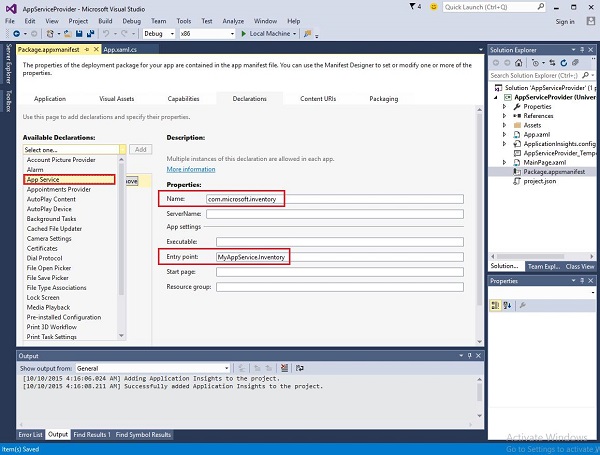
Maintenant dans le Package.appmenifest fichier, ajoutez les informations suivantes.

Pour créer un service d'application, qui peut être appelé par des applications de premier plan, ajoutons un nouveau Windows Runtime Projet de composant à la solution avec MyAppService name, car les services d'application sont implémentés en tant que tâche d'arrière-plan.
Ajouter une référence au MyAppService projet dans le AppServiceProvider projet.
Supprimez maintenant le class1.cs fichier de MyAppService project et ajoutez une nouvelle classe avec le nom de l'inventaire, qui implémentera le IBackgrounTask interface.
le IBackgrounTask l'interface n'a qu'une seule méthode “Run” qui doit être implémenté pour la tâche d'arrière-plan.
public sealed class Inventory : IBackgroundTask {
   public void Run(IBackgroundTaskInstance taskInstance) {

   }
}
Lorsque la tâche d'arrière-plan est créée, Run() methodest appelée et lorsque la méthode Run se termine, les tâches d'arrière-plan sont terminées. Pour rester à une tâche d'arrière-plan, pour répondre aux demandes, le code prend un report.
Le code des services d'application est dans OnRequestedReceived(). Dans cet exemple, un index d'un article d'inventaire est transmis au service, pour récupérer le nom et le prix de l'article d'inventaire spécifié.
private async void OnRequestReceived(AppServiceConnection sender,
   AppServiceRequestReceivedEventArgs args) {
      // Get a deferral because we use an awaitable API below to respond to the message
}
Vous trouverez ci-dessous l'implémentation complète de la classe Inventory en C #.
using System;
using System.Collections.Generic;
using System.Linq;
using System.Text;
using System.Threading.Tasks;

using Windows.ApplicationModel.AppService;
using Windows.ApplicationModel.Background;
using Windows.Foundation.Collections;

namespace MyAppService{
   public sealed class Inventory : IBackgroundTask {

      private BackgroundTaskDeferral backgroundTaskDeferral;
      private AppServiceConnection appServiceconnection;

      private String[] inventoryItems = new string[] { "Robot vacuum", "Chair" };
      private double[] inventoryPrices = new double[] { 129.99, 88.99 };

      public void Run(IBackgroundTaskInstance taskInstance) {
         this.backgroundTaskDeferral = taskInstance.GetDeferral();
         taskInstance.Canceled += OnTaskCanceled;
         var details = taskInstance.TriggerDetails as AppServiceTriggerDetails;

         appServiceconnection = details.AppServiceConnection;
         appServiceconnection.RequestReceived += OnRequestReceived;
      }

      private async void OnRequestReceived(AppServiceConnection sender,
         AppServiceRequestReceivedEventArgs args) {

            var messageDeferral = args.GetDeferral();
            ValueSet message = args.Request.Message;
            ValueSet returnData = new ValueSet();

            string command = message["Command"] as string;
            int? inventoryIndex = message["ID"] as int?;
            if (inventoryIndex.HasValue &&

            inventoryIndex.Value >= 0 &&
            inventoryIndex.Value < inventoryItems.GetLength(0)) {

               switch (command) {

                  case "Price": {
                     returnData.Add("Result", inventoryPrices[inventoryIndex.Value]);
                     returnData.Add("Status", "OK");
                     break;
                  }

                  case "Item": {
                     returnData.Add("Result", inventoryItems[inventoryIndex.Value]);
                     returnData.Add("Status", "OK");
                     break;
                  }

                  default: {
                     returnData.Add("Status", "Fail: unknown command");
                     break;
                  }
               } else {
                  returnData.Add("Status", "Fail: Index out of range");
               }
            }
            await args.Request.SendResponseAsync(returnData);
            messageDeferral.Complete();
      }

      private void OnTaskCanceled(IBackgroundTaskInstance sender,
         BackgroundTaskCancellationReason reason){
            if (this.backgroundTaskDeferral != null) {
               // Complete the service deferral.
               this.backgroundTaskDeferral.Complete();
            }
      }
   }
}
Laissez-nous créer une application cliente en ajoutant un nouveau projet UWP vierge ClientApp et ajoutez un bouton, une zone de texte et deux blocs de texte comme indiqué ci-dessous dans le fichier XAML.
<Page
   x:Class = "ClientApp.MainPage"
   xmlns = "http://schemas.microsoft.com/winfx/2006/xaml/presentation"
   xmlns:x = "http://schemas.microsoft.com/winfx/2006/xaml"
   xmlns:local = "using:ClientApp"
   xmlns:d = "http://schemas.microsoft.com/expression/blend/2008"
   xmlns:mc = "http://schemas.openxmlformats.org/markup-compatibility/2006"
   mc:Ignorable = "d">

   <Grid Background = "{ThemeResource ApplicationPageBackgroundThemeBrush}">
      <TextBlock HorizontalAlignment = "Left" Text = "Enter Item No."
         Margin = "52,40,0,0" TextWrapping = "Wrap"
         VerticalAlignment = "Top" Height = "32" Width = "268"/>

      <Button x:Name = "button" Content = "Get Info" HorizontalAlignment = "Left"
         Margin = "255,96,0,0" VerticalAlignment = "Top" Click = "button_Click"/>

      <TextBox x:Name = "textBox" HorizontalAlignment = "Left" Margin = "52,96,0,0"
         TextWrapping = "Wrap" VerticalAlignment = "Top" Width = "168"/>

      <TextBlock x:Name = "textBlock" HorizontalAlignment = "Left"
         Margin = "52,190,0,0" TextWrapping = "Wrap"
         VerticalAlignment = "Top" Height = "32" Width = "268"/>
   </Grid>

</Page>
Vous trouverez ci-dessous l'implémentation de l'événement de clic dans lequel les services d'application sont demandés.
using System;

using Windows.ApplicationModel.AppService;
using Windows.Foundation.Collections;

using Windows.UI.Xaml;
using Windows.UI.Xaml.Controls;

// The Blank Page item template is documented at
   http://go.microsoft.com/fwlink/?LinkId=402352&clcid=0x409

namespace ClientApp {

   /// <summary>
      /// An empty page that can be used on its own or navigated to within a Frame.
   /// </summary>

   public sealed partial class MainPage : Page {

      private AppServiceConnection inventoryService;

      public MainPage() {
         this.InitializeComponent();
      }

      private async void button_Click(object sender, RoutedEventArgs e){

         // Add the connection.
         if (this.inventoryService == null) {

            this.inventoryService = new AppServiceConnection();
            this.inventoryService.AppServiceName = "com.microsoft.inventory";
            this.inventoryService.PackageFamilyName =
               "bb1a8478-8005-46869923-e525ceaa26fc_4sz2ag3dcq60a";

            var status = await this.inventoryService.OpenAsync();

            if (status != AppServiceConnectionStatus.Success) {
               button.Content = "Failed to connect";
               return;
            }
         }

         // Call the service.
         int idx = int.Parse(textBox.Text);
         var message = new ValueSet();

         message.Add("Command", "Item");
         message.Add("ID", idx);

         AppServiceResponse response = await
            this.inventoryService.SendMessageAsync(message);
         string result = "";

         if (response.Status == AppServiceResponseStatus.Success) {
            // Get the data  that the service sent  to us.
            if (response.Message["Status"] as string == "OK") {
               result = response.Message["Result"] as string;
            }
         }

         message.Clear();
         message.Add("Command", "Price");
         message.Add("ID", idx);

         response = await this.inventoryService.SendMessageAsync(message);

         if (response.Status == AppServiceResponseStatus.Success){
            // Get the data that the service sent to us.
            if (response.Message["Status"] as string == "OK") {
               result += " : Price = " + "$"+ response.Message["Result"] as string;
            }
         }

         textBlock.Text = result;
      }
   }
}
Pour exécuter cette application, vous devrez définir le ClientApp projet en tant que projet de démarrage dans l'Explorateur de solutions, puis déployez cette solution à partir de Build > Deploy Solution.

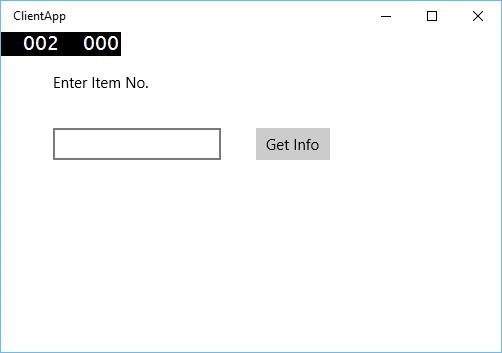
Lorsque le code ci-dessus est compilé et exécuté, vous verrez la fenêtre suivante. Dans les services App, nous venons d'ajouter des informations sur deux éléments. Ainsi, vous pouvez entrer 0 ou 1 pour obtenir des informations sur ces éléments.

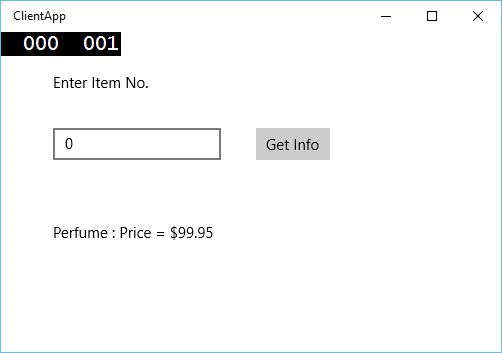
Lorsque vous entrez 0 et cliquez sur le bouton, il exécutera le service d'application en tant que tâche d'arrière-plan et affichera les informations de l'élément sur le textblock.