Android - Bluetooth
Trong số nhiều cách, Bluetooth là một cách để gửi hoặc nhận dữ liệu giữa hai thiết bị khác nhau. Nền tảng Android bao gồm hỗ trợ khung Bluetooth cho phép thiết bị trao đổi dữ liệu không dây với các thiết bị Bluetooth khác.
Android cung cấp API Bluetooth để thực hiện các hoạt động khác nhau này.
Quét các thiết bị Bluetooth khác
Nhận danh sách các thiết bị được ghép nối
Kết nối với các thiết bị khác thông qua khám phá dịch vụ
Android cung cấp lớp BluetoothAdapter để giao tiếp với Bluetooth. Tạo một đối tượng của lệnh gọi này bằng cách gọi phương thức tĩnh getDefaultAdapter (). Cú pháp của nó được đưa ra dưới đây.
private BluetoothAdapter BA;
BA = BluetoothAdapter.getDefaultAdapter();
Để bật Bluetooth của thiết bị của bạn, hãy gọi ý định bằng hằng số Bluetooth ACTION_REQUEST_ENABLE sau. Cú pháp của nó là.
Intent turnOn = new Intent(BluetoothAdapter.ACTION_REQUEST_ENABLE);
startActivityForResult(turnOn, 0);
Ngoài hằng số này, còn có các hằng số khác được cung cấp cho API, hỗ trợ các tác vụ khác nhau. Chúng được liệt kê dưới đây.
| Sr.No | Không đổi & mô tả |
|---|---|
| 1 | ACTION_REQUEST_DISCOVERABLE Hằng số này được sử dụng để bật tính năng khám phá bluetooth |
| 2 |
ACTION_STATE_CHANGED Hằng số này sẽ thông báo rằng trạng thái Bluetooth đã được thay đổi |
| 3 | ACTION_FOUND Hằng số này được sử dụng để nhận thông tin về từng thiết bị được phát hiện |
Sau khi bật Bluetooth, bạn có thể nhận danh sách các thiết bị được ghép nối bằng cách gọi phương thức getBondedDevices (). Nó trả về một tập hợp các thiết bị bluetooth. Cú pháp của nó là.
private Set<BluetoothDevice>pairedDevices;
pairedDevices = BA.getBondedDevices();
Ngoài hình thức Thiết bị phân vùng, còn có các phương pháp khác trong API cho phép kiểm soát nhiều hơn Blueetooth. Chúng được liệt kê dưới đây.
| Sr.No | Phương pháp & mô tả |
|---|---|
| 1 | enable() Phương pháp này bật bộ điều hợp nếu không được bật |
| 2 |
isEnabled() Phương thức này trả về true nếu bộ điều hợp được bật |
| 3 |
disable() Phương pháp này vô hiệu hóa bộ điều hợp |
| 4 |
getName() Phương thức này trả về tên của bộ điều hợp Bluetooth |
| 5 |
setName(String name) Phương pháp này thay đổi tên Bluetooth |
| 6 |
getState() Phương pháp này trả về trạng thái hiện tại của Bộ điều hợp Bluetooth. |
| 7 |
startDiscovery() Phương pháp này bắt đầu quá trình khám phá Bluetooth trong 120 giây. |
Thí dụ
Ví dụ này cung cấp trình diễn về lớp BluetoothAdapter để thao tác với Bluetooth và hiển thị danh sách các thiết bị được ghép nối bằng Bluetooth.
Để thử nghiệm với ví dụ này, bạn cần chạy nó trên một thiết bị thực tế.
| Các bước | Sự miêu tả |
|---|---|
| 1 | Bạn sẽ sử dụng Android studio để tạo một ứng dụng Android một gói com.example.sairamkrishna.myapplication. |
| 2 | Sửa đổi tệp src / MainActivity.java để thêm mã |
| 3 | Sửa đổi tệp XML bố cục res / layout / activity_main.xml thêm bất kỳ thành phần GUI nào nếu cần. |
| 4 | Sửa đổi AndroidManifest.xml để thêm các quyền cần thiết. |
| 5 | Chạy ứng dụng và chọn một thiết bị Android đang chạy và cài đặt ứng dụng trên đó và xác minh kết quả. |
Đây là nội dung của src/MainActivity.java
package com.example.sairamkrishna.myapplication;

import android.app.Activity;
import android.bluetooth.BluetoothAdapter;
import android.bluetooth.BluetoothDevice;

import android.content.Intent;
import android.os.Bundle;
import android.view.View;

import android.widget.ArrayAdapter;
import android.widget.Button;
import android.widget.ListView;

import android.widget.Toast;
import java.util.ArrayList;
import java.util.Set;

public class MainActivity extends Activity  {
   Button b1,b2,b3,b4;
   private BluetoothAdapter BA;
   private Set<BluetoothDevice>pairedDevices;
   ListView lv;

   @Override
   protected void onCreate(Bundle savedInstanceState) {
      super.onCreate(savedInstanceState);
      setContentView(R.layout.activity_main);

      b1 = (Button) findViewById(R.id.button);
      b2=(Button)findViewById(R.id.button2);
      b3=(Button)findViewById(R.id.button3);
      b4=(Button)findViewById(R.id.button4);

      BA = BluetoothAdapter.getDefaultAdapter();
      lv = (ListView)findViewById(R.id.listView);
   }

   public void on(View v){
      if (!BA.isEnabled()) {
         Intent turnOn = new Intent(BluetoothAdapter.ACTION_REQUEST_ENABLE);
         startActivityForResult(turnOn, 0);
         Toast.makeText(getApplicationContext(), "Turned on",Toast.LENGTH_LONG).show();
      } else {
         Toast.makeText(getApplicationContext(), "Already on", Toast.LENGTH_LONG).show();
      }
   }

   public void off(View v){
      BA.disable();
      Toast.makeText(getApplicationContext(), "Turned off" ,Toast.LENGTH_LONG).show();
   }


   public  void visible(View v){
      Intent getVisible = new Intent(BluetoothAdapter.ACTION_REQUEST_DISCOVERABLE);
      startActivityForResult(getVisible, 0);
   }


   public void list(View v){
      pairedDevices = BA.getBondedDevices();

      ArrayList list = new ArrayList();

      for(BluetoothDevice bt : pairedDevices) list.add(bt.getName());
      Toast.makeText(getApplicationContext(), "Showing Paired Devices",Toast.LENGTH_SHORT).show();

      final ArrayAdapter adapter = new  ArrayAdapter(this,android.R.layout.simple_list_item_1, list);

      lv.setAdapter(adapter);
   }
}
Đây là nội dung của activity_main.xml
Ở đây abc cho biết về logo của điểm hướng dẫn.
<?xml version="1.0" encoding="utf-8"?>
<RelativeLayout
xmlns:android="http://schemas.android.com/apk/res/android"
   xmlns:tools="http://schemas.android.com/tools"
   android:layout_width="match_parent"
   android:layout_height="match_parent"
   android:paddingLeft="@dimen/activity_horizontal_margin"
   android:paddingRight="@dimen/activity_horizontal_margin"
   android:paddingTop="@dimen/activity_vertical_margin"
   android:paddingBottom="@dimen/activity_vertical_margin"
   tools:context=".MainActivity"
   android:transitionGroup="true">

   <TextView android:text="Bluetooth Example"
      android:layout_width="wrap_content"
      android:layout_height="wrap_content"
      android:id="@+id/textview"
      android:textSize="35dp"
      android:layout_alignParentTop="true"
      android:layout_centerHorizontal="true" />

   <TextView
      android:layout_width="wrap_content"
      android:layout_height="wrap_content"
      android:text="Tutorials point"
      android:id="@+id/textView"
      android:layout_below="@+id/textview"
      android:layout_centerHorizontal="true"
      android:textColor="#ff7aff24"
      android:textSize="35dp" />

   <ImageView
      android:layout_width="wrap_content"
      android:layout_height="wrap_content"
      android:id="@+id/imageView"
      android:src="@drawable/abc"
      android:layout_below="@+id/textView"
      android:layout_centerHorizontal="true"
      android:theme="@style/Base.TextAppearance.AppCompat" />

   <Button
      android:layout_width="wrap_content"
      android:layout_height="wrap_content"
      android:text="Turn On"
      android:id="@+id/button"
      android:layout_below="@+id/imageView"
      android:layout_toStartOf="@+id/imageView"
      android:layout_toLeftOf="@+id/imageView"
      android:clickable="true"
      android:onClick="on" />

   <Button
      android:layout_width="wrap_content"
      android:layout_height="wrap_content"
      android:text="Get visible"
      android:onClick="visible"
      android:id="@+id/button2"
      android:layout_alignBottom="@+id/button"
      android:layout_centerHorizontal="true" />

   <Button
      android:layout_width="wrap_content"
      android:layout_height="wrap_content"
      android:text="List devices"
      android:onClick="list"
      android:id="@+id/button3"
      android:layout_below="@+id/imageView"
      android:layout_toRightOf="@+id/imageView"
      android:layout_toEndOf="@+id/imageView" />

   <Button
      android:layout_width="wrap_content"
      android:layout_height="wrap_content"
      android:text="turn off"
      android:onClick="off"
      android:id="@+id/button4"
      android:layout_below="@+id/button"
      android:layout_alignParentLeft="true"
      android:layout_alignParentStart="true" />

   <ListView
      android:layout_width="wrap_content"
      android:layout_height="wrap_content"
      android:id="@+id/listView"
      android:layout_alignParentBottom="true"
      android:layout_alignLeft="@+id/button"
      android:layout_alignStart="@+id/button"
      android:layout_below="@+id/textView2" />

   <TextView
      android:layout_width="wrap_content"
      android:layout_height="wrap_content"
      android:text="Paired devices:"
      android:id="@+id/textView2"
      android:textColor="#ff34ff06"
      android:textSize="25dp"
      android:layout_below="@+id/button4"
      android:layout_alignLeft="@+id/listView"
      android:layout_alignStart="@+id/listView" />

</RelativeLayout>
Đây là nội dung của Strings.xml
<resources>
   <string name="app_name">My Application</string>
</resources>
Đây là nội dung của AndroidManifest.xml
<?xml version="1.0" encoding="utf-8"?>
<manifest xmlns:android="http://schemas.android.com/apk/res/android"
   package="com.example.sairamkrishna.myapplication" >
   <uses-permission android:name="android.permission.BLUETOOTH"/>
   <uses-permission android:name="android.permission.BLUETOOTH_ADMIN"/>

   <application
      android:allowBackup="true"
      android:icon="@mipmap/ic_launcher"
      android:label="@string/app_name"
      android:theme="@style/AppTheme" >

      <activity
         android:name=".MainActivity"
         android:label="@string/app_name" >

         <intent-filter>
            <action android:name="android.intent.action.MAIN" />
            <category android:name="android.intent.category.LAUNCHER" />
         </intent-filter>

      </activity>

   </application>
</manifest>
Hãy thử chạy ứng dụng của bạn. Tôi giả sử bạn đã kết nối thiết bị di động Android thực tế với máy tính của mình. Để chạy ứng dụng từ Android studio, hãy mở một trong các tệp hoạt động của dự án của bạn và nhấp vào


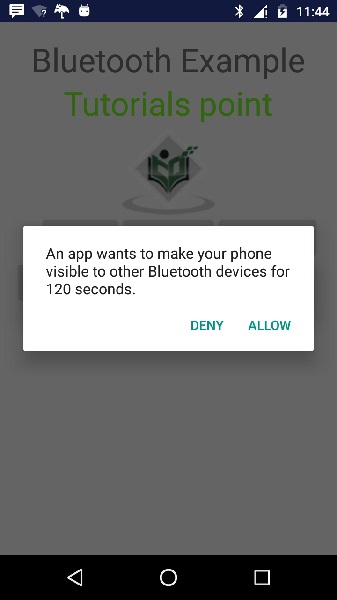
Bây giờ chỉ cần chọn nút Get Visible để bật khả năng hiển thị của bạn. Màn hình sau sẽ xuất hiện yêu cầu bạn cho phép bật tính năng khám phá trong 120 giây.

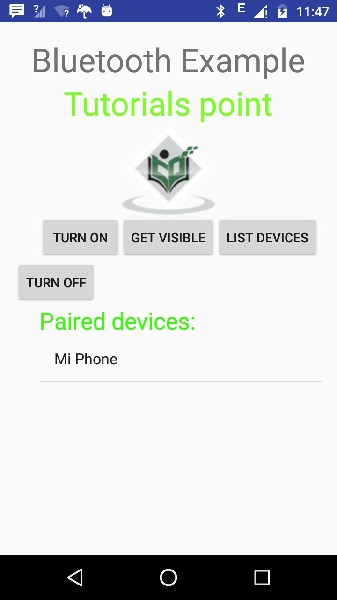
Bây giờ chỉ cần chọn tùy chọn Danh sách thiết bị. Nó sẽ liệt kê các thiết bị được ghép nối trong chế độ xem danh sách. Trong trường hợp của tôi, tôi chỉ có một thiết bị được ghép nối. Nó được hiển thị bên dưới.

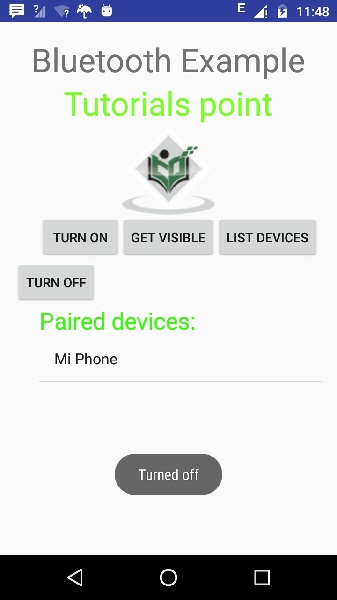
Bây giờ chỉ cần chọn nút Tắt để tắt Bluetooth. Thông báo sau sẽ xuất hiện khi bạn tắt bluetooth cho biết đã tắt Bluetooth thành công.
