Android - Đang tải Spinner
Bạn có thể hiển thị tiến độ của một nhiệm vụ trong Android thông qua thanh tiến trình tải. Thanh tiến trình có hai hình dạng. Thanh tải và Con quay tải. Trong chương này, chúng ta sẽ thảo luận về spinner.
Spinner được sử dụng để hiển thị tiến độ của những công việc có tổng thời gian hoàn thành không xác định. Để sử dụng, bạn chỉ cần xác định nó trong xml như thế này.
<ProgressBar
   android:id="@+id/progressBar1"
   style="?android:attr/progressBarStyleLarge"
   android:layout_width="wrap_content"
   android:layout_height="wrap_content"
   android:layout_centerHorizontal="true" />
Sau khi định nghĩa nó trong xml, bạn phải lấy tham chiếu của nó trong tệp java thông qua lớp ProgressBar. Cú pháp của nó được đưa ra dưới đây:
private ProgressBar spinner;
spinner = (ProgressBar)findViewById(R.id.progressBar1);
Sau đó, bạn có thể làm cho nó biến mất và đưa nó trở lại khi cần thông qua Phương pháp setVisibility. Cú pháp của nó được đưa ra dưới đây:
spinner.setVisibility(View.GONE);
spinner.setVisibility(View.VISIBLE);
Ngoài các Phương thức này, còn có các phương thức khác được định nghĩa trong lớp ProgressBar mà bạn có thể sử dụng để xử lý spinner hiệu quả hơn.
| Sr.No | Phương pháp & mô tả |
|---|---|
| 1 | isIndeterminate() Cho biết thanh tiến trình này có ở chế độ không xác định hay không |
| 2 | postInvalidate() Gây ra sự mất hiệu lực xảy ra vào chu kỳ tiếp theo thông qua vòng lặp sự kiện |
| 3 | setIndeterminate(boolean indeterminate) Thay đổi chế độ không xác định cho thanh tiến trình này |
| 4 | invalidateDrawable(Drawable dr) Làm mất hiệu lực của Drawable được chỉ định |
| 5 | incrementSecondaryProgressBy(int diff) Tăng tiến trình phụ của thanh tiến trình theo số lượng được chỉ định |
| 6 | getProgressDrawable() Nhận có thể vẽ được sử dụng để vẽ thanh tiến trình trong chế độ tiến trình |
Thí dụ
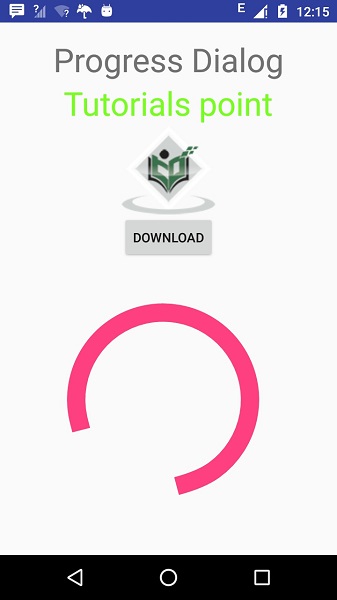
Đây là một ví dụ minh họa việc sử dụng ProgressBar để xử lý spinner. Nó tạo ra một ứng dụng cơ bản cho phép bạn bật con quay khi nhấp vào nút.
Để thử nghiệm với ví dụ này, bạn có thể chạy trên thiết bị thực tế hoặc trong trình giả lập.
| Các bước | Sự miêu tả |
|---|---|
| 1 | Bạn sẽ sử dụng Android studio để tạo ứng dụng Android theo gói com.example.sairamkrishna.myapplication. |
| 2 | Sửa đổi tệp src / MainActivity.java để thêm mã cần thiết. |
| 3 | Sửa đổi res / layout / activity_main để thêm các thành phần XML tương ứng |
| 4 | Cần tạo một tệp xml trong thư mục drawable. Nó chứa thông tin về hình dạng và xoay về thanh tiến trình |
| 5 | Chạy ứng dụng và chọn một thiết bị Android đang chạy và cài đặt ứng dụng trên đó và xác minh kết quả |
Sau đây là nội dung của tệp hoạt động chính được sửa đổi src/MainActivity.java.
package com.example.sairamkrishna.myapplication;

import android.app.Activity;
import android.os.Bundle;
import android.view.View;
import android.widget.Button;
import android.widget.ProgressBar;


public class MainActivity extends Activity {
   Button b1;

   private ProgressBar spinner;
   @Override
   protected void onCreate(Bundle savedInstanceState) {
      super.onCreate(savedInstanceState);
      setContentView(R.layout.activity_main);

      b1=(Button)findViewById(R.id.button);
      spinner=(ProgressBar)findViewById(R.id.progressBar);
      spinner.setVisibility(View.GONE);

      b1.setOnClickListener(new View.OnClickListener() {
         @Override
         public void onClick(View v) {
            spinner.setVisibility(View.VISIBLE);
         }
      });
   }
}
Sau đây là nội dung sửa đổi của xml res/layout/activity_main.xml.
Trong đoạn mã sau abc cho biết logo của tutorialspoint.com
<?xml version="1.0" encoding="utf-8"?>
<RelativeLayout xmlns:android="http://schemas.android.com/apk/res/android"
   xmlns:tools="http://schemas.android.com/tools" android:layout_width="match_parent"
   android:layout_height="match_parent"
   android:paddingLeft="@dimen/activity_horizontal_margin"
   android:paddingRight="@dimen/activity_horizontal_margin"
   android:paddingTop="@dimen/activity_vertical_margin"
   android:paddingBottom="@dimen/activity_vertical_margin" tools:context=".MainActivity">

   <TextView android:text="Progress Dialog" android:layout_width="wrap_content"
      android:layout_height="wrap_content"
      android:id="@+id/textview"
      android:textSize="35dp"
      android:layout_alignParentTop="true"
      android:layout_centerHorizontal="true" />

   <TextView
      android:layout_width="wrap_content"
      android:layout_height="wrap_content"
      android:text="Tutorials point"
      android:id="@+id/textView"
      android:layout_below="@+id/textview"
      android:layout_centerHorizontal="true"
      android:textColor="#ff7aff24"
      android:textSize="35dp" />

   <Button
      android:layout_width="wrap_content"
      android:layout_height="wrap_content"
      android:text="download"
      android:id="@+id/button"
      android:layout_below="@+id/imageView"
      android:layout_centerHorizontal="true" />

   <ImageView
      android:layout_width="wrap_content"
      android:layout_height="wrap_content"
      android:id="@+id/imageView"
      android:src="@drawable/abc"
      android:layout_below="@+id/textView"
      android:layout_centerHorizontal="true" />

   <ProgressBar
      style="?android:attr/progressBarStyleLarge"
      android:layout_width="wrap_content"
      android:layout_height="wrap_content"
      android:id="@+id/progressBar"
      android:progressDrawable="@drawable/circular_progress_bar"
      android:layout_below="@+id/button"
      android:layout_alignRight="@+id/textView"
      android:layout_alignEnd="@+id/textView"
      android:layout_alignLeft="@+id/textview"
      android:layout_alignStart="@+id/textview"
      android:layout_alignParentBottom="true" />

</RelativeLayout>
Sau đây là nội dung của res/drawable/circular_progress_bar.xml.
<?xml version="1.0" encoding="utf-8"?>
<rotate
   xmlns:android="http://schemas.android.com/apk/res/android"
   android:fromDegrees="90"
   android:pivotX="50%"
   android:pivotY="50%"
   android:toDegrees="360">

   <shape
      android:innerRadiusRatio="3"
      android:shape="ring"
      android:thicknessRatio="7.0">

      <gradient
         android:centerColor="#007DD6"
         android:endColor="#007DD6"
         android:startColor="#007DD6"
         android:angle="0"
         android:type="sweep"
         android:useLevel="false" />
   </shape>

</rotate>
Sau đây là nội dung của AndroidManifest.xml tập tin.
<?xml version="1.0" encoding="utf-8"?>
<manifest xmlns:android="http://schemas.android.com/apk/res/android"
   package="com.example.sairamkrishna.myapplication" >

   <application
      android:allowBackup="true"
      android:icon="@drawable/ic_launcher"
      android:label="@string/app_name"
      android:theme="@style/AppTheme" >

      <activity
         android:name="com.example.sairamkrishna.myapplication.MainActivity"
         android:label="@string/app_name" >

         <intent-filter>
            <action android:name="android.intent.action.MAIN" />
            <category android:name="android.intent.category.LAUNCHER" />
         </intent-filter>

      </activity>

   </application>
</manifest>
Hãy thử chạy ứng dụng mà chúng tôi vừa sửa đổi. Tôi cho rằng bạn đã tạo raAVDtrong khi thiết lập môi trường. Để chạy ứng dụng từ Android studio, hãy mở một trong các tệp hoạt động của dự án của bạn và nhấp vào


Bây giờ hãy nhấp vào nút load spinner để bật load spinner. Nó được hiển thị trong hình ảnh bên dưới -
