Angular Material7-波紋
ザ・ <mat-ripple>、Angular Directiveは、ユーザーの操作を表す領域を定義するために使用されます。
この章では、AngularMaterialを使用して波及効果を描画するために必要な構成を紹介します。
変更されたモジュール記述子の内容は次のとおりです app.module.ts。
import { BrowserModule } from '@angular/platform-browser';
import { NgModule } from '@angular/core';
import { AppComponent } from './app.component';
import {BrowserAnimationsModule} from '@angular/platform-browser/animations';
import {MatRippleModule, MatCheckboxModule, MatInputModule} from '@angular/material'
import {FormsModule, ReactiveFormsModule} from '@angular/forms';
@NgModule({
   declarations: [
      AppComponent
   ],
   imports: [
      BrowserModule,
      BrowserAnimationsModule,
      MatRippleModule, MatCheckboxModule, MatInputModule,
      FormsModule,
      ReactiveFormsModule
   ],
   providers: [],
   bootstrap: [AppComponent]
})
export class AppModule { }
以下は、変更されたHTMLホストファイルの内容です。 app.component.html。
<mat-checkbox [(ngModel)] = "centered" class = "tp-ripple-checkbox">Centered</mat-checkbox>
<mat-checkbox [(ngModel)] = "disabled" class = "tp-ripple-checkbox">Disabled</mat-checkbox>
<mat-checkbox [(ngModel)] = "unbounded" class = "tp-ripple-checkbox">Unbounded</mat-checkbox>
<section>
   <mat-form-field class = "tp-ripple-form-field">
      <input matInput [(ngModel)] = "radius" type = "number" placeholder = "Radius">
   </mat-form-field>
   <mat-form-field class = "tp-ripple-form-field">
      <input matInput [(ngModel)] = "color" type = "text" placeholder = "Color">
   </mat-form-field>
</section>
<div class = "tp-ripple-container mat-elevation-z4"
   matRipple
   [matRippleCentered] = "centered"
   [matRippleDisabled] = "disabled"
   [matRippleUnbounded] = "unbounded"
   [matRippleRadius] = "radius"
   [matRippleColor] = "color">
   Click me
</div>
変更されたCSSファイルの内容は次のとおりです app.component.css。
.tp-ripple-container {
   cursor: pointer;
   text-align: center;
   width: 300px;
   height: 300px;
   line-height: 300px;
   user-select: none;
   -webkit-user-select: none;
   -moz-user-select: none;
   -ms-user-select: none;
   -webkit-user-drag: none;
   -webkit-tap-highlight-color: transparent;
}
.tp-ripple-checkbox {
   margin: 6px 12px 6px 0;
}
.tp-ripple-form-field {
   margin: 0 12px 0 0;
}
以下は、変更されたtsファイルの内容です。 app.component.ts。
import { Component } from '@angular/core';
@Component({
   selector: 'app-root',
   templateUrl: './app.component.html',
   styleUrls: ['./app.component.css']
})
export class AppComponent {
   title = 'materialApp';
   centered = false;
   disabled = false;
   unbounded = false;
   radius: number;
   color: string;
}
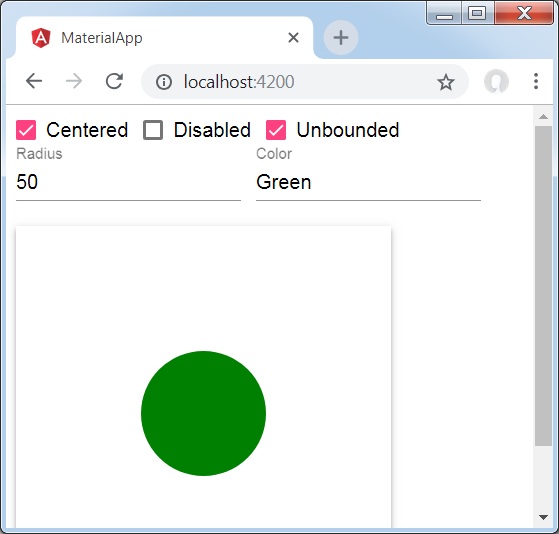
結果
結果を確認します。

詳細
最初に、mat-checkboxを使用してチェックボックスを作成し、ngModelと変数を使用してそれらをバインドしました。これらのプロパティは、リップルをカスタマイズするために使用されます。
次に、リップルを作成し、.tsファイルの変数にバインドされたさまざまな属性を紹介しました。