Google AMP - Grundlegende Syntax
In diesem Kapitel werden die grundlegenden Anforderungen für den Einstieg in Google AMP-Seiten erläutert.
Beispiel Amp Seite
Ein grundlegendes Beispiel für eine Amp-Seite ist unten dargestellt -
<!doctype html>
<html amp>
   <head>
      <meta charset = "utf-8">
      <title>Amp Sample Page</title>
      <link rel = "canonical" href = "./regular-html-version.html">
      <meta name = "viewport" content = "width = device-width,
      minimum-scale = 1,initial-scale = 1">
      <style amp-custom>
         h1 {color: red}
      </style>

      <style amp-boilerplate>
         body{
            -webkit-animation:
            -amp-start 8s steps(1,end) 0s 1 normal both;-moz-animation:
            -amp-start 8s steps(1,end) 0s 1 normal both;-ms-animation:
            -amp-start 8s steps(1,end) 0s 1 normal both;animation:
            -amp-start 8s steps(1,end) 0s 1 normal both
         }
         @-webkit-keyframes
         -amp-start{from{visibility:hidden}to{visibility:visible}}@-moz-keyframes
         -amp-start{from{visibility:hidden}to{visibility:visible}}@-ms-keyframes
         -amp-start{from{visibility:hidden}to{visibility:visible}}@-o-keyframes
         -amp-start{from{visibility:hidden}to{visibility:visible}}@keyframes
         -amp-start{from{visibility:hidden}to{visibility:visible}}
      </style>
      <noscript>
         <style amp-boilerplate>
            body{
               -webkit-animation:none;
               -moz-animation:none;
               -ms-animation:none;
               animation:none}
         </style>
      </noscript>
      <script async src = "https://cdn.ampproject.org/v0.js">
      </script>
   </head>
   <body>
      <h1>Amp Sample Page</h1>
      <p>
         <amp-img
            src = "images/christmas1.jpg"
            width = "300"
            height = "300"
            layout = "responsive">
         </amp-img>
      </p>
   </body>
</html>
Obligatorische Tags
Es gibt einige obligatorische Tags, die in eine Amp-Seite aufgenommen werden müssen. In diesem Abschnitt werden sie ausführlich erläutert -
Wir müssen sicherstellen, dass wir hinzufügen amp oder ⚡ zum HTML-Tag wie unten gezeigt
<html amp>
   OR
<html ⚡>
Wir sollten die Tags <head> und <body> zur HTML-Seite hinzufügen.
Die Amp-Validierung kann fehlschlagen, wenn Sie eines der obligatorischen Meta-Tags verpassen. Einige obligatorische Mets-Tags, die im Kopfbereich der Seite hinzugefügt werden sollen, werden hier angezeigt -
<meta charset="utf-8">
   <meta name  =  "viewport"
      content = "width = device-width,
      minimum-scale = 1,
      initial-scale = 1">
Link von rel = "canonical", der innerhalb des Head-Tags hinzugefügt werden soll
<link rel = "canonical" href = "./regular-html-version.html">Style-Tag mit Amp-Boilerplate -
<style amp-boilerplate>
   body{
     -webkit-animation:
      -amp-start 8s steps(1,end) 0s 1 normal both;-moz-animation:
      -amp-start 8s steps(1,end) 0s 1 normal both;-ms-animation:
      -amp-start 8s steps(1,end) 0s 1 normal both;animation:
      -amp-start 8s steps(1,end) 0s 1 normal both
   }
   @-webkit-keyframes
   -amp-start{from{visibility:hidden}to{visibility:visible}}@-moz-keyframes
   -amp-start{from{visibility:hidden}to{visibility:visible}}@-ms-keyframes
   -amp-start{from{visibility:hidden}to{visibility:visible}}@-o-keyframes
   -amp-start{from{visibility:hidden}to{visibility:visible}}@keyframes
   -amp-start{from{visibility:hidden}to{visibility:visible}}
</style>
Noscript-Tag mit Amp-Boilerplate -
<noscript>
   <style amp-boilerplate>
      body{
         -webkit-animation:none;
         -moz-animation:none;
         -ms-animation:none;
         animation:none}
   </style>
</noscript>
Das Amp-Skript-Tag mit Async wurde wie unten gezeigt hinzugefügt. Dies ist das wichtigste Tag von allen -
<script async src = "https://cdn.ampproject.org/v0.js">
</script>
Sie sollten dieses Tag verwenden, wenn Sie der Seite benutzerdefiniertes CSS hinzufügen möchten. Bitte beachten Sie, dass wir auf Amp-Seiten kein externes Stylesheet aufrufen können. Um benutzerdefinierte CSS hinzuzufügen, muss Ihre gesamte CSS hier abgelegt werden -
<style amp-custom>
   //all your styles here
</style>
Sie können die obige Seite in Ihrem Browser mit # development = 1 am Ende der Seiten-URL überprüfen.
Lassen Sie uns jetzt dasselbe im Browser testen. Ich habe die Seite lokal gehostet und als amppage.html gespeichert.
Die oben zu testende URL lautet
http://localhost/googleamp/amppage.html#development=1
Beispiel
<!doctype html>
<html amp>
   <head>
      <meta charset = "utf-8">
      <title>Amp Sample Page</title>
      <link rel = "canonical" href = "./regular-html-version.html">
      <meta name = "viewport" content = "width=device-width,
      minimum-scale = 1,initial-scale = 1">
      <style amp-custom>
         h1 {color: red}
      </style>
      <style amp-boilerplate>
         body{
            -webkit-animation:
            -amp-start 8s steps(1,end) 0s 1 normal both;-moz-animation:
            -amp-start 8s steps(1,end) 0s 1 normal both;-ms-animation:
            -amp-start 8s steps(1,end) 0s 1 normal both;animation:
            -amp-start 8s steps(1,end) 0s 1 normal both
         }
         @-webkit-keyframes
         -amp-start{from{visibility:hidden}to{visibility:visible}}@-moz-keyframes
         -amp-start{from{visibility:hidden}to{visibility:visible}}@-ms-keyframes
         -amp-start{from{visibility:hidden}to{visibility:visible}}@-o-keyframes
         -amp-start{from{visibility:hidden}to{visibility:visible}}@keyframes
         -amp-start{from{visibility:hidden}to{visibility:visible}}
      </style>
      <noscript>
         <style amp-boilerplate>
            body{
               -webkit-animation:none;
               -moz-animation:none;
               -ms-animation:none;
               animation:none}
         </style>
      </noscript>
      <script async src = "https://cdn.ampproject.org/v0.js">
      </script>
   </head>
   <body>
      <h1>Amp Sample Page</h1>
      <p>
         <amp-img
            src = "images/christmas1.jpg"
            width = "300"
            height = "250"
            layout = "responsive">
         </amp-img>
      </p>
   </body>
</html>
Ausgabe

Sie können den Status der Amp-Validierung in der Entwicklerkonsole wie folgt anzeigen:
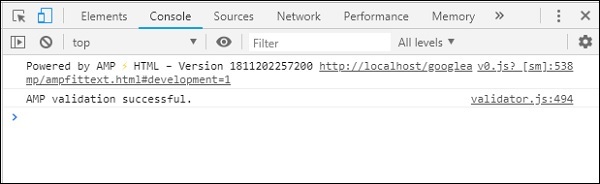
Damit ist die AMP-Validierung erfolgreich, da wir alle erforderlichen obligatorischen Tags für eine gültige Amp-Seite hinzugefügt haben.