Windows10Dev-コネクテッドエクスペリエンス
すでに知っているように、Windows 10では、複数のWindows10デバイスで実行および実行できるアプリケーションを作成できます。これらの異なるデバイスがあり、異なるデバイスで実行されている場合でも、1つのアプリケーションであるかのように感じさせたいとします。
ユニバーサルWindowsプラットフォーム(UWP)では、すべてのWindows 10デバイスで単一のアプリケーションを実行でき、ユーザーにそれが1つのアプリケーションであると感じさせることができます。これはとして知られていますconnecting experience。
コネクテッドエクスペリエンスの重要な機能-
Windows 10は、アプリ、サービス、コンテンツをデバイス間でシームレスかつ簡単に移動できる、よりパーソナルなコンピューティングの時代への第一歩です。
接続されたエクスペリエンスを使用すると、そのアプリケーションに関連するデータと個人設定を簡単に共有でき、すべてのデバイスで利用できるようになります。
この章では、以下について学習します。
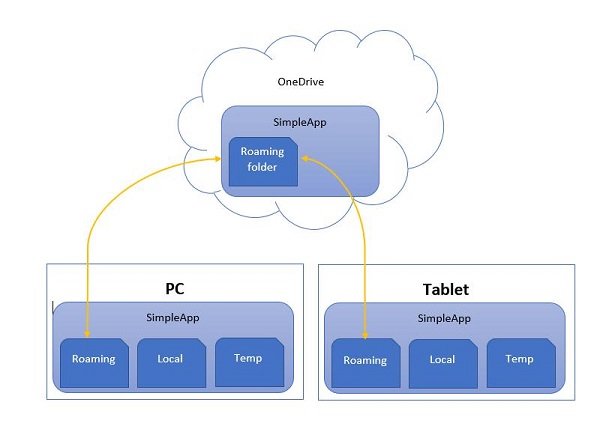
これらの共有データまたは設定が保存され、その1つのアプリケーションのデバイスで使用できるようになります。
ユーザーの識別方法。異なるデバイスで同じアプリケーションを使用しているのは同じユーザーであること。
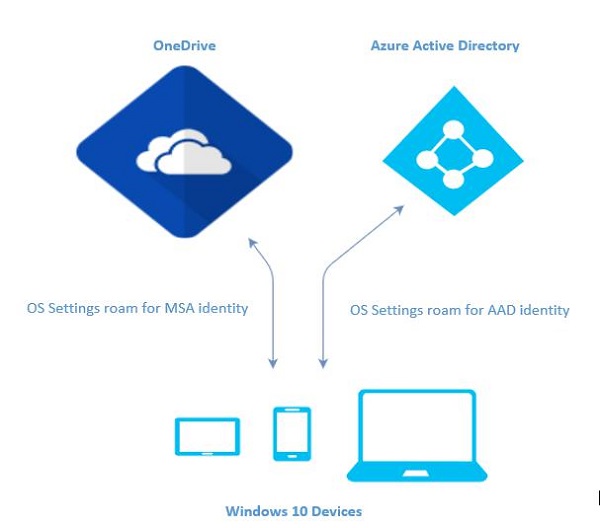
Windows10は大胆な一歩を踏み出しました。Microsoftアカウント(MSA)または企業アカウントまたは(職場)アカウントのいずれかを使用してWindows 10にログインすると、次のように想定されます。
OneDrive for MSAアカウントに無料でアクセスでき、Active Directory(AD)とエンタープライズアカウントのクラウドバージョンであるAzure Active Directory(AAD)にアクセスできます。
さまざまなアプリケーションやリソースにアクセスできます。
デバイスとアプリケーションはローミング状態と設定になっています。

Windows10でのローミング
PCにログオンするときは、ロック画面や背景色などの設定を行ったり、さまざまな種類の設定をカスタマイズしたりします。Windows 10で実行されているコンピューターまたはデバイスが複数ある場合、同じアカウントで他のデバイスにログインすると、1つのデバイスの設定と設定がクラウドから同期されます。
Windows 10では、アプリケーション設定を設定またはパーソナライズすると、これらの設定はUWPで利用可能なローミングAPIを使用してローミングします。同じアプリケーションを他のデバイスで再度実行すると、最初に設定が取得され、それらの設定がそのデバイスのアプリケーションに適用されます。

ローミングデータをクラウドにアップロードするには、100KBの制限があります。この制限を超えると、同期が停止し、ローカルフォルダのように動作します。
ザ・ RoamingSettings APIは、アプリケーションがデータを保存できる辞書として公開されます。
Windows.Storage.ApplicationDataContainer roamingSettings =
   Windows.Storage.ApplicationData.Current.RoamingSettings;

// Retrivve value from RoamingSettings
var colorName = roamingSettings.Values["PreferredBgColor"].ToString();

// Set values to RoamingSettings
roamingSettings.Values["PreferredBgColor"] = "Green";
データが変更されたとき RoamingSettings それからそれは発砲します DataChanged イベント。設定を更新できます。
Windows.Storage.ApplicationData.Current.DataChanged += RoamingDataChanged;

private void RoamingDataChanged(Windows.Storage.ApplicationData sender, object args) {
   // Something has changed in the roaming data or settings
}
アプリケーションの背景色を設定し、これらの設定がUWPで利用可能なローミングAPIを使用してローミングする例を見てみましょう。
以下に示すのは、さまざまなコントロールが追加されたXAMLコードです。
<Page
   x:Class = "RoamingSettingsDemo.Views.MainPage"
   xmlns = "http://schemas.microsoft.com/winfx/2006/xaml/presentation"
   xmlns:x = "http://schemas.microsoft.com/winfx/2006/xaml"
   xmlns:local = "using:RoamingSettingsDemo.Views"
   xmlns:d = "http://schemas.microsoft.com/expression/blend/2008"
   xmlns:mc = "http://schemas.openxmlformats.org/markup-compatibility/2006"
   mc:Ignorable = "d">

   <Grid x:Name = "MainGrid" Background = "{ThemeResource ApplicationPageBackgroundThemeBrush}">
      <Grid.RowDefinitions>
         <RowDefinition Height = "80" />
         <RowDefinition />
      </Grid.RowDefinitions>

      <StackPanel Orientation = "Horizontal" VerticalAlignment = "Top" Margin = "12,12,0,0">
         <TextBlock Style = "{StaticResource HeaderTextBlockStyle}"
            FontSize = "24" Text = "Connected Experience Demo" />
      </StackPanel>

      <Grid Grid.Row = "1" Margin = "0,80,0,0">
         <StackPanel Margin = "62,0,0,0">
            <TextBlock x:Name = "textBlock" HorizontalAlignment = "Left"
               TextWrapping = "Wrap" Text = "Choose your background color:"
               VerticalAlignment = "Top"/>

            <RadioButton x:Name = "BrownRadioButton" Content = "Brown"
               Checked = "radioButton_Checked" />

            <RadioButton x:Name = "GrayRadioButton" Content = "Gray"
               Checked = "radioButton_Checked"/>
         </StackPanel>
      </Grid>

   </Grid>

</Page>
のC#実装 RoamingSettings さまざまなイベントを以下に示します。
using System;
using System.Collections.Generic;
using System.IO;
using System.Linq;
using System.Runtime.InteropServices.WindowsRuntime;

using Windows.Foundation;
using Windows.Foundation.Collections;

using Windows.UI;
using Windows.UI.Xaml;
using Windows.UI.Xaml.Controls;
using Windows.UI.Xaml.Controls.Primitives;
using Windows.UI.Xaml.Data;
using Windows.UI.Xaml.Input;
using Windows.UI.Xaml.Media;
using Windows.UI.Xaml.Navigation;

// The RoamingSettingsDemo Page item template is documented at
   http://go.microsoft.com/fwlink/?LinkId=234238

namespace RoamingSettingsDemo.Views {

   /// <summary>
      /// An empty page that can be used on its own or navigated to within a Frame.
   /// </summary>

   public sealed partial class MainPage : Page {

      public MainPage() {
         this.InitializeComponent();
      }

      protected override void OnNavigatedTo(NavigationEventArgs e) {
         SetBackgroundFromSettings();
         Windows.Storage.ApplicationData.Current.DataChanged += RoamingDataChanged;
      }

      protected override void OnNavigatedFrom(NavigationEventArgs e) {
         Windows.Storage.ApplicationData.Current.DataChanged -= RoamingDataChanged;
      }

      private void RoamingDataChanged(Windows.Storage.ApplicationData sender, object args) {

         // Something has changed in the roaming data or settings
         var ignore = Dispatcher.RunAsync(Windows.UI.Core.CoreDispatcherPriority.Normal,
            () ⇒ SetBackgroundFromSettings());
      }

      private void SetBackgroundFromSettings() {

         // Get the roaming settings
         Windows.Storage.ApplicationDataContainer roamingSettings =
            Windows.Storage.ApplicationData.Current.RoamingSettings;

         if (roamingSettings.Values.ContainsKey("PreferBrownBgColor")) {
            var colorName = roamingSettings.Values["PreferBrownBgColor"].ToString();

            if (colorName == "Gray") {
               MainGrid.Background = new SolidColorBrush(Colors.Gray);
               GrayRadioButton.IsChecked = true;
            } else if (colorName == "Brown") {
               MainGrid.Background = new SolidColorBrush(Colors.Brown);
               BrownRadioButton.IsChecked = true;
            }
         }

      }

      private void radioButton_Checked(object sender, RoutedEventArgs e){
         if (GrayRadioButton.IsChecked.HasValue &&
            (GrayRadioButton.IsChecked.Value == true)) {
               Windows.Storage.ApplicationData.Current.RoamingSettings.
                  Values["PreferBrownBgCo lor"] = "Gray";
         } else {
            Windows.Storage.ApplicationData.Current.RoamingSettings.
               Values["PreferBrownBgCo lor"] = "Brown";
         }

         SetBackgroundFromSettings();
      }

   }
}
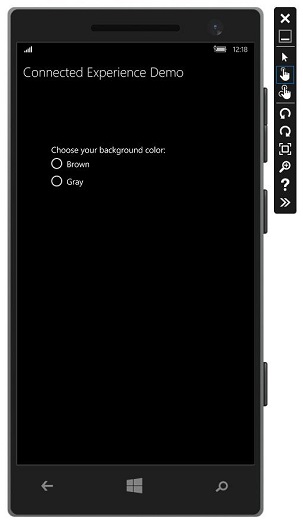
上記のコードをコンパイルして実行すると、次のウィンドウが表示されます。

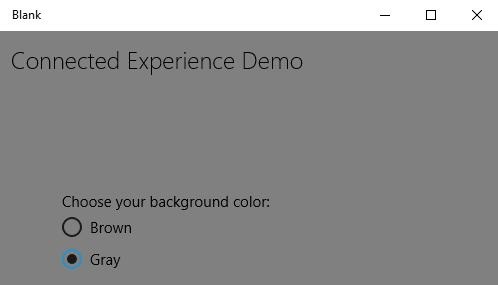
背景色として灰色を選択して、このアプリを閉じましょう。
これで、このデバイスまたは他のデバイスでこのアプリを実行すると、背景色が灰色に変わったことがわかります。これは、アプリがで背景色の変化の情報を正常に取得したことを示していますRoamingSettings。
