Windows10開発-サービス
この章では、UWPアプリが別のユニバーサルWindowsプラットフォーム(UWP)アプリケーションを支援またはサービスを提供する方法について学習します。実際、この章は章の延長ですBackground execution そしてそれの特別な場合です。
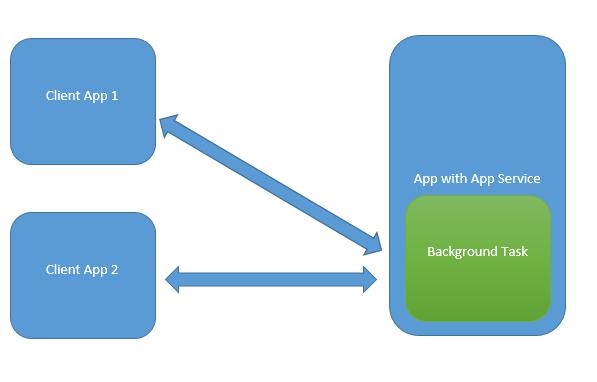
Windows 10では、アプリサービスは、アプリが他のアプリにサービスを提供するための方法またはメカニズムです。
アプリサービスは、バックグラウンドタスクの形で機能します。
フォアグラウンドアプリは、別のアプリのアプリサービスを呼び出して、バックグラウンドでタスクを実行できます。

アプリサービスはWebサービスに似ていますが、アプリサービスはWindows10デバイスで使用されます。
ユニバーサルWindowsプラットフォーム(UWP)アプリケーションは、さまざまな方法で別のUWPアプリケーションと対話できます-
- LaunchUriAsyncを使用したURIの関連付け
- LaunchFileAsyncを使用したファイルの関連付け
- LaunchUriForResultsAsyncを使用して結果を起動します
- アプリサービス
最初の3つの方法は、両方のアプリケーションがフォアグラウンドである場合に使用されますが、アプリサービスは background task その場合、クライアントアプリケーションはフォアグラウンドにあり、Appサービスを使用できる必要があります。
アプリサービスは、フォアグラウンドアプリが画像を取得し、それらのバイトをアプリサービスに送信してバーコードを識別するバーコードスキャナーなど、非ビジュアルサービスが提供されるアプリケーションで非常に役立ちます。
これらすべての概念を理解するために、名前を付けて新しいUWPプロジェクトを作成しましょう。 AppServiceProvider Microsoft Visual Studio2015で。
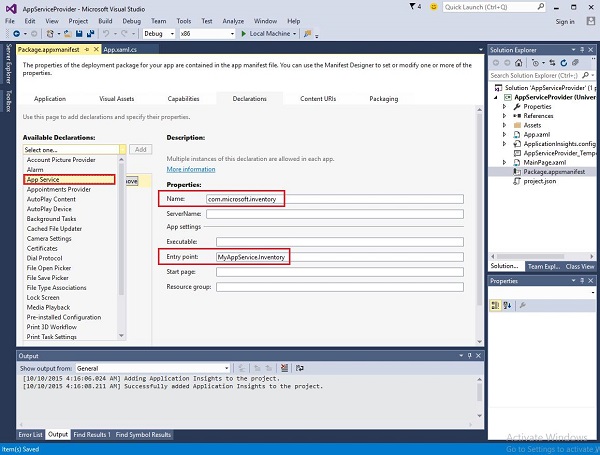
今では Package.appmenifest ファイルに、次の情報を追加します。

フォアグラウンドアプリケーションから呼び出すことができるアプリサービスを作成するには、新しいアプリを追加しましょう Windows Runtime ソリューションへのコンポーネントプロジェクト MyAppService これは、アプリサービスがバックグラウンドタスクとして実装されているためです。
への参照を追加します MyAppService のプロジェクト AppServiceProvider 事業。
今すぐ削除します class1.cs からのファイル MyAppService プロジェクトを作成し、インベントリ名を使用して新しいクラスを追加します。これにより、 IBackgrounTask インターフェース。
ザ・ IBackgrounTask インターフェイスには1つのメソッドしかありません “Run” これは、バックグラウンドタスク用に実装する必要があります。
public sealed class Inventory : IBackgroundTask {
   public void Run(IBackgroundTaskInstance taskInstance) {

   }
}
バックグラウンドタスクが作成されると、 Run() methodが呼び出され、Runメソッドが完了すると、バックグラウンドタスクが終了します。バックグラウンドタスクを維持するため、リクエストを処理するために、コードは延期されます。
アプリサービスコードは OnRequestedReceived()。この例では、在庫アイテムのインデックスがサービスに渡され、指定された在庫アイテムの名前と価格が取得されます。
private async void OnRequestReceived(AppServiceConnection sender,
   AppServiceRequestReceivedEventArgs args) {
      // Get a deferral because we use an awaitable API below to respond to the message
}
以下に示すのは、C#でのInventoryクラスの完全な実装です。
using System;
using System.Collections.Generic;
using System.Linq;
using System.Text;
using System.Threading.Tasks;

using Windows.ApplicationModel.AppService;
using Windows.ApplicationModel.Background;
using Windows.Foundation.Collections;

namespace MyAppService{
   public sealed class Inventory : IBackgroundTask {

      private BackgroundTaskDeferral backgroundTaskDeferral;
      private AppServiceConnection appServiceconnection;

      private String[] inventoryItems = new string[] { "Robot vacuum", "Chair" };
      private double[] inventoryPrices = new double[] { 129.99, 88.99 };

      public void Run(IBackgroundTaskInstance taskInstance) {
         this.backgroundTaskDeferral = taskInstance.GetDeferral();
         taskInstance.Canceled += OnTaskCanceled;
         var details = taskInstance.TriggerDetails as AppServiceTriggerDetails;

         appServiceconnection = details.AppServiceConnection;
         appServiceconnection.RequestReceived += OnRequestReceived;
      }

      private async void OnRequestReceived(AppServiceConnection sender,
         AppServiceRequestReceivedEventArgs args) {

            var messageDeferral = args.GetDeferral();
            ValueSet message = args.Request.Message;
            ValueSet returnData = new ValueSet();

            string command = message["Command"] as string;
            int? inventoryIndex = message["ID"] as int?;
            if (inventoryIndex.HasValue &&

            inventoryIndex.Value >= 0 &&
            inventoryIndex.Value < inventoryItems.GetLength(0)) {

               switch (command) {

                  case "Price": {
                     returnData.Add("Result", inventoryPrices[inventoryIndex.Value]);
                     returnData.Add("Status", "OK");
                     break;
                  }

                  case "Item": {
                     returnData.Add("Result", inventoryItems[inventoryIndex.Value]);
                     returnData.Add("Status", "OK");
                     break;
                  }

                  default: {
                     returnData.Add("Status", "Fail: unknown command");
                     break;
                  }
               } else {
                  returnData.Add("Status", "Fail: Index out of range");
               }
            }
            await args.Request.SendResponseAsync(returnData);
            messageDeferral.Complete();
      }

      private void OnTaskCanceled(IBackgroundTaskInstance sender,
         BackgroundTaskCancellationReason reason){
            if (this.backgroundTaskDeferral != null) {
               // Complete the service deferral.
               this.backgroundTaskDeferral.Complete();
            }
      }
   }
}
新しい空のUWPプロジェクトを追加して、クライアントアプリを作成しましょう ClientApp XAMLファイルに以下に示すように、1つのボタン、1つのテキストボックス、および2つのテキストブロックを追加します。
<Page
   x:Class = "ClientApp.MainPage"
   xmlns = "http://schemas.microsoft.com/winfx/2006/xaml/presentation"
   xmlns:x = "http://schemas.microsoft.com/winfx/2006/xaml"
   xmlns:local = "using:ClientApp"
   xmlns:d = "http://schemas.microsoft.com/expression/blend/2008"
   xmlns:mc = "http://schemas.openxmlformats.org/markup-compatibility/2006"
   mc:Ignorable = "d">

   <Grid Background = "{ThemeResource ApplicationPageBackgroundThemeBrush}">
      <TextBlock HorizontalAlignment = "Left" Text = "Enter Item No."
         Margin = "52,40,0,0" TextWrapping = "Wrap"
         VerticalAlignment = "Top" Height = "32" Width = "268"/>

      <Button x:Name = "button" Content = "Get Info" HorizontalAlignment = "Left"
         Margin = "255,96,0,0" VerticalAlignment = "Top" Click = "button_Click"/>

      <TextBox x:Name = "textBox" HorizontalAlignment = "Left" Margin = "52,96,0,0"
         TextWrapping = "Wrap" VerticalAlignment = "Top" Width = "168"/>

      <TextBlock x:Name = "textBlock" HorizontalAlignment = "Left"
         Margin = "52,190,0,0" TextWrapping = "Wrap"
         VerticalAlignment = "Top" Height = "32" Width = "268"/>
   </Grid>

</Page>
以下に示すのは、アプリサービスが要求されるボタンクリックイベントの実装です。
using System;

using Windows.ApplicationModel.AppService;
using Windows.Foundation.Collections;

using Windows.UI.Xaml;
using Windows.UI.Xaml.Controls;

// The Blank Page item template is documented at
   http://go.microsoft.com/fwlink/?LinkId=402352&clcid=0x409

namespace ClientApp {

   /// <summary>
      /// An empty page that can be used on its own or navigated to within a Frame.
   /// </summary>

   public sealed partial class MainPage : Page {

      private AppServiceConnection inventoryService;

      public MainPage() {
         this.InitializeComponent();
      }

      private async void button_Click(object sender, RoutedEventArgs e){

         // Add the connection.
         if (this.inventoryService == null) {

            this.inventoryService = new AppServiceConnection();
            this.inventoryService.AppServiceName = "com.microsoft.inventory";
            this.inventoryService.PackageFamilyName =
               "bb1a8478-8005-46869923-e525ceaa26fc_4sz2ag3dcq60a";

            var status = await this.inventoryService.OpenAsync();

            if (status != AppServiceConnectionStatus.Success) {
               button.Content = "Failed to connect";
               return;
            }
         }

         // Call the service.
         int idx = int.Parse(textBox.Text);
         var message = new ValueSet();

         message.Add("Command", "Item");
         message.Add("ID", idx);

         AppServiceResponse response = await
            this.inventoryService.SendMessageAsync(message);
         string result = "";

         if (response.Status == AppServiceResponseStatus.Success) {
            // Get the data  that the service sent  to us.
            if (response.Message["Status"] as string == "OK") {
               result = response.Message["Result"] as string;
            }
         }

         message.Clear();
         message.Add("Command", "Price");
         message.Add("ID", idx);

         response = await this.inventoryService.SendMessageAsync(message);

         if (response.Status == AppServiceResponseStatus.Success){
            // Get the data that the service sent to us.
            if (response.Message["Status"] as string == "OK") {
               result += " : Price = " + "$"+ response.Message["Result"] as string;
            }
         }

         textBlock.Text = result;
      }
   }
}
このアプリケーションを実行するには、を設定する必要があります ClientApp プロジェクトをソリューションエクスプローラーのスタートアッププロジェクトにしてから、このソリューションを Build > Deploy 解決。

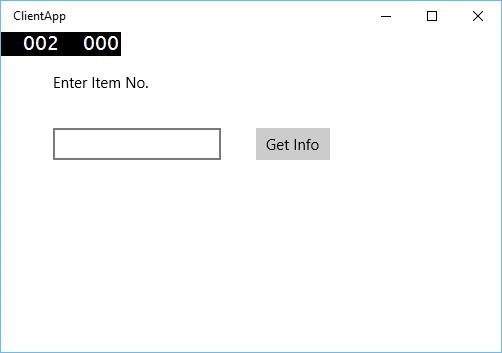
上記のコードをコンパイルして実行すると、次のウィンドウが表示されます。アプリサービスでは、2つの項目の情報を追加しました。したがって、0または1を入力して、これらのアイテムの情報を取得できます。

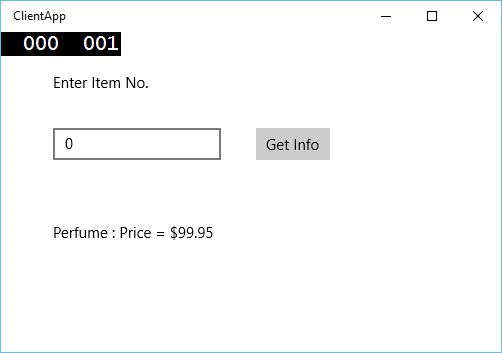
0を入力してボタンをクリックすると、バックグラウンドタスクとしてAppサービスが実行され、アイテム情報が表示されます。 textblock。