Windows10開発-最初のアプリ
この章では、最初の簡単なアプリケーションを作成します "Hello world" Windows 10でXAMLとC#を使用するユニバーサルWindowsプラットフォーム(UWP)で。VisualStudioで作成された単一のUWPアプリケーションを任意のWindows10デバイスで実行および実行する方法を示します。
以下の手順でアプリの作成を始めましょう。
Visual Studio2015を起動します。
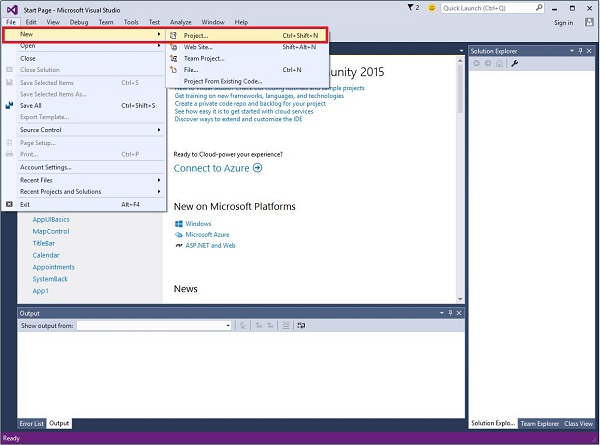
クリックしてください File メニューと選択 New > Project。
以下 New Projectダイアログウィンドウが表示されます。ダイアログボックスの左側のペインに、さまざまな種類のテンプレートが表示されます。
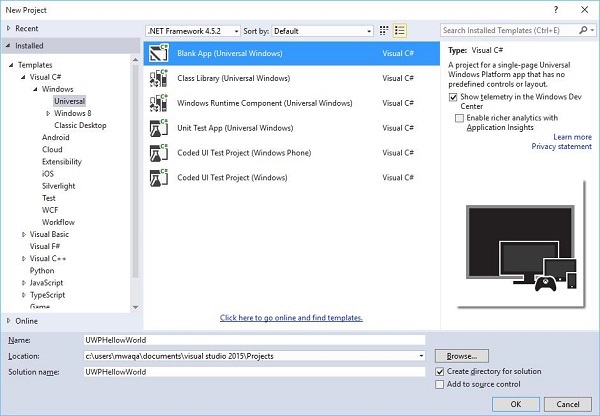
左側のペインに、ツリービューが表示されます。選択するUniversal template から Templates > Visual C# > Windows。
中央のペインから、 Blank App (Universal Windows) テンプレート
書いてプロジェクトに名前を付けます UWPHelloWorld の中に Name field。
クリック OK 新しいUWPプロジェクトを作成します。
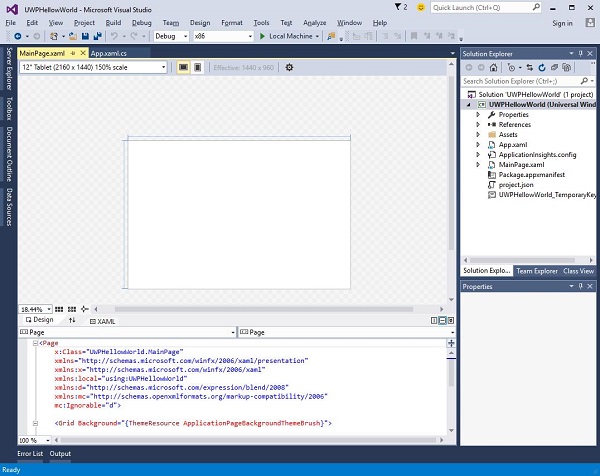
新しく作成されたプロジェクトは、 Solution Explorer。
これは空白のアプリですが、多くのファイルが含まれています。これは、UWPアプリケーションの最小要件です。
MainPage.xaml そして MainPage.xaml.cs アプリケーションを実行するときに実行します。
デフォルトでは、 MainPage.xaml ファイルには次の情報が含まれています。
<Page
   x:Class = ”UWPHellowWorld.MainPage”
   xmlns = ”http://schemas.microsoft.com/winfx/2006/xaml/presentation”
   xmlns:x = ”http://schemas.microsoft.com/winfx/2006/xaml”
   xmlns:local = ”using:UWPHellowWorld”
   xmlns:d = ”http://schemas.microsoft.com/expression/blend/2008”
   xmlns:mc = ”http://schemas.openxmlformats.org/markup-compatibility/2006”
   mc:Ignorable = ”d”>

   <Grid Background = ”{ThemeResource ApplicationPageBackgroundThemeBrush}”>
   </Grid>

</Page>
以下に示すのは、で利用可能なデフォルト情報です。 MainPage.xaml.cs。
using System;
using System.Collections.Generic;
using System.IO;
using System.Linq;
using System.Runtime.InteropServices.WindowsRuntime;

using Windows.Foundation;
using Windows.Foundation.Collections;

using Windows.UI.Xaml;
using Windows.UI.Xaml.Controls;
using Windows.UI.Xaml.Controls.Primitives;
using Windows.UI.Xaml.Data;
using Windows.UI.Xaml.Input;
using Windows.UI.Xaml.Media;
using Windows.UI.Xaml.Navigation;

// The Blank Page item template is documented at
   http://go.microsoft.com/fwlink/?LinkId=402352&clcid=0x409

namespace UWPHellowWorld {

   /// <summary>
      /// An empty page that can be used on its own or navigated to within a Frame.
   /// </summary>

   public sealed partial class MainPage : Page {
      public MainPage(){
         this.InitializeComponent();
      }
   }

}
以下のXAMLコードに示すように、いくつかのテキストブロック、テキストボックス、およびボタンを追加しましょう。
<Page
   x:Class = ”UWPHellowWorld.MainPage”
   xmlns = ”http://schemas.microsoft.com/winfx/2006/xaml/presentation”
   xmlns:x = ”http://schemas.microsoft.com/winfx/2006/xaml”
   xmlns:local = ”using:UWPHellowWorld”
   xmlns:d = ”http://schemas.microsoft.com/expression/blend/2008”
   xmlns:mc = ”http://schemas.openxmlformats.org/markup-compatibility/2006”
   mc:Ignorable = ”d”>

   <Grid Background = ”{ThemeResource ApplicationPageBackgroundThemeBrush}”>

      <StackPanel HorizontalAlignment = ”Center”>
         <TextBlock Text = ”Hello, world!”  Margin = ”20”  Width = ”200”
            HorizontalAlignment = ”Left”/>

         <TextBlock Text = ”Write your name.” Margin = ”20” Width = ”200”
            HorizontalAlignment = ”Left”/>

         <TextBox x:Name = ”txtbox”  Width = ”280” Margin = ”20”
            HorizontalAlignment = ”Left”/>

         <Button x:Name = ”button” Content = ”Click Me” Margin = ”20”
            Click = ”button_Click”/>

         <TextBlock x:Name = ”txtblock” HorizontalAlignment = ”Left”
            Margin = ”20”/>
      </StackPanel>

   </Grid>

</Page>- 以下に示すのは、C#のクリックイベントボタンです。
using System;
using System.Collections.Generic;
using System.IO;
using System.Linq;

using System.Runtime.InteropServices.WindowsRuntime;
using Windows.Foundation;
using Windows.Foundation.Collections;

using Windows.UI.Xaml;
using Windows.UI.Xaml.Controls;
using Windows.UI.Xaml.Controls.Primitives;
using Windows.UI.Xaml.Data;
using Windows.UI.Xaml.Input;
using Windows.UI.Xaml.Media;
using Windows.UI.Xaml.Navigation;

// The Blank Page item template is documented at
   http://go.microsoft.com/fwlink/?LinkId=402352&clcid=0x409

namespace UWPHellowWorld {

   /// <summary>
      /// An empty page that can be used on its own or navigated to within a Frame.
   /// </summary>

   public sealed partial class MainPage : Page {
      public MainPage() {
         this.InitializeComponent();
      }

      private void button_Click(object sender, RoutedEventArgs e) {
         if (txtbox.Text != “”)
            txtblock.Text = “Hello: “ + txtbox.Text;
         else
            txtblock.Text = “You have not write your name”;
      }

   }

}
UWPプロジェクトでは、 device preview オプションはで利用可能です Design Window、レイアウトを簡単に変更できるため、アプリケーションの対象となるデバイスファミリ内のすべてのデバイスの画面サイズに合わせることができます。
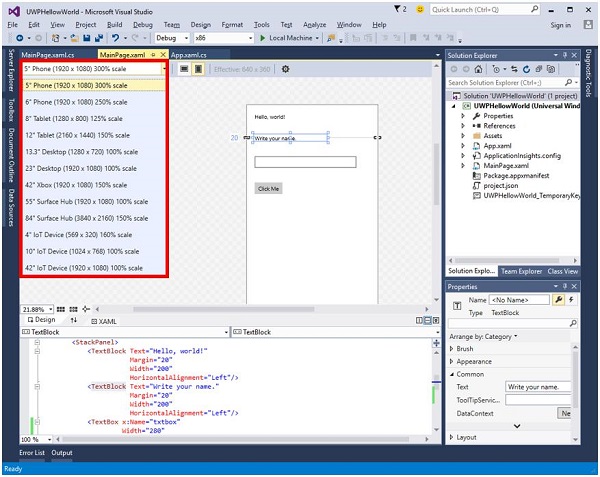
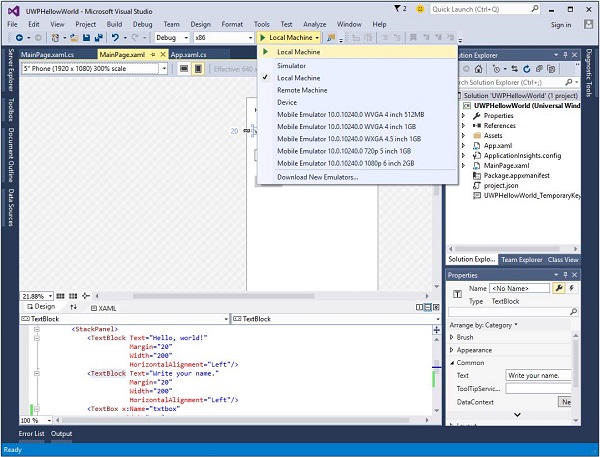
アプリは、ローカルマシン、シミュレーター、エミュレーター、またはリモートデバイスのいずれかで実行およびテストできます。以下に示すように、以下のメニューから対象機器を選択できます。
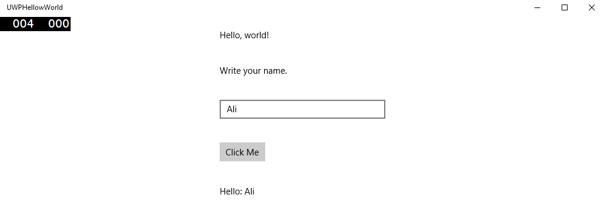
上記のコードをローカルマシンで実行すると、次のウィンドウが表示されます。次に、テキストボックスに任意の名前を入力して、ボタンをクリックしますClick Me。
これで、エミュレーターでアプリをテストする場合は、メニューから特定のエミュレーターを選択して、アプリケーションを実行できます。次のエミュレータが表示されます-
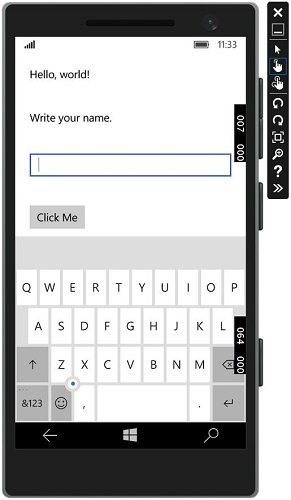
上記のアプリケーションは、さまざまなデバイスで実行することをお勧めします。