Windows10開発-共有契約
この章では、アプリケーション間でデータを共有する方法を学習します。ユーザーは、誰かと共有したり、別のアプリケーションで使用したりすることに興奮している情報に出くわすことがよくあります。今日、ユーザーはテクノロジーを使用して他の人とつながり、共有したいと考えています。
ユーザーが共有したい場合があります-
- 彼らのソーシャルネットワークとのリンク
- 写真をレポートにコピーする
- クラウドストレージにファイルをアップロードする
今日のアプリケーションでは、使用するデータをユーザーが共有および交換できるようにする必要があります。共有は軽量の機能であり、UWPアプリケーションに簡単に追加できます。アプリが他のアプリとデータを交換する方法はいくつかあります。
UWPアプリケーションでは、共有機能は次の方法でサポートできます。
まず、アプリケーションは、ユーザーが共有したいコンテンツを提供するソースアプリにすることができます。
次に、アプリは、ユーザーが共有コンテンツの宛先として選択するターゲットアプリにすることができます。
アプリは、ソースアプリとターゲットアプリの両方にすることもできます。
コンテンツの共有
ソースアプリであるアプリケーションからのコンテンツの共有は非常に簡単です。共有操作を実行するには、DataPackageクラスオブジェクト。このオブジェクトには、ユーザーが共有したいデータが含まれています。
次の種類のコンテンツを含めることができます DataPackage オブジェクト-
- プレーンテキスト
- ユニフォームリソース識別子(URI)
- HTML
- フォーマットされたテキスト
- Bitmaps
- Files
- 開発者定義のデータ
データを共有するときに、上記の形式を1つ以上含めることができます。アプリケーションでの共有をサポートするには、最初にインスタンスを取得する必要がありますDataTransferManager クラス。
次に、イベントハンドラーを登録します。イベントハンドラーは、 DataRequested イベントが発生します。
DataTransferManager dataTransferManager = DataTransferManager.GetForCurrentView();
dataTransferManager.DataRequested += new TypedEventHandler<DataTransferManager,
   DataRequestedEventArgs>(this.ShareTextHandler);
アプリが DataRequest オブジェクトがあれば、アプリケーションはユーザーが共有したいコンテンツを追加する準備ができています。
private void ShareTextHandler(DataTransferManager sender, DataRequestedEventArgs e){
   DataRequest request = e.Request;

   // The Title is mandatory
   request.Data.Properties.Title = "Share Text Example";
   request.Data.Properties.Description = "A demonstration that shows how to share text.";
   request.Data.SetText("Hello World!");
}
アプリケーションが共有するコンテンツには、2つのプロパティが含まれている必要があります-
- Titleプロパティ。これは必須であり、設定する必要があります。
- コンテンツ自体。
共有コンテンツの受信
アプリケーションが共有コンテンツを受信できるようにしたい場合、最初に行う必要があるのは、アプリケーションが Share Contract。宣言後、システムはアプリケーションがコンテンツを受信できるようにします。
株式契約のサポートを追加するには-
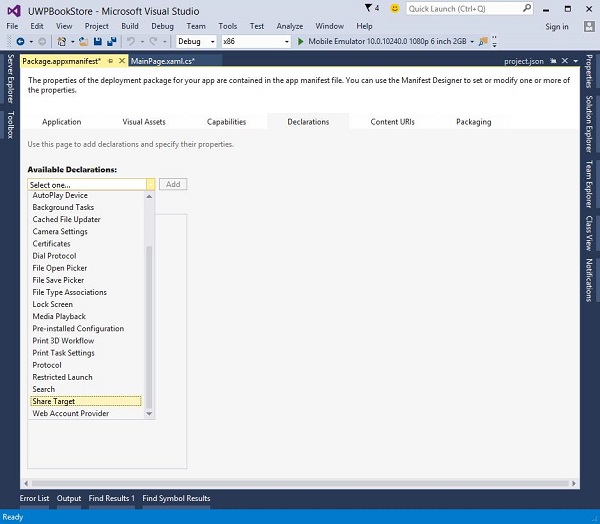
をダブルクリックします package.appmanifest ファイル。
に移動します Declarationsタブ。選択Share Target から Available Declarations リストをクリックし、 Add ボタン。
アプリケーションであらゆる種類のファイルを共有コンテンツとして受信する場合は、ファイルの種類とデータ形式を指定できます。
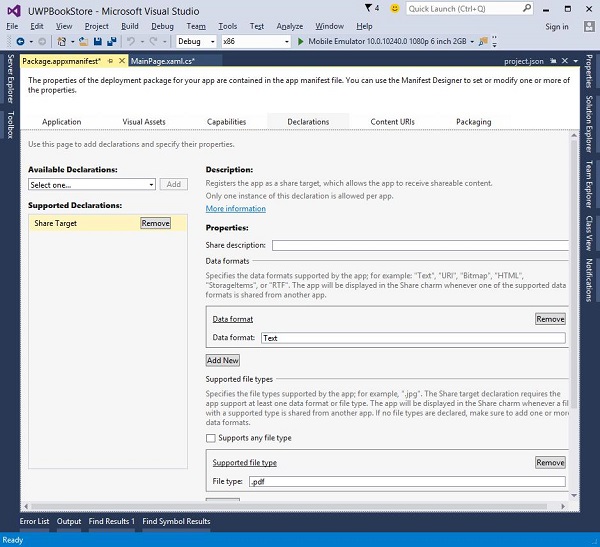
サポートするデータ形式を指定するには、にアクセスしてください。 Data Formats セクション、の Declarations ページをクリックしてクリックします Add New。
サポートするデータ形式の名前を入力します。例えば、"Text"。
サポートするファイルタイプを指定するには、 Supported File Types のセクション Declarations ページをクリックします Add New。
サポートするファイル名拡張子を入力します。例: .pdf
サポートしたい場合 All file タイプ、チェックしてください SupportsAnyFileType ボックス。
ユーザーがデータを共有するためのターゲットアプリケーションとしてアプリケーションを選択すると、 OnShareTargetActivated イベントが発生します。
アプリは、ユーザーが共有したいデータを処理するためにこのイベントを処理する必要があります。
protected override async void OnShareTargetActivated(ShareTargetActivatedEventArgs args) {
   // Code to handle activation goes here.
}
ユーザーが任意のアプリケーションと共有したいすべてのデータは、 ShareOperationオブジェクト。含まれているデータの形式を確認することもできます。
以下に示すのは、処理するコードスニペットです。 shared content プレーンテキスト形式。
ShareOperation shareOperation = args.ShareOperation;

if (shareOperation.Data.Contains(StandardDataFormats.Text)) {
   string text = await shareOperation.Data.GetTextAsync();

   // To output the text from this example, you need a TextBlock control
   // with a name of "sharedContent".
   sharedContent.Text = "Text: " + text;
}
Webリンクを共有する新しいUWPプロジェクトを作成して、簡単な例を見てみましょう。
以下に示すのは、いくつかのプロパティを使用してボタンが作成されるXAMLコードです。
<Page
   x:Class = "UWPSharingDemo.MainPage"
   xmlns = "http://schemas.microsoft.com/winfx/2006/xaml/presentation"
   xmlns:x = "http://schemas.microsoft.com/winfx/2006/xaml"
   xmlns:local = "using:UWPSharingDemo"
   xmlns:d = "http://schemas.microsoft.com/expression/blend/2008"
   xmlns:mc = "http://schemas.openxmlformats.org/markup-compatibility/2006"
   mc:Ignorable = "d">

   <Grid Background = "{ThemeResource ApplicationPageBackgroundThemeBrush}">

      <StackPanel Orientation = "Vertical">
         <TextBlock Text = "Share Web Link" Style = "{StaticResource
            HeaderTextBlockStyle}" Margin = "30"></TextBlock>

         <Button Content = "Invoke share contract" Margin = "10"
            Name = "InvokeShareContractButton" Click = "InvokeShareContractButton_Click"
            ></Button>
      </StackPanel>

   </Grid>

</Page>
ボタンクリックイベントが実装されたC#コードとURI共有コードを以下に示します。
using System;

using Windows.ApplicationModel.DataTransfer;
using Windows.UI.Xaml;
using Windows.UI.Xaml.Controls;

// The Blank Page item template is documented at
   http://go.microsoft.com/fwlink/?LinkId=402352&clcid=0x409

namespace UWPSharingDemo {

   /// <summary>
      /// An empty page that can be used on its own or navigated to within a Frame.
   /// </summary>

   public sealed partial class MainPage : Page {

      DataTransferManager dataTransferManager;

      public MainPage() {
         this.InitializeComponent();
         dataTransferManager = DataTransferManager.GetForCurrentView();
         dataTransferManager.DataRequested += dataTransferManager_DataRequested;
      }

      void dataTransferManager_DataRequested(DataTransferManager sender,
         DataRequestedEventArgs args) {
            Uri sharedWebLink = new Uri("https://msdn.microsoft.com");

            if (sharedWebLink != null) {
               DataPackage dataPackage = args.Request.Data;
               dataPackage.Properties.Title = "Sharing MSDN link";

               dataPackage.Properties.Description = "The Microsoft Developer Network (MSDN)
                  is designed to help developers write applications using Microsoft
                  products and technologies.";

               dataPackage.SetWebLink(sharedWebLink);
            }
      }

      private void InvokeShareContractButton_Click(object sender, RoutedEventArgs e) {
         DataTransferManager.ShowShareUI();
      }

   }
}
上記のコードをコンパイルして実行すると、エミュレーターに次のページが表示されます。
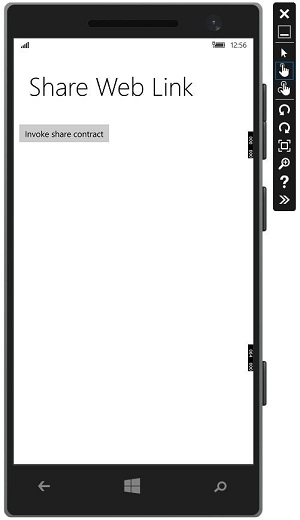
ボタンをクリックすると、どのアプリケーションで共有するかを選択できます。
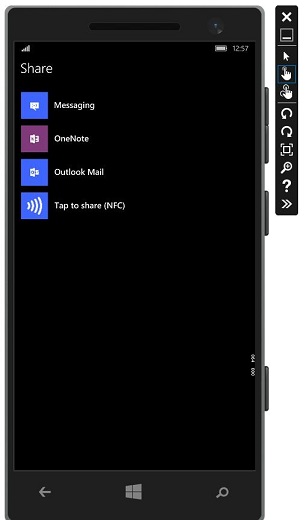
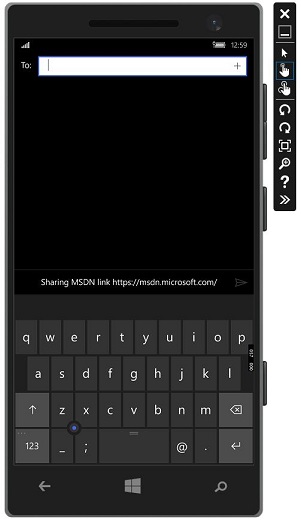
メッセージをクリックすると、次のウィンドウが表示され、そこからリンクを誰にでも送信できます。
