안드로이드-PHP / MYSQL
이 장에서는 PHP와 MYSQL을 Android 애플리케이션과 통합하는 방법을 설명합니다. 이것은 웹 서버가 있고 Android 애플리케이션에서 해당 데이터에 액세스하려는 경우 매우 유용합니다.
MYSQL은 웹 서버에서 데이터베이스로 사용되며 PHP는 데이터베이스에서 데이터를 가져 오는 데 사용됩니다. 우리의 응용 프로그램은 필요한 매개 변수를 사용하여 PHP 페이지와 통신하고 PHP는 MYSQL 데이터베이스에 연결하여 결과를 가져와 결과를 반환합니다.
PHP-MYSQL
데이터베이스 생성
이 간단한 스크립트를 사용하여 MYSQL 데이터베이스를 쉽게 만들 수 있습니다. 그만큼CREATE DATABASE 문은 데이터베이스를 만듭니다.
<?php
   $con=mysqli_connect("example.com","username","password");
   $sql="CREATE DATABASE my_db";
   if (mysqli_query($con,$sql)) {
      echo "Database my_db created successfully";
   }
?>
테이블 생성
데이터베이스가 생성되면 데이터베이스에 일부 테이블을 생성해야합니다. 그만큼CREATE TABLE 문은 데이터베이스를 만듭니다.
<?php
   $con=mysqli_connect("example.com","username","password","my_db");
   $sql="CREATE TABLE table1(Username CHAR(30),Password CHAR(30),Role CHAR(30))";
   if (mysqli_query($con,$sql)) {
      echo "Table have been created successfully";
   }
?>
테이블에 값 삽입
데이터베이스와 테이블이 생성 될 때. 이제 테이블에 데이터를 삽입 할 차례입니다. 그만큼Insert Into 문은 데이터베이스를 만듭니다.
<?php
   $con=mysqli_connect("example.com","username","password","my_db");
   $sql="INSERT INTO table1 (FirstName, LastName, Age) VALUES ('admin', 'admin','adminstrator')";
   if (mysqli_query($con,$sql)) {
      echo "Values have been inserted successfully";
   }
?>
PHP-GET 및 POST 메서드
PHP는 mysql 데이터베이스가 생성되면 레코드를 가져 오는데도 사용됩니다. 레코드를 가져 오려면 가져올 레코드에 대한 일부 정보를 PHP 페이지에 전달해야합니다.
정보를 전달하는 첫 번째 방법은 GET 메소드를 통해 $_GET명령이 사용됩니다. 변수가 URL로 전달되고 레코드가 가져옵니다. 구문은 다음과 같습니다.
<?php
   $con=mysqli_connect("example.com","username","password","database name");

   if (mysqli_connect_errno($con)) {
      echo "Failed to connect to MySQL: " . mysqli_connect_error();
   }

   $username = $_GET['username'];
   $password = $_GET['password'];
   $result = mysqli_query($con,"SELECT Role FROM table1 where Username='$username'
      and Password='$password'");
   $row = mysqli_fetch_array($result);
   $data = $row[0];

   if($data){
      echo $data;
   }
   mysqli_close($con);
?>
두 번째 방법은 POST 방법을 사용하는 것입니다. 위 스크립트의 유일한 변경 사항은 $ _GET을$_POST. Post 메소드에서 변수는 URL을 통해 전달되지 않습니다.
Android-MYSQL 연결
Get 메서드를 통해 연결
PHP 페이지를 통해 MYSQL에 연결하는 방법에는 두 가지가 있습니다. 첫 번째는Get method. 우리는 사용할 것입니다HttpGet 과 HttpClient연결할 클래스. 구문은 다음과 같습니다.
URL url = new URL(link);
HttpClient client = new DefaultHttpClient();
HttpGet request = new HttpGet();
request.setURI(new URI(link));
그 후에 전화해야합니다 executeHttpClient 클래스의 메서드를 사용하고 HttpResponse 개체에서 수신합니다. 그 후 데이터를 수신하려면 스트림을 열어야합니다.
HttpResponse response = client.execute(request);
BufferedReader in = new BufferedReader
(new InputStreamReader(response.getEntity().getContent()));
Post 방식으로 연결
Post 메소드에서 URLEncoder,URLConnection클래스가 사용됩니다. urlencoder는 전달 변수의 정보를 인코딩합니다. 구문은 다음과 같습니다.
URL url = new URL(link);
String data  = URLEncoder.encode("username", "UTF-8")
+ "=" + URLEncoder.encode(username, "UTF-8");
data += "&" + URLEncoder.encode("password", "UTF-8")
+ "=" + URLEncoder.encode(password, "UTF-8");
URLConnection conn = url.openConnection();
마지막으로해야 할 일은이 데이터를 링크에 쓰는 것입니다. 쓰기 후에는 응답 된 데이터를 받기 위해 스트림을 열어야합니다.
OutputStreamWriter wr = new OutputStreamWriter(conn.getOutputStream());
wr.write( data );
BufferedReader reader = new BufferedReader(new
InputStreamReader(conn.getInputStream()));
예
아래 예제는 PHP 페이지를 통해 안드로이드 애플리케이션을 MYSQL 데이터베이스와 연결하는 완전한 예제입니다. GET 및 POST 방법을 사용하여 로그인 할 수있는 기본 애플리케이션을 생성합니다.
PHP-MYSQL 부분
이 예에서는 이름이 temp 인 데이터베이스가 000webhost.com에 생성되었습니다. 해당 데이터베이스에서 table1이라는 이름으로 테이블이 생성되었습니다. 이 테이블에는 세 개의 필드가 있습니다. (사용자 이름, 암호, 역할). 테이블에는 ( "admin", "admin", "administrator")라는 하나의 레코드 만 있습니다.
post 메소드로 매개 변수를 취하는 PHP 페이지가 아래에 제공되었습니다.
<?php
   $con=mysqli_connect("mysql10.000webhost.com","username","password","db_name");

   if (mysqli_connect_errno($con)) {
      echo "Failed to connect to MySQL: " . mysqli_connect_error();
   }

   $username = $_POST['username'];
   $password = $_POST['password'];
   $result = mysqli_query($con,"SELECT Role FROM table1 where
   Username='$username' and Password='$password'");
   $row = mysqli_fetch_array($result);
   $data = $row[0];

   if($data){
      echo $data;
   }

   mysqli_close($con);
?>
Android 부품
이 예제를 실험하려면 wifi 인터넷이 연결된 실제 장치에서 실행해야합니다.
| 단계 | 기술 |
|---|---|
| 1 | Android 스튜디오 IDE를 사용하여 Android 애플리케이션을 만들고 com.example.phpmysql 패키지에서 PHPMYSQL로 이름을 지정합니다. |
| 2 | src / MainActivity.java 파일을 수정하여 활동 코드를 추가하십시오. |
| 삼 | src / SiginActivity.java 파일을 생성하여 PHPMYSQL 코드를 추가합니다. |
| 4 | 레이아웃 XML 파일 res / layout / activity_main.xml 수정 필요한 경우 GUI 구성 요소를 추가하십시오. |
| 5 | res / values / string.xml 파일을 수정하고 필요한 문자열 구성 요소를 추가합니다. |
| 6 | AndroidManifest.xml을 수정하여 필요한 권한을 추가하십시오. |
| 7 | 애플리케이션을 실행하고 실행중인 Android 기기를 선택하고 여기에 애플리케이션을 설치하고 결과를 확인합니다. |
내용은 다음과 같습니다. src/com.example.phpmysql/MainActivity.java.
package com.example.phpmysql;

import android.app.Activity;
import android.os.Bundle;
import android.view.View;
import android.widget.EditText;
import android.widget.TextView;

public class MainActivity extends Activity {

   private EditText usernameField,passwordField;
   private TextView status,role,method;

   @Override
   protected void onCreate(Bundle savedInstanceState) {
      super.onCreate(savedInstanceState);
      setContentView(R.layout.activity_main);

      usernameField = (EditText)findViewById(R.id.editText1);
      passwordField = (EditText)findViewById(R.id.editText2);

      status = (TextView)findViewById(R.id.textView6);
      role = (TextView)findViewById(R.id.textView7);
      method = (TextView)findViewById(R.id.textView9);
   }


   public void login(View view){
      String username = usernameField.getText().toString();
      String password = passwordField.getText().toString();
      method.setText("Get Method");
      new SigninActivity(this,status,role,0).execute(username,password);

   }

   public void loginPost(View view){
      String username = usernameField.getText().toString();
      String password = passwordField.getText().toString();
      method.setText("Post Method");
      new SigninActivity(this,status,role,1).execute(username,password);
   }
}
내용은 다음과 같습니다. src/com.example.phpmysql/SigninActivity.java.
package com.example.phpmysql;

import java.io.BufferedReader;
import java.io.InputStreamReader;
import java.io.OutputStreamWriter;
import java.net.URI;
import java.net.URL;
import java.net.URLConnection;
import java.net.URLEncoder;

import org.apache.http.HttpResponse;
import org.apache.http.client.HttpClient;
import org.apache.http.client.methods.HttpGet;
import org.apache.http.impl.client.DefaultHttpClient;

import android.content.Context;
import android.os.AsyncTask;
import android.widget.TextView;

public class SigninActivity  extends AsyncTask{
   private TextView statusField,roleField;
   private Context context;
   private int byGetOrPost = 0;

   //flag 0 means get and 1 means post.(By default it is get.)
   public SigninActivity(Context context,TextView statusField,TextView roleField,int flag) {
      this.context = context;
      this.statusField = statusField;
      this.roleField = roleField;
      byGetOrPost = flag;
   }

   protected void onPreExecute(){
   }

   @Override
   protected String doInBackground(String... arg0) {
      if(byGetOrPost == 0){ //means by Get Method

         try{
            String username = (String)arg0[0];
            String password = (String)arg0[1];
            String link = "http://myphpmysqlweb.hostei.com/login.php?username="+username+"& password="+password;

            URL url = new URL(link);
            HttpClient client = new DefaultHttpClient();
            HttpGet request = new HttpGet();
            request.setURI(new URI(link));
            HttpResponse response = client.execute(request);
            BufferedReader in = new BufferedReader(new
               InputStreamReader(response.getEntity().getContent()));

            StringBuffer sb = new StringBuffer("");
            String line="";

            while ((line = in.readLine()) != null) {
               sb.append(line);
               break;
            }

            in.close();
            return sb.toString();
         } catch(Exception e){
            return new String("Exception: " + e.getMessage());
         }
      } else{
         try{
            String username = (String)arg0[0];
            String password = (String)arg0[1];

            String link="http://myphpmysqlweb.hostei.com/loginpost.php";
            String data  = URLEncoder.encode("username", "UTF-8") + "=" +
               URLEncoder.encode(username, "UTF-8");
            data += "&" + URLEncoder.encode("password", "UTF-8") + "=" +
               URLEncoder.encode(password, "UTF-8");

            URL url = new URL(link);
            URLConnection conn = url.openConnection();

            conn.setDoOutput(true);
            OutputStreamWriter wr = new OutputStreamWriter(conn.getOutputStream());

            wr.write( data );
            wr.flush();

            BufferedReader reader = new BufferedReader(new
               InputStreamReader(conn.getInputStream()));

            StringBuilder sb = new StringBuilder();
            String line = null;

            // Read Server Response
            while((line = reader.readLine()) != null) {
               sb.append(line);
               break;
            }

            return sb.toString();
         } catch(Exception e){
            return new String("Exception: " + e.getMessage());
         }
      }
   }

   @Override
   protected void onPostExecute(String result){
      this.statusField.setText("Login Successful");
      this.roleField.setText(result);
   }
}
다음 내용을 추가하십시오. build.gradle 전체 프로젝트를 다시 빌드하십시오.
android {
   useLibrary 'org.apache.http.legacy'
}
내용은 다음과 같습니다. activity_main.xml.
<?xml version="1.0" encoding="utf-8"?>
<RelativeLayout xmlns:android="http://schemas.android.com/apk/res/android"
   xmlns:tools="http://schemas.android.com/tools"
   android:layout_width="match_parent"
   android:layout_height="match_parent"
   android:paddingBottom="@dimen/activity_vertical_margin"
   android:paddingLeft="@dimen/activity_horizontal_margin"
   android:paddingRight="@dimen/activity_horizontal_margin"
   android:paddingTop="@dimen/activity_vertical_margin"
   tools:context=".MainActivity" >

   <EditText
      android:id="@+id/editText2"
      android:layout_width="wrap_content"
      android:layout_height="wrap_content"
      android:layout_alignRight="@+id/editText1"
      android:layout_below="@+id/editText1"
      android:layout_marginTop="25dp"
      android:ems="10"
      android:inputType="textPassword" >
   </EditText>

   <EditText
      android:id="@+id/editText1"
      android:layout_width="wrap_content"
      android:layout_height="wrap_content"
      android:layout_alignParentRight="true"
      android:layout_alignParentTop="true"
      android:layout_marginTop="44dp"
      android:ems="10" >

   <requestFocus android:layout_width="wrap_content" />

   </EditText>

   <TextView
      android:id="@+id/textView1"
      android:layout_width="wrap_content"
      android:layout_height="wrap_content"
      android:layout_alignBottom="@+id/editText1"
      android:layout_alignParentLeft="true"
      android:text="@string/Username" />

   <TextView
      android:id="@+id/textView3"
      android:layout_width="wrap_content"
      android:layout_height="wrap_content"
      android:layout_alignParentTop="true"
      android:layout_centerHorizontal="true"
      android:text="@string/App"
      android:textAppearance="?android:attr/textAppearanceLarge" />

   <TextView
      android:id="@+id/textView7"
      android:layout_width="wrap_content"
      android:layout_height="wrap_content"
      android:layout_alignBottom="@+id/textView5"
      android:layout_alignLeft="@+id/textView6"
      android:text="@string/Role"
      android:textAppearance="?android:attr/textAppearanceMedium"
      android:textSize="10sp" />

   <TextView
      android:id="@+id/textView5"
      android:layout_width="wrap_content"
      android:layout_height="wrap_content"
      android:layout_below="@+id/textView6"
      android:layout_marginTop="27dp"
      android:layout_toLeftOf="@+id/editText1"
      android:text="@string/LoginRole" />
   <TextView
      android:id="@+id/textView8"
      android:layout_width="wrap_content"
      android:layout_height="wrap_content"
      android:layout_above="@+id/textView6"
      android:layout_alignLeft="@+id/textView5"
      android:layout_marginBottom="27dp"
      android:text="@string/method" />

   <TextView
      android:id="@+id/textView4"
      android:layout_width="wrap_content"
      android:layout_height="wrap_content"
      android:layout_alignLeft="@+id/textView8"
      android:layout_below="@+id/button1"
      android:layout_marginTop="86dp"
      android:text="@string/LoginStatus" />


   <TextView
      android:id="@+id/textView6"
      android:layout_width="wrap_content"
      android:layout_height="wrap_content"
      android:layout_alignTop="@+id/textView4"
      android:layout_centerHorizontal="true"
      android:text="@string/Status"
      android:textAppearance="?android:attr/textAppearanceMedium"
      android:textSize="10sp" />

   <TextView
      android:id="@+id/textView9"
      android:layout_width="wrap_content"
      android:layout_height="wrap_content"
      android:layout_alignBottom="@+id/textView8"
      android:layout_alignLeft="@+id/textView6"
      android:text="@string/Choose"
      android:textAppearance="?android:attr/textAppearanceMedium"
      android:textSize="10sp" />

   <Button
      android:id="@+id/button2"
      android:layout_width="wrap_content"
      android:layout_height="wrap_content"
      android:layout_centerVertical="true"
      android:layout_toRightOf="@+id/textView6"
      android:onClick="loginPost"
      android:text="@string/LoginPost" />

   <Button
      android:id="@+id/button1"
      android:layout_width="wrap_content"
      android:layout_height="wrap_content"
      android:layout_alignBaseline="@+id/button2"
      android:layout_alignBottom="@+id/button2"
      android:layout_alignLeft="@+id/textView2"
      android:onClick="login"
      android:text="@string/LoginGet" />

   <TextView
      android:id="@+id/textView2"
      android:layout_width="wrap_content"
      android:layout_height="wrap_content"
      android:layout_alignBaseline="@+id/editText2"
      android:layout_alignBottom="@+id/editText2"
      android:layout_alignParentLeft="true"
      android:text="@string/Password" />

</RelativeLayout>
내용은 다음과 같습니다. Strings.xml.
<?xml version="1.0" encoding="utf-8"?>
<resources>

   <string name="app_name">PHPMYSQL</string>
   <string name="action_settings">Settings</string>
   <string name="hello_world">Hello world!</string>
   <string name="Username">Username</string>
   <string name="Password">Password</string>
   <string name="LoginGet">Login - Get</string>
   <string name="LoginPost">Login - Post</string>
   <string name="App">Login Application</string>
   <string name="LoginStatus">Login Status</string>
   <string name="LoginRole">Login Role</string>
   <string name="Status">Not login</string>
   <string name="Role">Not assigned</string>
   <string name="method">Login Method</string>
   <string name="Choose">Choose Method</string>

</resources>
내용은 다음과 같습니다. AndroidManifest.xml.
<?xml version="1.0" encoding="utf-8"?>
<manifest xmlns:android="http://schemas.android.com/apk/res/android"
   package="com.example.phpmysql" >

      <uses-permission android:name="android.permission.INTERNET"/>
      <uses-permission android:name="android.permission.ACCESS_NETWORK_STATE" />

   <application
      android:allowBackup="true"
      android:icon="@drawable/ic_launcher"
      android:label="@string/app_name"
      android:theme="@style/AppTheme" >

      <activity
         android:name="com.example.phpmysql.MainActivity"
         android:label="@string/app_name" >

         <intent-filter>
            <action android:name="android.intent.action.MAIN" />
            <category android:name="android.intent.category.LAUNCHER" />
         </intent-filter>

      </activity>

   </application>
</manifest>
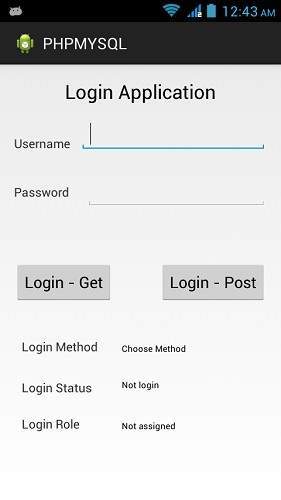
PHPMYSQL 애플리케이션을 실행 해 보겠습니다. 실제 Android 모바일 장치를 컴퓨터에 연결했다고 가정합니다. Android 스튜디오에서 앱을 실행하려면 프로젝트의 활동 파일 중 하나를 열고


옵션으로 모바일 장치를 선택하고 다음 화면이 표시되는 모바일 장치를 확인하십시오-

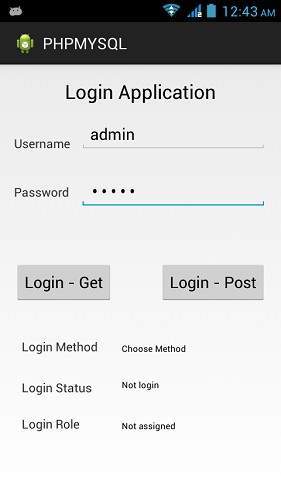
이제 사용자 이름과 비밀번호를 입력하십시오. 제 경우에는 사용자 이름과 비밀번호로 admin을 입력하고 있습니다. 그림에 나와 있습니다-

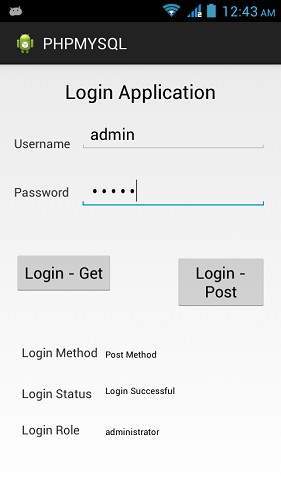
이제 Get 버튼을 누르고 몇 초간 기다리면 응답이 다운로드되고 표시됩니다. 이 경우 응답은 관리자의 경우 사용자 이름과 비밀번호로 가져 오는 ROLE이며 아래 그림과 같습니다.

이제 다시 POST 버튼을 누르면 동일한 결과가 나타납니다. 아래 그림에 나와 있습니다.
