Android-メールの送信
Email は、電子的手段によって1人のシステムユーザーからネットワークを介して1人以上の受信者に配信されるメッセージです。
電子メールアクティビティを開始する前に、インテントを使用して電子メール機能を理解する必要があります。インテントは、アプリケーション内またはアプリケーション外で、あるコンポーネントから別のコンポーネントにデータを伝送します。
アプリケーションからメールを送信するために、最初からメールクライアントを実装する必要はありませんが、Android、Gmail、Outlook、K-9Mailなどから提供されるデフォルトのメールアプリのような既存のクライアントを使用できます。目的としては、適切なアクションとデータを含む暗黙のインテントを使用して、電子メールクライアントを起動するアクティビティを作成する必要があります。この例では、既存のメールクライアントを起動するIntentオブジェクトを使用して、アプリからメールを送信します。
次のセクションでは、メールの送信に必要なIntentオブジェクトのさまざまな部分について説明します。
インテントオブジェクト-電子メールを送信するアクション
使用します ACTION_SENDAndroidデバイスにインストールされているメールクライアントを起動するアクション。以下は、ACTION_SENDアクションでインテントを作成するための簡単な構文です。
Intent emailIntent = new Intent(Intent.ACTION_SEND);インテントオブジェクト-Eメールを送信するデータ/タイプ
メールを送信するには、指定する必要があります mailto: setData()メソッドとデータ型を使用するURIは、 text/plain 次のようにsetType()メソッドを使用します-
emailIntent.setData(Uri.parse("mailto:"));
emailIntent.setType("text/plain");
インテントオブジェクト-Eメールを送信するための追加
Androidには、ターゲットの電子メールクライアントにインテントを送信する前にインテントに添付できるTO、SUBJECT、CC、TEXTなどのフィールドを追加するためのサポートが組み込まれています。メールで次の追加フィールドを使用できます-
| シニア番号 | 追加のデータと説明 |
|---|---|
| 1 | EXTRA_BCC ブラインドカーボンコピーする必要のある電子メールアドレスを保持するString []。 |
| 2 | EXTRA_CC カーボンコピーする必要のある電子メールアドレスを保持するString []。 |
| 3 | EXTRA_EMAIL 配信する必要のある電子メールアドレスを保持するString []。 |
| 4 | EXTRA_HTML_TEXT インテントに関連付けられた定数文字列。ACTION_SENDとともに使用され、HTML形式のテキストとしてEXTRA_TEXTの代替を提供します。 |
| 5 | EXTRA_SUBJECT メッセージの目的の件名を保持する定数文字列。 |
| 6 | EXTRA_TEXT インテントに関連付けられた定数CharSequence。ACTION_SENDとともに使用され、送信されるリテラルデータを提供します。 |
| 7 | EXTRA_TITLE ACTION_CHOOSERとともに使用したときにユーザーに提供するCharSequenceダイアログのタイトル。 |
これは、インテントに追加のデータを割り当てる方法を示す例です。
emailIntent.putExtra(Intent.EXTRA_EMAIL  , new String[]{"Recipient"});
emailIntent.putExtra(Intent.EXTRA_SUBJECT, "subject");
emailIntent.putExtra(Intent.EXTRA_TEXT   , "Message Body");
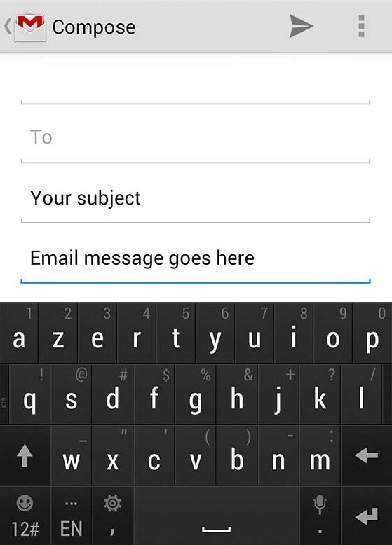
上記のコードの出力は以下の画像のようになります

メールの例
例
次の例は、Intentオブジェクトを使用してEメールクライアントを起動し、特定の受信者にEメールを送信する実際の方法を示しています。
この例をメールで試すには、最新のAndroid OSを搭載した実際のモバイルデバイスが必要です。そうしないと、エミュレーターで問題が発生し、正しく動作しない可能性があります。次に、GMail(デフォルトではGmailクライアントアプリを備えたすべてのAndroidバージョン)やK9mailなどのメールクライアントをデバイスにインストールする必要があります。
| ステップ | 説明 |
|---|---|
| 1 | Android Studioを使用してAndroidアプリケーションを作成し、com.example.tutorialspointパッケージの下にTutorialspointという名前を付けます。 |
| 2 | src / MainActivity.javaファイルを変更し、電子メールの送信を処理するために必要なコードを追加します。 |
| 3 | レイアウトXMLファイルを変更しますres / layout / activity_main.xml必要に応じて、GUIコンポーネントを追加します。電子メールクライアントを起動するための簡単なボタンを追加しています。 |
| 4 | res / values / strings.xmlを変更して、必要な定数値を定義します |
| 5 | 以下に示すようにAndroidManifest.xmlを変更します |
| 6 | アプリケーションを実行してAndroidエミュレーターを起動し、アプリケーションで行われた変更の結果を確認します。 |
変更されたメインアクティビティファイルの内容は次のとおりです src/com.example.Tutorialspoint/MainActivity.java。
package com.example.tutorialspoint;

import android.net.Uri;
import android.os.Bundle;
import android.app.Activity;
import android.content.Intent;
import android.util.Log;
import android.view.Menu;
import android.view.View;
import android.widget.Button;
import android.widget.Toast;

public class MainActivity extends Activity {
   @Override
   protected void onCreate(Bundle savedInstanceState) {
      super.onCreate(savedInstanceState);
      setContentView(R.layout.activity_main);

      Button startBtn = (Button) findViewById(R.id.sendEmail);
      startBtn.setOnClickListener(new View.OnClickListener() {
         public void onClick(View view) {
            sendEmail();
         }
      });
   }

   protected void sendEmail() {
      Log.i("Send email", "");
      String[] TO = {""};
      String[] CC = {""};
      Intent emailIntent = new Intent(Intent.ACTION_SEND);

      emailIntent.setData(Uri.parse("mailto:"));
      emailIntent.setType("text/plain");
      emailIntent.putExtra(Intent.EXTRA_EMAIL, TO);
      emailIntent.putExtra(Intent.EXTRA_CC, CC);
      emailIntent.putExtra(Intent.EXTRA_SUBJECT, "Your subject");
      emailIntent.putExtra(Intent.EXTRA_TEXT, "Email message goes here");

      try {
         startActivity(Intent.createChooser(emailIntent, "Send mail..."));
         finish();
         Log.i("Finished sending email...", "");
      } catch (android.content.ActivityNotFoundException ex) {
         Toast.makeText(MainActivity.this, "There is no email client installed.", Toast.LENGTH_SHORT).show();
      }
   }
}
以下の内容になります res/layout/activity_main.xml ファイル-
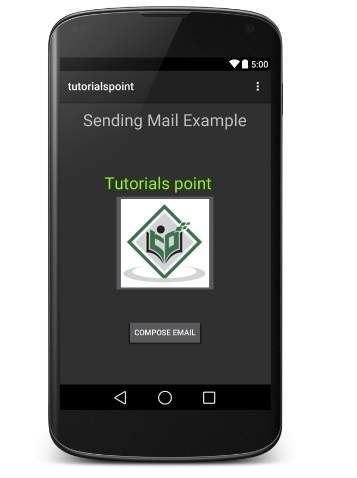
ここでabcはtutorialspointロゴについて示しています
<LinearLayout xmlns:android="http://schemas.android.com/apk/res/android"
   android:layout_width="fill_parent"
   android:layout_height="fill_parent"
   android:orientation="vertical" >

   <TextView
      android:id="@+id/textView1"
      android:layout_width="wrap_content"
      android:layout_height="wrap_content"
      android:text="Sending Mail Example"
      android:layout_alignParentTop="true"
      android:layout_centerHorizontal="true"
      android:textSize="30dp" />

   <TextView
      android:id="@+id/textView2"
      android:layout_width="wrap_content"
      android:layout_height="wrap_content"
      android:text="Tutorials point "
      android:textColor="#ff87ff09"
      android:textSize="30dp"
      android:layout_above="@+id/imageButton"
      android:layout_alignRight="@+id/imageButton"
      android:layout_alignEnd="@+id/imageButton" />

   <ImageButton
      android:layout_width="wrap_content"
      android:layout_height="wrap_content"
      android:id="@+id/imageButton"
      android:src="@drawable/abc"
      android:layout_centerVertical="true"
      android:layout_centerHorizontal="true" />

   <Button
      android:id="@+id/sendEmail"
      android:layout_width="fill_parent"
      android:layout_height="wrap_content"
      android:text="@string/compose_email"/>

</LinearLayout>
以下の内容になります res/values/strings.xml 2つの新しい定数を定義する-
<?xml version="1.0" encoding="utf-8"?>
<resources>
   <string name="app_name">Tutorialspoint</string>
   <string name="compose_email">Compose Email</string>
</resources>
以下はのデフォルトコンテンツです AndroidManifest.xml −
<?xml version="1.0" encoding="utf-8"?>
<manifest xmlns:android="http://schemas.android.com/apk/res/android"
   package="com.example.Tutorialspoint" >

   <application
      android:allowBackup="true"
      android:icon="@drawable/ic_launcher"
      android:label="@string/app_name"
      android:theme="@style/AppTheme" >

      <activity
         android:name="com.example.tutorialspoint.MainActivity"
         android:label="@string/app_name" >

         <intent-filter>
            <action android:name="android.intent.action.MAIN" />
            <category android:name="android.intent.category.LAUNCHER" />
         </intent-filter>

      </activity>

   </application>
</manifest>
あなたを実行してみましょう tutorialspoint応用。実際のAndroidモバイルデバイスをコンピューターに接続していると思います。Android Studioからアプリを実行するには、プロジェクトのアクティビティファイルの1つを開き


今すぐ使用 Compose Emailインストールされているすべての電子メールクライアントを一覧表示するボタン。リストから、電子メールを送信する電子メールクライアントの1つを選択できます。Gmailクライアントを使用してメールを送信します。メールには、以下に示すように、提供されているすべてのデフォルトフィールドが用意されています。ここにFrom: Androidデバイスに登録したデフォルトのメールIDになります。

指定されたデフォルトフィールドのいずれかを変更し、最後に[電子メールの送信]ボタンを使用して、指定された受信者に電子メールを送信できます。