Android - ส่วนประกอบที่กำหนดเอง
การใช้ส่วนประกอบของตัวเองในส่วนประกอบที่มีอยู่แล้วภายในพร้อมกับการขยายคลาสย่อยด้วยคลาสที่กำหนดเอง
Android มีรายการวิดเจ็ตที่สร้างไว้ล่วงหน้ามากมายเช่น Button, TextView, EditText, ListView, CheckBox, RadioButton, Gallery, Spinner, AutoCompleteTextView เป็นต้นซึ่งคุณสามารถใช้โดยตรงในการพัฒนาแอปพลิเคชัน Android ของคุณ แต่อาจมีสถานการณ์เกิดขึ้น ไม่พอใจกับฟังก์ชันการทำงานที่มีอยู่ของวิดเจ็ตใด ๆ ที่มีอยู่ Android มีวิธีการสร้างส่วนประกอบที่กำหนดเองซึ่งคุณสามารถปรับแต่งให้เหมาะกับความต้องการของคุณได้
หากคุณต้องการปรับเปลี่ยนวิดเจ็ตหรือเลย์เอาต์ที่มีอยู่เพียงเล็กน้อยคุณสามารถซับคลาสวิดเจ็ตหรือเลย์เอาต์และลบล้างวิธีการซึ่งจะทำให้คุณสามารถควบคุมลักษณะที่ปรากฏและหน้าที่ขององค์ประกอบหน้าจอได้อย่างแม่นยำ
บทช่วยสอนนี้อธิบายวิธีสร้างมุมมองที่กำหนดเองและใช้ในแอปพลิเคชันของคุณโดยใช้ขั้นตอนที่ง่ายและสะดวก

ตัวอย่างส่วนประกอบที่กำหนดเองในลำดับชั้นของมุมมองที่กำหนดเอง
การสร้างคอมโพเนนต์ที่กำหนดเองอย่างง่าย
| ขั้นตอน | คำอธิบาย |
|---|---|
| 1 | คุณจะใช้ Android studio IDE เพื่อสร้างแอปพลิเคชัน Android และตั้งชื่อเป็นmyapplicationภายใต้แพ็คเกจcom.example.tutorialspoint7.myapplicationตามที่อธิบายไว้ในบทตัวอย่าง Hello World |
| 2 | สร้างไฟล์ XML res / values / attrs.xmlเพื่อกำหนดแอ็ตทริบิวต์ใหม่พร้อมกับชนิดข้อมูล |
| 3 | สร้างไฟล์src / mainactivity.javaและเพิ่มโค้ดเพื่อกำหนดส่วนประกอบที่คุณกำหนดเอง |
| 4 | แก้ไขไฟล์res / layout / activity_main.xmlและเพิ่มโค้ดเพื่อสร้างอินสแตนซ์มุมมองผสมสีพร้อมกับแอตทริบิวต์เริ่มต้นและแอตทริบิวต์ใหม่ |
| 5 | เรียกใช้แอปพลิเคชันเพื่อเปิดโปรแกรมจำลอง Android และตรวจสอบผลลัพธ์ของการเปลี่ยนแปลงที่ทำในแอปพลิเคชัน |
สร้างไฟล์แอ็ตทริบิวต์ต่อไปนี้ชื่อ attrs.xml ในโฟลเดอร์ res / values ของคุณ
<?xml version="1.0" encoding="utf-8"?>
<resources>
   <declare-styleable name="TimeView">
      <declare-styleable name="TimeView">
         <attr name="title" format="string" />
         <attr name="setColor" format="boolean"/>
      </declare-styleable>
   </declare-styleable>
</resources>
เปลี่ยนไฟล์เค้าโครงที่กิจกรรมใช้เป็นดังต่อไปนี้
<?xml version="1.0" encoding="utf-8"?>
<RelativeLayout xmlns:android="http://schemas.android.com/apk/res/android"
   xmlns:tools="http://schemas.android.com/tools"
   xmlns:custom="http://schemas.android.com/apk/res-auto"
   android:layout_width="match_parent"
   android:layout_height="match_parent"
   tools:context=".MainActivity" >

   <com.example.tutorialspoint7.myapplication.TimeView
      android:id="@+id/timeView"
      android:layout_width="match_parent"
      android:layout_height="wrap_content"
      android:textColor="#fff"
      android:textSize="40sp"
      custom:title="my time view"
      custom:setColor="true" />

   <TextView
      android:layout_width="match_parent"
      android:layout_height="wrap_content"
      android:id="@+id/simple"
      android:layout_below="@id/timeView"
      android:layout_marginTop="10dp" />
</RelativeLayout>
สร้างไฟล์ java ต่อไปนี้ที่เรียกว่า timeview สำหรับมุมมองแบบผสมของคุณ
package com.example.tutorialspoint7.myapplication;
/**
 * Created by TutorialsPoint7 on 9/14/2016.
 */
import java.text.SimpleDateFormat;
import java.util.Calendar;

import android.content.Context;
import android.content.res.TypedArray;

import android.graphics.Color;
import android.util.AttributeSet;
import android.widget.TextView;

public class TimeView extends TextView {
   private String titleText;
   private boolean color;

   public TimeView(Context context) {
      super(context);
      setTimeView();
   }

   public TimeView(Context context, AttributeSet attrs) {
      super(context, attrs);
      // retrieved values correspond to the positions of the attributes
         TypedArray typedArray = context.obtainStyledAttributes(attrs,
            R.styleable.TimeView);
      int count = typedArray.getIndexCount();
      try{

         for (int i = 0; i < count; ++i) {

            int attr = typedArray.getIndex(i);
            // the attr corresponds to the title attribute
            if(attr == R.styleable.TimeView_title) {

               // set the text from the layout
               titleText = typedArray.getString(attr);
               setTimeView();
            } else if(attr == R.styleable.TimeView_setColor) {
               // set the color of the attr "setColor"
               color = typedArray.getBoolean(attr, false);
               decorateText();
            }
         }
      }

      // the recycle() will be executed obligatorily
      finally {
         // for reuse
         typedArray.recycle();
      }
   }

   public TimeView(Context context, AttributeSet attrs, int defStyle) {
      super(context, attrs, defStyle);
      setTimeView();
   }

   private void setTimeView() {
      // has the format hour.minuits am/pm
      SimpleDateFormat dateFormat = new SimpleDateFormat("hh.mm aa");
      String time = dateFormat.format(Calendar.getInstance().getTime());

      if(this.titleText != null )
      setText(this.titleText+" "+time);
      else
         setText(time);
   }

   private void decorateText() {
      // when we set setColor attribute to true in the XML layout
      if(this.color == true){
         // set the characteristics and the color of the shadow
         setShadowLayer(4, 2, 2, Color.rgb(250, 00, 250));
         setBackgroundColor(Color.CYAN);
      } else {
         setBackgroundColor(Color.RED);
      }
   }
}
เปลี่ยนไฟล์ Java กิจกรรมหลักของคุณเป็นรหัสต่อไปนี้และเรียกใช้แอปพลิเคชันของคุณ
package com.example.tutorialspoint7.myapplication;

import android.os.Bundle;
import android.widget.TextView;
import android.app.Activity;

public class MainActivity extends Activity {

   @Override
   protected void onCreate(Bundle savedInstanceState) {
      super.onCreate(savedInstanceState);
      setContentView(R.layout.activity_main);

      TextView simpleText = (TextView) findViewById(R.id.simple);
      simpleText.setText("That is a simple TextView");
   }
}
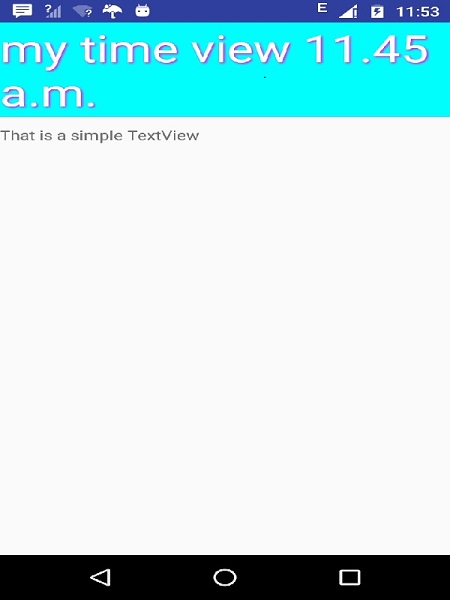
แอปพลิเคชันที่ทำงานอยู่ควรมีลักษณะเหมือนภาพหน้าจอต่อไปนี้
