Android - PHP / MYSQL
ในบทนี้เราจะอธิบายวิธีรวม PHP และ MYSQL กับแอปพลิเคชัน Android ของคุณ สิ่งนี้มีประโยชน์มากในกรณีที่คุณมีเว็บเซิร์ฟเวอร์และคุณต้องการเข้าถึงข้อมูลบนแอปพลิเคชัน Android ของคุณ
MYSQL ใช้เป็นฐานข้อมูลที่เว็บเซิร์ฟเวอร์และ PHP ใช้เพื่อดึงข้อมูลจากฐานข้อมูล แอปพลิเคชันของเราจะสื่อสารกับหน้า PHP พร้อมพารามิเตอร์ที่จำเป็นและ PHP จะติดต่อฐานข้อมูล MYSQL และจะดึงผลลัพธ์และส่งผลลัพธ์กลับมาให้เรา
PHP - MYSQL
การสร้างฐานข้อมูล
ฐานข้อมูล MYSQL สามารถสร้างได้อย่างง่ายดายโดยใช้สคริปต์ง่ายๆนี้ CREATE DATABASE คำสั่งสร้างฐานข้อมูล
<?php
   $con=mysqli_connect("example.com","username","password");
   $sql="CREATE DATABASE my_db";
   if (mysqli_query($con,$sql)) {
      echo "Database my_db created successfully";
   }
?>
การสร้างตาราง
เมื่อสร้างฐานข้อมูลแล้วก็ถึงเวลาสร้างตารางในฐานข้อมูล CREATE TABLE คำสั่งสร้างฐานข้อมูล
<?php
   $con=mysqli_connect("example.com","username","password","my_db");
   $sql="CREATE TABLE table1(Username CHAR(30),Password CHAR(30),Role CHAR(30))";
   if (mysqli_query($con,$sql)) {
      echo "Table have been created successfully";
   }
?>
การแทรกค่าในตาราง
เมื่อฐานข้อมูลและตารางถูกสร้างขึ้น ถึงเวลาแทรกข้อมูลลงในตารางแล้ว Insert Into คำสั่งสร้างฐานข้อมูล
<?php
   $con=mysqli_connect("example.com","username","password","my_db");
   $sql="INSERT INTO table1 (FirstName, LastName, Age) VALUES ('admin', 'admin','adminstrator')";
   if (mysqli_query($con,$sql)) {
      echo "Values have been inserted successfully";
   }
?>
PHP - รับและวิธีการโพสต์
PHP ยังใช้เพื่อดึงข้อมูลจากฐานข้อมูล mysql เมื่อสร้างขึ้น ในการดึงข้อมูลบันทึกจะต้องส่งผ่านไปยังหน้า PHP เกี่ยวกับสิ่งที่บันทึกที่จะดึงข้อมูล
วิธีแรกในการส่งผ่านข้อมูลคือวิธี GET ซึ่ง $_GETใช้คำสั่ง ตัวแปรจะถูกส่งไปใน url และมีการดึงข้อมูลบันทึก ไวยากรณ์ได้รับด้านล่าง -
<?php
   $con=mysqli_connect("example.com","username","password","database name");

   if (mysqli_connect_errno($con)) {
      echo "Failed to connect to MySQL: " . mysqli_connect_error();
   }

   $username = $_GET['username'];
   $password = $_GET['password'];
   $result = mysqli_query($con,"SELECT Role FROM table1 where Username='$username'
      and Password='$password'");
   $row = mysqli_fetch_array($result);
   $data = $row[0];

   if($data){
      echo $data;
   }
   mysqli_close($con);
?>
วิธีที่สองคือการใช้วิธีการโพสต์ การเปลี่ยนแปลงเพียงอย่างเดียวในสคริปต์ข้างต้นคือการแทนที่ $ _GET ด้วย$_POST. ในวิธีการโพสต์ตัวแปรจะไม่ถูกส่งผ่าน URL
Android - การเชื่อมต่อ MYSQL
การเชื่อมต่อผ่าน Get Method
มีสองวิธีในการเชื่อมต่อกับ MYSQL ผ่านหน้า PHP คนแรกเรียกว่าGet method. เราจะใช้HttpGet และ HttpClientคลาสเพื่อเชื่อมต่อ ไวยากรณ์ของพวกเขาได้รับด้านล่าง -
URL url = new URL(link);
HttpClient client = new DefaultHttpClient();
HttpGet request = new HttpGet();
request.setURI(new URI(link));
หลังจากนั้นคุณต้องโทร executeเมธอดของคลาส HttpClient และรับในอ็อบเจ็กต์ HttpResponse หลังจากนั้นคุณต้องเปิดสตรีมเพื่อรับข้อมูล
HttpResponse response = client.execute(request);
BufferedReader in = new BufferedReader
(new InputStreamReader(response.getEntity().getContent()));
การเชื่อมต่อผ่านวิธีการโพสต์
ในวิธีการโพสต์ไฟล์ URLEncoder,URLConnectionจะใช้คลาส urlencoder จะเข้ารหัสข้อมูลของตัวแปรที่ส่งผ่าน ไวยากรณ์ได้รับด้านล่าง -
URL url = new URL(link);
String data  = URLEncoder.encode("username", "UTF-8")
+ "=" + URLEncoder.encode(username, "UTF-8");
data += "&" + URLEncoder.encode("password", "UTF-8")
+ "=" + URLEncoder.encode(password, "UTF-8");
URLConnection conn = url.openConnection();
สิ่งสุดท้ายที่คุณต้องทำคือเขียนข้อมูลนี้ลงในลิงก์ หลังจากเขียนแล้วคุณต้องเปิดสตรีมเพื่อรับข้อมูลที่ตอบกลับ
OutputStreamWriter wr = new OutputStreamWriter(conn.getOutputStream());
wr.write( data );
BufferedReader reader = new BufferedReader(new
InputStreamReader(conn.getInputStream()));
ตัวอย่าง
ตัวอย่างด้านล่างเป็นตัวอย่างที่สมบูรณ์ของการเชื่อมต่อแอปพลิเคชัน Android ของคุณกับฐานข้อมูล MYSQL ผ่านหน้า PHP สร้างแอปพลิเคชันพื้นฐานที่ให้คุณเข้าสู่ระบบโดยใช้วิธี GET และ POST
PHP - ส่วน MYSQL
ในตัวอย่างนี้ฐานข้อมูลชื่อ temp ถูกสร้างขึ้นที่ 000webhost.com ในฐานข้อมูลนั้นตารางถูกสร้างขึ้นโดยใช้ชื่อของ table1 ตารางนี้มีสามฟิลด์ (ชื่อผู้ใช้รหัสผ่านบทบาท) ตารางมีเพียงระเบียนเดียวซึ่ง ได้แก่ ("admin", "admin", "administrator")
หน้า php ได้รับด้านล่างซึ่งรับพารามิเตอร์โดยวิธีการโพสต์
<?php
   $con=mysqli_connect("mysql10.000webhost.com","username","password","db_name");

   if (mysqli_connect_errno($con)) {
      echo "Failed to connect to MySQL: " . mysqli_connect_error();
   }

   $username = $_POST['username'];
   $password = $_POST['password'];
   $result = mysqli_query($con,"SELECT Role FROM table1 where
   Username='$username' and Password='$password'");
   $row = mysqli_fetch_array($result);
   $data = $row[0];

   if($data){
      echo $data;
   }

   mysqli_close($con);
?>
ส่วน Android
ในการทดลองกับตัวอย่างนี้คุณต้องเรียกใช้สิ่งนี้บนอุปกรณ์จริงที่เชื่อมต่ออินเทอร์เน็ตไร้สาย
| ขั้นตอน | คำอธิบาย |
|---|---|
| 1 | คุณจะใช้ Android studio IDE เพื่อสร้างแอปพลิเคชัน Android และตั้งชื่อเป็น PHPMYSQL ภายใต้แพ็คเกจ com.example.phpmysql |
| 2 | แก้ไขไฟล์ src / MainActivity.java เพื่อเพิ่มรหัสกิจกรรม |
| 3 | สร้างไฟล์ src / SiginActivity.java เพื่อเพิ่มโค้ด PHPMYSQL |
| 4 | แก้ไขไฟล์ XML เค้าโครง res / layout / activity_main.xml เพิ่มคอมโพเนนต์ GUI หากจำเป็น |
| 5 | แก้ไขไฟล์ res / values / string.xml และเพิ่มส่วนประกอบสตริงที่จำเป็น |
| 6 | แก้ไข AndroidManifest.xml เพื่อเพิ่มสิทธิ์ที่จำเป็น |
| 7 | เรียกใช้แอปพลิเคชันและเลือกอุปกรณ์ Android ที่ใช้งานอยู่และติดตั้งแอปพลิเคชันบนแอปพลิเคชันและตรวจสอบผลลัพธ์ |
นี่คือเนื้อหาของ src/com.example.phpmysql/MainActivity.java.
package com.example.phpmysql;

import android.app.Activity;
import android.os.Bundle;
import android.view.View;
import android.widget.EditText;
import android.widget.TextView;

public class MainActivity extends Activity {

   private EditText usernameField,passwordField;
   private TextView status,role,method;

   @Override
   protected void onCreate(Bundle savedInstanceState) {
      super.onCreate(savedInstanceState);
      setContentView(R.layout.activity_main);

      usernameField = (EditText)findViewById(R.id.editText1);
      passwordField = (EditText)findViewById(R.id.editText2);

      status = (TextView)findViewById(R.id.textView6);
      role = (TextView)findViewById(R.id.textView7);
      method = (TextView)findViewById(R.id.textView9);
   }


   public void login(View view){
      String username = usernameField.getText().toString();
      String password = passwordField.getText().toString();
      method.setText("Get Method");
      new SigninActivity(this,status,role,0).execute(username,password);

   }

   public void loginPost(View view){
      String username = usernameField.getText().toString();
      String password = passwordField.getText().toString();
      method.setText("Post Method");
      new SigninActivity(this,status,role,1).execute(username,password);
   }
}
นี่คือเนื้อหาของ src/com.example.phpmysql/SigninActivity.java.
package com.example.phpmysql;

import java.io.BufferedReader;
import java.io.InputStreamReader;
import java.io.OutputStreamWriter;
import java.net.URI;
import java.net.URL;
import java.net.URLConnection;
import java.net.URLEncoder;

import org.apache.http.HttpResponse;
import org.apache.http.client.HttpClient;
import org.apache.http.client.methods.HttpGet;
import org.apache.http.impl.client.DefaultHttpClient;

import android.content.Context;
import android.os.AsyncTask;
import android.widget.TextView;

public class SigninActivity  extends AsyncTask{
   private TextView statusField,roleField;
   private Context context;
   private int byGetOrPost = 0;

   //flag 0 means get and 1 means post.(By default it is get.)
   public SigninActivity(Context context,TextView statusField,TextView roleField,int flag) {
      this.context = context;
      this.statusField = statusField;
      this.roleField = roleField;
      byGetOrPost = flag;
   }

   protected void onPreExecute(){
   }

   @Override
   protected String doInBackground(String... arg0) {
      if(byGetOrPost == 0){ //means by Get Method

         try{
            String username = (String)arg0[0];
            String password = (String)arg0[1];
            String link = "http://myphpmysqlweb.hostei.com/login.php?username="+username+"& password="+password;

            URL url = new URL(link);
            HttpClient client = new DefaultHttpClient();
            HttpGet request = new HttpGet();
            request.setURI(new URI(link));
            HttpResponse response = client.execute(request);
            BufferedReader in = new BufferedReader(new
               InputStreamReader(response.getEntity().getContent()));

            StringBuffer sb = new StringBuffer("");
            String line="";

            while ((line = in.readLine()) != null) {
               sb.append(line);
               break;
            }

            in.close();
            return sb.toString();
         } catch(Exception e){
            return new String("Exception: " + e.getMessage());
         }
      } else{
         try{
            String username = (String)arg0[0];
            String password = (String)arg0[1];

            String link="http://myphpmysqlweb.hostei.com/loginpost.php";
            String data  = URLEncoder.encode("username", "UTF-8") + "=" +
               URLEncoder.encode(username, "UTF-8");
            data += "&" + URLEncoder.encode("password", "UTF-8") + "=" +
               URLEncoder.encode(password, "UTF-8");

            URL url = new URL(link);
            URLConnection conn = url.openConnection();

            conn.setDoOutput(true);
            OutputStreamWriter wr = new OutputStreamWriter(conn.getOutputStream());

            wr.write( data );
            wr.flush();

            BufferedReader reader = new BufferedReader(new
               InputStreamReader(conn.getInputStream()));

            StringBuilder sb = new StringBuilder();
            String line = null;

            // Read Server Response
            while((line = reader.readLine()) != null) {
               sb.append(line);
               break;
            }

            return sb.toString();
         } catch(Exception e){
            return new String("Exception: " + e.getMessage());
         }
      }
   }

   @Override
   protected void onPostExecute(String result){
      this.statusField.setText("Login Successful");
      this.roleField.setText(result);
   }
}
เพิ่มเนื้อหาต่อไปนี้ใน build.gradle และสร้างโครงการใหม่ทั้งหมด
android {
   useLibrary 'org.apache.http.legacy'
}
นี่คือเนื้อหาของ activity_main.xml.
<?xml version="1.0" encoding="utf-8"?>
<RelativeLayout xmlns:android="http://schemas.android.com/apk/res/android"
   xmlns:tools="http://schemas.android.com/tools"
   android:layout_width="match_parent"
   android:layout_height="match_parent"
   android:paddingBottom="@dimen/activity_vertical_margin"
   android:paddingLeft="@dimen/activity_horizontal_margin"
   android:paddingRight="@dimen/activity_horizontal_margin"
   android:paddingTop="@dimen/activity_vertical_margin"
   tools:context=".MainActivity" >

   <EditText
      android:id="@+id/editText2"
      android:layout_width="wrap_content"
      android:layout_height="wrap_content"
      android:layout_alignRight="@+id/editText1"
      android:layout_below="@+id/editText1"
      android:layout_marginTop="25dp"
      android:ems="10"
      android:inputType="textPassword" >
   </EditText>

   <EditText
      android:id="@+id/editText1"
      android:layout_width="wrap_content"
      android:layout_height="wrap_content"
      android:layout_alignParentRight="true"
      android:layout_alignParentTop="true"
      android:layout_marginTop="44dp"
      android:ems="10" >

   <requestFocus android:layout_width="wrap_content" />

   </EditText>

   <TextView
      android:id="@+id/textView1"
      android:layout_width="wrap_content"
      android:layout_height="wrap_content"
      android:layout_alignBottom="@+id/editText1"
      android:layout_alignParentLeft="true"
      android:text="@string/Username" />

   <TextView
      android:id="@+id/textView3"
      android:layout_width="wrap_content"
      android:layout_height="wrap_content"
      android:layout_alignParentTop="true"
      android:layout_centerHorizontal="true"
      android:text="@string/App"
      android:textAppearance="?android:attr/textAppearanceLarge" />

   <TextView
      android:id="@+id/textView7"
      android:layout_width="wrap_content"
      android:layout_height="wrap_content"
      android:layout_alignBottom="@+id/textView5"
      android:layout_alignLeft="@+id/textView6"
      android:text="@string/Role"
      android:textAppearance="?android:attr/textAppearanceMedium"
      android:textSize="10sp" />

   <TextView
      android:id="@+id/textView5"
      android:layout_width="wrap_content"
      android:layout_height="wrap_content"
      android:layout_below="@+id/textView6"
      android:layout_marginTop="27dp"
      android:layout_toLeftOf="@+id/editText1"
      android:text="@string/LoginRole" />
   <TextView
      android:id="@+id/textView8"
      android:layout_width="wrap_content"
      android:layout_height="wrap_content"
      android:layout_above="@+id/textView6"
      android:layout_alignLeft="@+id/textView5"
      android:layout_marginBottom="27dp"
      android:text="@string/method" />

   <TextView
      android:id="@+id/textView4"
      android:layout_width="wrap_content"
      android:layout_height="wrap_content"
      android:layout_alignLeft="@+id/textView8"
      android:layout_below="@+id/button1"
      android:layout_marginTop="86dp"
      android:text="@string/LoginStatus" />


   <TextView
      android:id="@+id/textView6"
      android:layout_width="wrap_content"
      android:layout_height="wrap_content"
      android:layout_alignTop="@+id/textView4"
      android:layout_centerHorizontal="true"
      android:text="@string/Status"
      android:textAppearance="?android:attr/textAppearanceMedium"
      android:textSize="10sp" />

   <TextView
      android:id="@+id/textView9"
      android:layout_width="wrap_content"
      android:layout_height="wrap_content"
      android:layout_alignBottom="@+id/textView8"
      android:layout_alignLeft="@+id/textView6"
      android:text="@string/Choose"
      android:textAppearance="?android:attr/textAppearanceMedium"
      android:textSize="10sp" />

   <Button
      android:id="@+id/button2"
      android:layout_width="wrap_content"
      android:layout_height="wrap_content"
      android:layout_centerVertical="true"
      android:layout_toRightOf="@+id/textView6"
      android:onClick="loginPost"
      android:text="@string/LoginPost" />

   <Button
      android:id="@+id/button1"
      android:layout_width="wrap_content"
      android:layout_height="wrap_content"
      android:layout_alignBaseline="@+id/button2"
      android:layout_alignBottom="@+id/button2"
      android:layout_alignLeft="@+id/textView2"
      android:onClick="login"
      android:text="@string/LoginGet" />

   <TextView
      android:id="@+id/textView2"
      android:layout_width="wrap_content"
      android:layout_height="wrap_content"
      android:layout_alignBaseline="@+id/editText2"
      android:layout_alignBottom="@+id/editText2"
      android:layout_alignParentLeft="true"
      android:text="@string/Password" />

</RelativeLayout>
นี่คือเนื้อหาของ Strings.xml.
<?xml version="1.0" encoding="utf-8"?>
<resources>

   <string name="app_name">PHPMYSQL</string>
   <string name="action_settings">Settings</string>
   <string name="hello_world">Hello world!</string>
   <string name="Username">Username</string>
   <string name="Password">Password</string>
   <string name="LoginGet">Login - Get</string>
   <string name="LoginPost">Login - Post</string>
   <string name="App">Login Application</string>
   <string name="LoginStatus">Login Status</string>
   <string name="LoginRole">Login Role</string>
   <string name="Status">Not login</string>
   <string name="Role">Not assigned</string>
   <string name="method">Login Method</string>
   <string name="Choose">Choose Method</string>

</resources>
นี่คือเนื้อหาของ AndroidManifest.xml.
<?xml version="1.0" encoding="utf-8"?>
<manifest xmlns:android="http://schemas.android.com/apk/res/android"
   package="com.example.phpmysql" >

      <uses-permission android:name="android.permission.INTERNET"/>
      <uses-permission android:name="android.permission.ACCESS_NETWORK_STATE" />

   <application
      android:allowBackup="true"
      android:icon="@drawable/ic_launcher"
      android:label="@string/app_name"
      android:theme="@style/AppTheme" >

      <activity
         android:name="com.example.phpmysql.MainActivity"
         android:label="@string/app_name" >

         <intent-filter>
            <action android:name="android.intent.action.MAIN" />
            <category android:name="android.intent.category.LAUNCHER" />
         </intent-filter>

      </activity>

   </application>
</manifest>
มาลองเรียกใช้แอปพลิเคชัน PHPMYSQL ของคุณ ฉันถือว่าคุณได้เชื่อมต่ออุปกรณ์มือถือ Android จริงกับคอมพิวเตอร์ของคุณ หากต้องการเรียกใช้แอปจาก Android studio ให้เปิดไฟล์กิจกรรมของโครงการแล้วคลิก


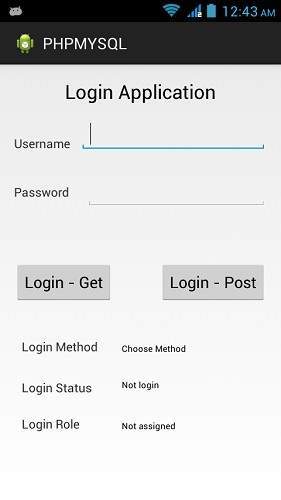
เลือกอุปกรณ์เคลื่อนที่ของคุณเป็นตัวเลือกจากนั้นตรวจสอบอุปกรณ์เคลื่อนที่ของคุณซึ่งจะแสดงหน้าจอต่อไปนี้ -

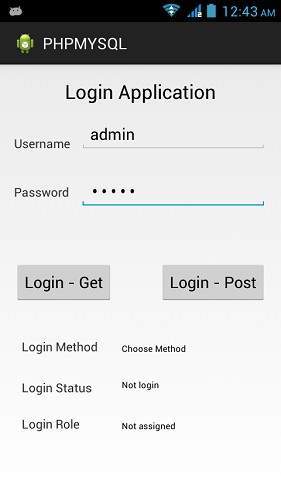
ตอนนี้เพียงพิมพ์ชื่อผู้ใช้และรหัสผ่านของคุณ ในกรณีของฉันฉันกำลังพิมพ์ admin เป็นชื่อผู้ใช้และรหัสผ่าน ดังแสดงในรูป -

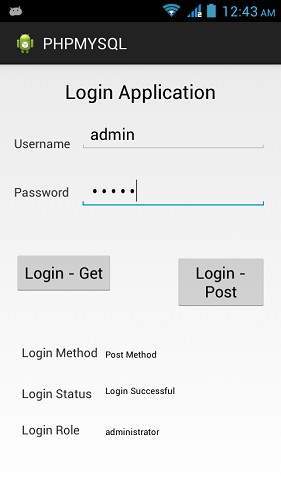
ตอนนี้กดปุ่มรับและรอสักครู่และการตอบกลับจะถูกดาวน์โหลดและจะแสดงให้คุณเห็น ในกรณีนี้คำตอบคือ ROLE ที่ดึงมาในกรณีของ admin เป็นชื่อผู้ใช้และรหัสผ่านดังแสดงในรูปด้านล่าง -

ตอนนี้กดปุ่ม POST อีกครั้งและผลลัพธ์เดียวกันจะปรากฏขึ้น ดังแสดงในรูปด้านล่าง -
